
These no bake nut bars are my little secret for quick, satisfying treats that don’t demand oven time or fancy ingredients. I’ve always loved the idea of turning pantry staples into something that feels both indulgent and honest, especially on busy days when baking feels like a distant dream. They’re perfect for grabbing when a sweet tooth hits hard, and I can make them with just a few simple ingredients I usually keep around.
What keeps me coming back to this recipe is how forgiving it is—no complicated steps, no messy dough, just a little melting, mixing, and pressing. It’s that honest, straightforward approach to dessert that reminds me of childhood afternoons spent in the kitchen, sticky fingers and all. Plus, there’s something about the smell of toasted nuts and melting chocolate that instantly makes the house feel warmer.
This recipe feels especially right now, when we’re craving comfort but want something easy and fuss-free. It’s a small reminder that sometimes, the best treats are the ones you can throw together with your hands, no stress, no cleanup, just pure, nutty goodness.
This recipe is inspired by childhood nostalgia but with a twist — I’ve tweaked it to be entirely no-bake, using only pantry staples and a touch of love. It’s about reclaiming that simple, messy joy of making something sweet without needing a stove or oven, perfect for lazy afternoons or last-minute cravings. Plus, it’s a no-fuss, clean-up friendly way to indulge that feels honest and approachable.
The story behind this recipe
- This recipe was born out of a messy kitchen experiment after a particularly hectic weekend. I wanted something sweet but didn’t want to turn on the oven or deal with a complicated process. The idea of combining crunchy nuts with melting chocolate in a quick, no-fuss way just clicked one afternoon, and I’ve been hooked ever since.
- What really keeps me coming back is how these bars feel like a tiny act of rebellion—no baking, no fuss, just honest ingredients pressed into shape. They remind me of lazy Sunday afternoons spent rummaging through pantry shelves, trying to see how much flavor I can pack into a simple treat. Plus, they’re a hit with kids and adults alike, which makes them a real keeper.
- heading: The story behind this recipe
Key ingredients and tips
- Roasted almonds: I love the deep, smoky aroma they develop when toasted—adds a richer flavor. Feel free to swap for cashews if you prefer a milder nut.
- Honey: It gives just enough stickiness and sweetness, but you can substitute maple syrup for a more complex, caramelized note that’s less floral.
- Dark chocolate: I use a good-quality melting chocolate for that glossy, smooth finish and intense cocoa hit. You could try milk chocolate if you want it sweeter and creamier.
- Butter: I prefer unsalted to control saltiness, and it helps everything set nicely. For a dairy-free version, coconut oil works but will add a subtle coconut scent.
- Oats: They add texture and a bit of chew. Rolled oats are best, but quick oats can save time if you’re in a rush—they’ll be softer but still tasty.
- Sea salt: Just a pinch enhances all the flavors, especially the chocolate and nuts. Try finishing with flaky sea salt for a crunchy burst that really wakes up the palate.
- Optional add-ins: Dried cranberries or chopped dried apricots can introduce a tart contrast, making each bite more interesting and colorful.
Spotlight on key ingredients
Chocolate:
- Peanut Butter: I love the creamy, salty richness it adds; opt for natural varieties for a more intense nutty flavor.
- Honey: Its gooey sweetness and floral aroma bind everything together; maple syrup can be a less floral, richer alternative.
- Dark Chocolate: I use a glossy, intense cocoa bar that melts smoothly; milk chocolate offers a sweeter, mellower finish.
Nuts and Oats:
- Nuts: Toasted almonds release a smoky aroma and add crunch; they soften slightly but still provide a satisfying bite.
- Oats: They add chewiness and texture, turning sticky when combined; quick oats are fine if you’re in a rush, but they’ll be softer.
Notes for ingredient swaps
- Nuts: I prefer toasted almonds for their smoky aroma, but cashews or pecans work well too, offering different textures and flavors.
- Honey: I love the sticky sweetness it provides, but maple syrup or agave nectar can be used for a plant-based, more caramel-like flavor.
- Dark chocolate: I opt for high-quality melting chocolate for a glossy finish; milk chocolate can be swapped in for a sweeter, creamier taste.
- Butter: Unsalted butter gives control over saltiness, but coconut oil makes it dairy-free with a subtle coconut scent.
- Oats: Rolled oats give a hearty chew, but quick oats can be used in a pinch—they’ll be softer, less chewy but still good.
- Sea salt: Just a pinch enhances all flavors, but finishing with flaky sea salt adds a crunchy, savory burst that wakes up the bars.
- Add-ins: Dried cranberries or apricots can add tartness and color—try them for a more layered flavor profile.
Equipment & Tools
- 20×20 cm (8×8 inch) pan: Holds the mixture for pressing and setting.
- Heatproof spatula: Stirs melted chocolate and presses mixture evenly.
- Parchment paper: Prevents sticking and makes removal easier.
- Microwave or double boiler: Melts the chocolate smoothly.
- Sharp knife: Cuts the set bars cleanly.
Step-by-step guide to no bake nut bars
- Gather your equipment: a 20×20 cm (8×8 inch) baking pan, heatproof spatula, and parchment paper for easy removal.
- Line the pan with parchment, leaving some overhang for easy lifting later. Set aside.
- In a microwave-safe bowl, melt 200g dark chocolate (about 30 seconds in the microwave, stir, then 15 more seconds if needed).
- While the chocolate melts, toast 1 cup of chopped nuts (almonds, cashews, or your choice) in a dry pan over medium heat for 3-4 minutes until fragrant, stirring often.
- In a large mixing bowl, combine 1 cup rolled oats, 1/2 cup honey, 2 tbsp unsalted butter, and a pinch of sea salt. Mix until well coated.
- Pour the melted chocolate into the nut and oat mixture. Stir thoroughly until everything is evenly coated and sticky.
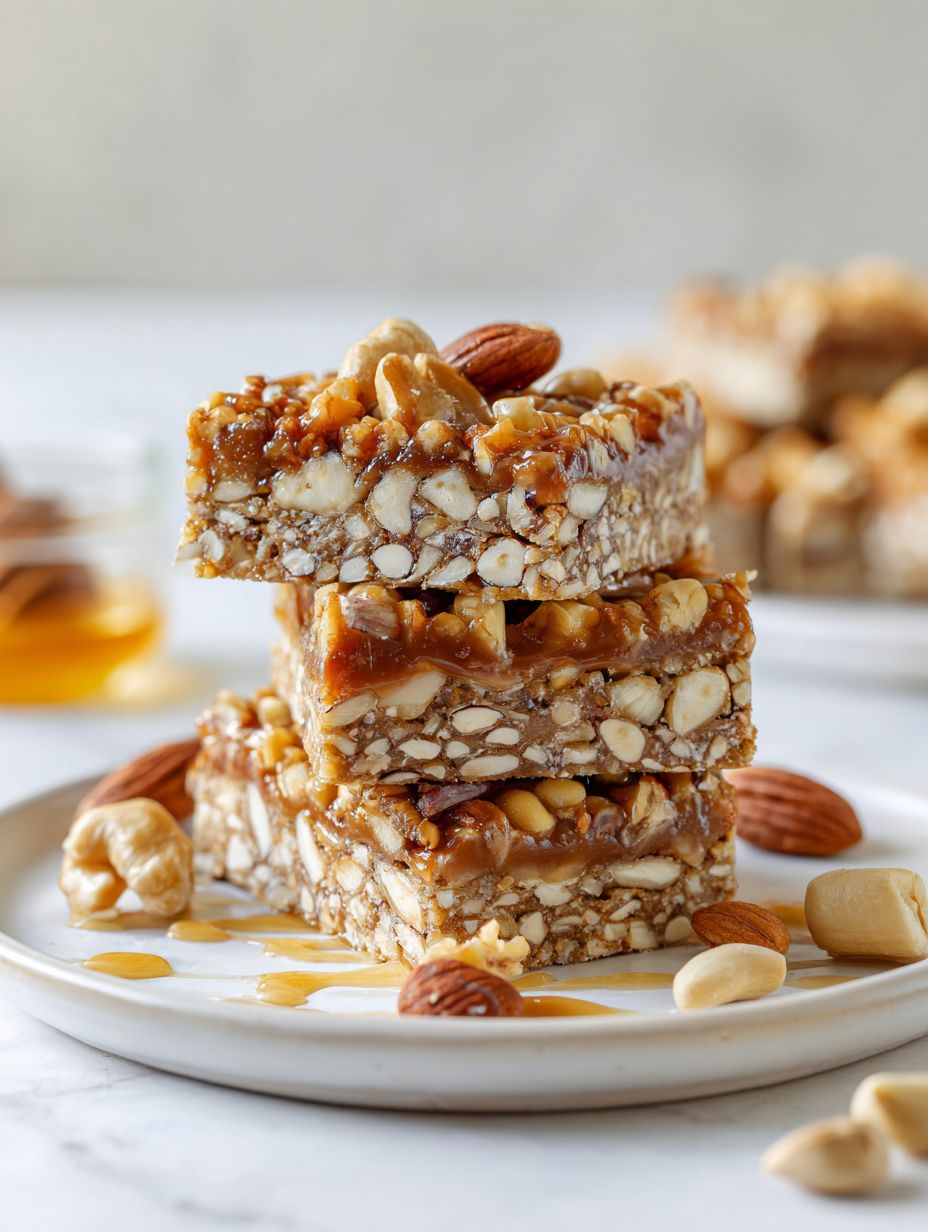
- Transfer the mixture into your prepared pan. Using a spatula, press it down firmly and evenly, about 2-3 minutes of steady pressing to compact.
- Refrigerate the pan for at least 2 hours, or until the bars are firm and set. For best results, cover with plastic wrap.
- Once chilled, lift the entire block out using the parchment overhang. Place on a cutting board.
- Cut into 8-12 bars, depending on your preferred size. Use a sharp knife and press down firmly.
- For a glossy finish, melt an additional 50g of chocolate and drizzle over the bars before serving, if desired.
- Store the bars in an airtight container in the fridge for up to a week. They soften slightly at room temp but stay delicious.
Refrigerate the bars until firm, at least 2 hours. Then, lift out, cut into squares, and serve. For a shiny top, drizzle with melted chocolate just before serving.
How to Know It’s Done
- Chocolate is glossy and smooth before mixing.
- Nut and oat mixture is sticky and holds together when pressed.
- Bars are firm and set after refrigeration, with a slight crack when cut.
No-Bake Nut Bars
Ingredients
Equipment
Method
- Line your pan with parchment paper, leaving some overhang for easy removal, and set aside.
- In a microwave-safe bowl, melt the dark chocolate in short 30-second bursts, stirring in between until smooth and glossy. This will fill your kitchen with a rich, chocolaty aroma.
- While the chocolate melts, toast your chopped nuts in a dry skillet over medium heat for about 3-4 minutes until fragrant, listening for a gentle sizzling sound and smelling warm, nutty notes.
- In a large mixing bowl, combine the rolled oats, honey, melted butter, and a pinch of sea salt. Mix everything together until the oats are evenly coated and the mixture feels slightly sticky.
- Pour the melted chocolate into the oat mixture and add the toasted nuts. Stir thoroughly with your spatula until all ingredients are coated and sticky, creating a cohesive, fudgy texture.
- Transfer the mixture into your prepared pan, pressing it down firmly with the back of your spatula or your hands to create an even, compact layer. This helps the bars hold together neatly.
- Refrigerate the pan for at least 2 hours, or until the mixture is set and firm to the touch. You’ll notice the chocolate glossy and the bars holding their shape.
- Once chilled, lift the entire block out of the pan using the parchment overhang and place it on a cutting board. Use a sharp knife to cut into 8-12 bars, pressing down firmly for clean slices.
- If desired, melt a small amount of chocolate and drizzle it over the bars for a shiny, decorative finish. Serve and enjoy these chewy, crunchy treats!
Pro tips for perfect bars
- Bolded mini-head: Use room temperature chocolate for smoother melting and fewer lumps.
- Bolded mini-head: Toast your nuts until fragrant—this intensifies their aroma and flavor.
- Bolded mini-head: Press the mixture firmly into the pan to prevent bars from crumbling later.
- Bolded mini-head: Chill the bars thoroughly—at least 2 hours—to achieve optimal firmness and clean cuts.
- Bolded mini-head: Drizzle melted chocolate on top while still warm for a shiny, appealing finish.
- Bolded mini-head: Use a sharp knife warmed slightly with hot water for cleaner cuts through the bars.
- Bolded mini-head: Incorporate a pinch of sea salt on top before chilling to enhance the chocolate and nut flavors.
Common mistakes and how to fix them
- FORGOT to level the mixture, resulting in uneven bars. Use a spatula to press firmly.
- DUMPED too much chocolate in, causing a greasy texture. Mix until just combined to avoid this.
- OVER-TORCHED the chocolate, leading to a bitter taste. Melt on low power and stir often.
- MISSED the chill time, bars stay soft. Refrigerate for at least 2 hours for proper setting.
Quick fixes and pantry swaps
- If chocolate seizes, splash in a teaspoon of vegetable oil and stir gently.
- When nuts burn, dump them into cold water to stop the toasting instantly.
- Patch cracked bars by pressing broken pieces back together before chilling again.
- Shield melted chocolate from humidity with a dry cloth to keep it glossy.
- heading:
Prepping and storing tips
- Prep the mixture ahead by melting chocolate and toasting nuts; it speeds up assembly and enhances flavor. The smell of toasted nuts is warm and inviting.
- Store the assembled bars in an airtight container in the fridge for up to a week. They soften slightly but remain chewy and flavorful.
- For longer storage, freeze the bars wrapped tightly in plastic wrap and placed in a sealed container; they’ll keep up to a month. Expect a firmer texture upon thawing.
- Reheat briefly in the microwave at 50% power if you want to soften for serving, but they’re best enjoyed chilled for a firm bite and glossy appearance.
- Allow the bars to come to room temperature slightly before serving if refrigerated—this intensifies the chocolate aroma and improves mouthfeel.
Frequently Asked Questions
1. How do I melt chocolate without burning it?
Use a microwave in short bursts, stirring in between, until smooth and glossy. It’s the safest way to avoid burning.
2. Why are my nut bars falling apart?
If your bars are crumbly, press the mixture more firmly into the pan and chill longer, at least 2 hours.
3. How long do no-bake nut bars last?
Refrigerate the bars in an airtight container for up to a week; they stay chewy and fresh, but soften slightly at room temp.
4. Can I substitute honey in this recipe?
You can swap honey with maple syrup or agave nectar for a different sweetness profile, but expect slight changes in texture.
5. Can I use different nuts?
Use toasted nuts for richer flavor and aroma. Feel free to switch types—almonds, cashews, pecans—all work well.
6. What if my melted chocolate looks grainy or seizes?
If the chocolate seizes or becomes grainy, add a splash of vegetable oil and stir until smooth again.
7. How do I get the bars to stay firm?
Press the mixture into the pan with a firm spatula or the back of a spoon to ensure compact, chewy bars.
8. How long should I chill the bars?
For best results, chill the bars for at least 2 hours, allowing the flavors to meld and the texture to set.
9. Can I add dried fruit to these bars?
Yes, you can add dried cranberries or apricots for a tart contrast and extra color—just mix them in with the nuts.
10. How do I cut the bars neatly?
Use a sharp, warm knife to cut cleanly through the bars, pressing down firmly to avoid crumbling.
These no bake nut bars are more than just a quick treat; they’re a small act of making something honest and satisfying. The smell of toasted nuts and melting chocolate fills the kitchen with comfort, especially when you need a sweet fix fast. It’s a simple reminder that good things don’t always need a lot of fuss or fancy equipment.
Whenever I make these, I feel a little bit of that childhood joy—messy fingers, sticky palms, and all. They’re perfect for lazy weekends or busy weekdays when you want something homemade and genuine. No matter the season, they bring a quiet moment of pleasure to my day.

I’m Emily Richardson, the heart and soul behind Playing with Flavors. Cooking isn’t just a hobby for me – it’s a passion that I’ve cultivated for years, and it’s become the driving force of my life.
From the kitchen of my cozy café to the pages of this blog, every dish I create is a reflection of my love for food and the joy it brings to people.


