
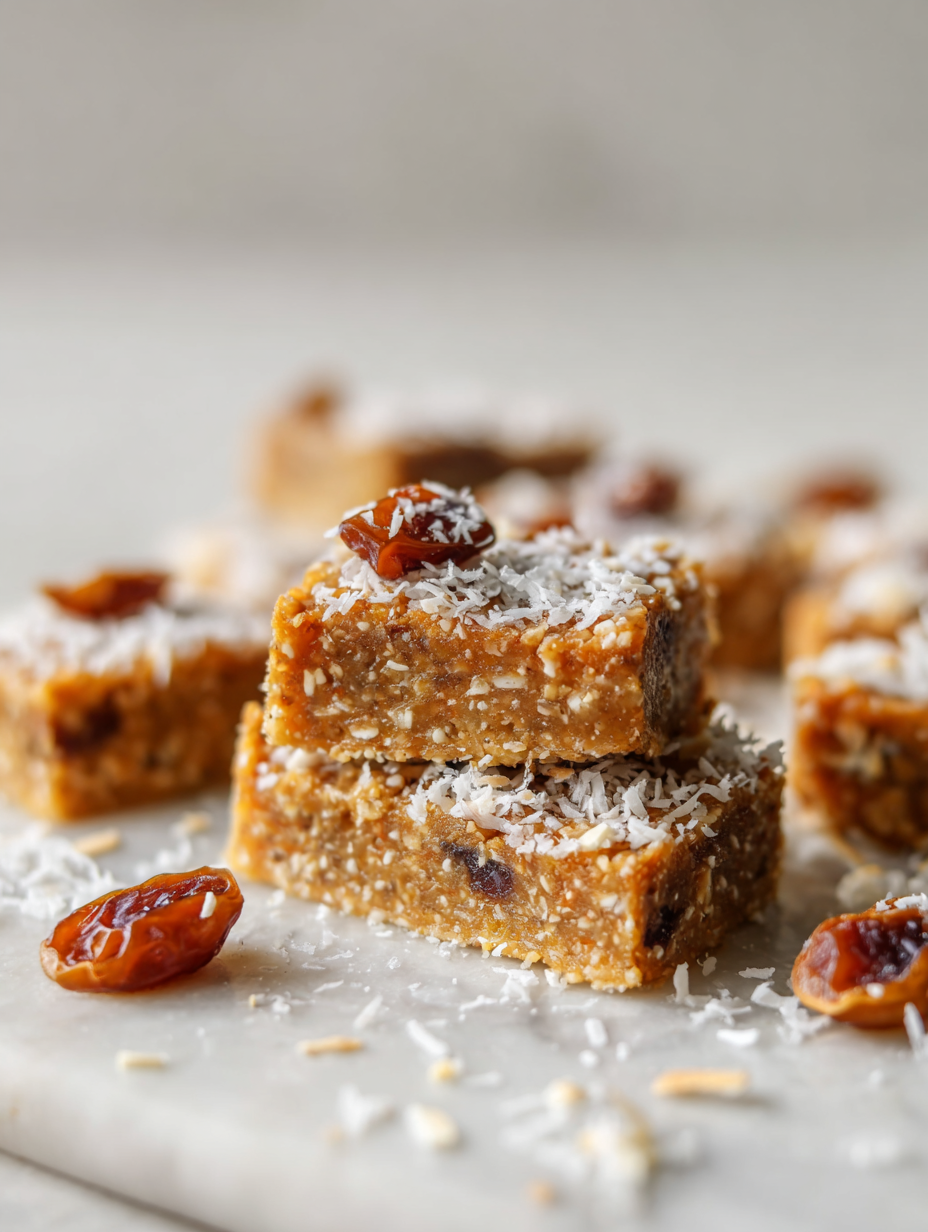
Dried dates often get a bad rap, but when you blend them into a sticky paste, they transform into this surprisingly caramel-like ingredient. It’s like nature’s own candy, and it’s the backbone of these no-bake coconut bars. I love how they bring that chewy, rich sweetness without any added sugar or fuss.
This recipe is a bit of a secret weapon for quick snacks or unexpected sweet cravings. No oven, no fuss—just a handful of ingredients and a little patience as everything sets. Plus, it’s a great way to use up those dates hiding in the back of your pantry, maybe from a forgotten baking project or a health kick that’s lost momentum.
Focusing on the unexpected role of dried dates in creating a chewy, caramel-like texture that mimics traditional caramel bars, yet keeps it all naturally sweet and no-bake.
The story behind this recipe
- This recipe came together on a rainy Sunday afternoon when I realized I had a bunch of dates that needed using up. I wanted something sweet, chewy, and no-fuss—something I could just throw together without turning on the oven. The idea of mimicking caramel without any processed sugar felt like a little victory in itself.
- I remember the first batch I made was a bit messy—crumbling when I cut it, but the flavor was there. Since then, I’ve tweaked the ingredients and proportions, learning that a touch of coconut oil makes all the difference in getting that perfect, sticky texture. It’s funny how simple ingredients can turn into something so satisfying, especially when you’re craving a quick treat.
- heading
- story_type
Key ingredients and their quirks
- Medjool dates: They’re sweet, sticky, and almost caramel-like—perfect for that chewy base. If they’re dry, soak them for 10 minutes to soften and blend easier.
- Unsweetened shredded coconut: Adds texture and a nutty flavor. Toast lightly if you want a deeper aroma, but fresh works fine for a softer bite.
- Coconut oil: It’s the glue that keeps everything together and adds richness. Use melted and warm so it mixes smoothly, especially if your kitchen’s chilly.
- Almonds or cashews: I like adding chopped nuts for crunch. Toast them beforehand for extra aroma, but raw works if you want a softer texture.
- Vanilla extract: Just a splash brightens everything up with a fragrant warmth, but skip if you want a more neutral, pure coconut flavor.
- Sea salt: A pinch heightens the sweetness and balances the richness. Sprinkle lightly—less is more unless you love that salty-sweet contrast.
- Optional: Dark chocolate chips or a drizzle—because sometimes, a little chocolate makes the chewy, coconut base feel more decadent.
Spotlight on key ingredients
Medjool dates:
- Their sticky, caramel-like sweetness is essential. If they’re dry, soak for 10 minutes before blending.
- They become oozy and rich when processed, creating that perfect chewy base for the bars.
Coconut oil:
- It melts into the mixture, adding gloss and grip. Warm it until just liquid—about 20 seconds in the microwave.
- It makes the bars hold together without feeling greasy, giving a subtle coconut aroma that deepens as it sets.
Notes for ingredient swaps
- Dairy-Free: Use coconut yogurt instead of butter for added creaminess, but expect a slightly tangier flavor.
- Sweetener Swap: Maple syrup or honey can replace coconut syrup, giving a different depth of sweetness and moisture.
- Nut Alternatives: Sunflower or pumpkin seeds work well—just chop them finely to prevent overly crunchy bars.
- Coconut Variations: Use toasted shredded coconut for a richer aroma, or unsweetened for a more neutral coconut flavor.
- Texture Tweaks: Add a handful of rolled oats for chewiness or omit for an extra sticky, dense bar.
- Chocolate Options: Milk or white chocolate chips can swap dark chocolate, affecting sweetness and richness.
- Flavor Boost: A pinch of cinnamon or cardamom can lift the overall flavor profile without overpowering the coconut.
Equipment & Tools
- Food processor: To blend dates into a sticky paste and chop nuts finely.
- Square baking dish: To shape and set the mixture into bars.
- Parchment paper: To prevent sticking and make removal easier.
- Spatula: To press and smooth the mixture evenly.
- Knife: To cut the set bars into squares or rectangles.
Step-by-step guide to no-bake coconut date bars
- Gather your equipment: a food processor, a square baking dish (about 20×20 cm), a spatula, and parchment paper. The processor will blend the dates and nuts, while the dish is for setting the bars.
- Line the baking dish with parchment paper, leaving some overhang for easy removal later. This keeps cleanup quick and the bars intact.
- Add the pitted dates and a pinch of salt to the food processor. Pulse until they form a sticky, cohesive paste. You might need to scrape down the sides a few times.
- Transfer the date mixture to a bowl. Stir in the shredded coconut and chopped nuts (if using). Mix well with a spatula until evenly combined—this is where the texture starts to feel sticky and satisfying.
- Warm the coconut oil until just melted (about 20 seconds in the microwave). Pour over the mixture and fold thoroughly until everything is coated and slightly glossy.
- Press the mixture firmly into the prepared dish with the back of a spatula or your hands. Aim for an even layer, about 2 cm thick. Smooth the top as much as possible.
- Place the dish in the fridge for at least 2 hours, or until the mixture is firm enough to cut. If you’re in a rush, the freezer can speed this up, about 30 minutes.
- Once set, lift the entire block out using the parchment overhang. Slice into bars or squares with a sharp knife. Clean the knife between cuts for clean edges.
- Finish by drizzling with melted chocolate or sprinkling extra shredded coconut if you like. Serve immediately or keep chilled.
Refrigerate the bars for at least 2 hours until firm. For best texture, let them sit at room temperature for 10 minutes before serving. Store in an airtight container in the fridge for up to a week. For longer storage, freeze and thaw slightly before eating.
How to Know It’s Done
- Color: The mixture should be sticky and dark caramel in appearance.
- Texture: When pressed, the bars should hold their shape without crumbling.
- Appearance: The surface should be even and glossy, indicating proper mixing and setting.
No-Bake Coconut Date Bars
Ingredients
Equipment
Method
- Line your square baking dish with parchment paper, leaving some overhang for easy removal.
- Add the soaked dates and a pinch of salt to your food processor. Pulse until they break down and form a sticky, cohesive paste—this takes about 30 seconds. The mixture should feel thick and gooey when pressed between fingers.
- Transfer the date paste to a mixing bowl. Stir in the shredded coconut and chopped nuts until evenly combined. The mixture will be sticky and slightly textured, with bits of nuts visible throughout.
- Warm the coconut oil until just melted, about 20 seconds in the microwave. Pour it over the mixture and fold everything together thoroughly until the mixture looks glossy and well-coated—this helps it stick together nicely.
- Transfer the mixture into the prepared dish. Use a spatula or your fingers to press it down firmly and evenly across the dish. Aim for about 2 cm thickness and smooth the top for a neat appearance.
- Place the dish in the fridge and chill for at least 2 hours, or until the mixture is firm and set. If you're in a hurry, pop it in the freezer for about 30 minutes to speed up the process.
- Once set, lift the entire block out of the dish using the parchment overhang. Place on a cutting board and slice into squares or rectangles with a sharp knife dipped in hot water for clean cuts.
- If desired, melt some dark chocolate and drizzle over the bars or sprinkle with extra shredded coconut for added flavor and presentation. Serve immediately or store in the fridge for later.
Notes
Pro tips for perfect bars
- Use very soft dates for easier blending, which creates a smoother, more caramel-like texture.
- Toast shredded coconut lightly to elevate its nutty aroma and add depth to the bars.
- Warm the coconut oil just until melted to ensure it mixes seamlessly without clumping.
- Press the mixture firmly into the dish to prevent crumbling and achieve clean edges.
- Chill the bars thoroughly—at least 2 hours—to develop that satisfying chew and hold shape.
- Use a sharp knife dipped in hot water for cleaner cuts, especially through sticky, dense bars.
- For a glossy finish, drizzle melted chocolate when the bars are just slightly warmed to prevent melting.
Common mistakes and how to fix them
- FORGOT to double-check the mixture’s texture before pressing in the dish.
- DUMPED in too much coconut oil, making bars greasy; use just enough to coat evenly.
- OVER-TORCHED the chocolate drizzle, resulting in a burnt flavor; melt gently and stir constantly.
- FAILED to chill long enough, leading to soft bars; give them at least 2 hours in the fridge.
Quick fixes and pantry swaps
- When mixture is too dry, splash a tiny bit of warm water to loosen it.
- If bars crack while slicing, chill longer or warm the knife for cleaner cuts.
- Splash extra coconut oil if the mixture feels too crumbly before pressing.
- Patch over cracks with a thin layer of melted chocolate for a smoother look.
- Shield the bars from moisture by wrapping tightly; avoid humidity for best texture.
Prep, store, and reheat tips
- Prepare the date mixture and chop nuts ahead of time; store in an airtight container in the fridge for up to 24 hours for convenience.
- Once the bars are set, they can be wrapped tightly in plastic wrap and stored in the fridge for up to a week. The flavors deepen slightly overnight.
- For longer storage, freeze the bars in an airtight container for up to 3 months. Thaw at room temperature for 10 minutes before serving.
- Reheat chilled or frozen bars briefly at room temperature or in a low oven (around 60°C / 140°F) for a softer bite. Expect a fragrant, chewy texture with a hint of coconut aroma.
Top questions about no bake coconut date bars
1. How do I prepare the dates for blending?
Dates can be sticky and oozy, so soaking them for 10 minutes softens them perfectly for blending, making the process smoother.
2. What’s the best way to blend the dates into a paste?
Use a food processor to get a sticky, uniform paste. If it’s too thick, add a splash of warm water or a tiny bit of coconut oil.
3. How long should I chill the bars?
Chilling the bars for at least 2 hours helps them set properly. If you’re in a rush, 30 minutes in the freezer can work.
4. Why are my bars crumbling when I cut them?
To prevent crumbling, press the mixture firmly into the dish and chill until completely set before slicing.
5. My mixture is dry and crumbly—what now?
If the mixture feels too dry, add a teaspoon of melted coconut oil or a few drops of water to loosen it up.
6. How can I get clean cuts through sticky bars?
Use a sharp, hot knife to cut through the bars cleanly. Dipping the knife in hot water helps slices go smoothly.
7. How should I store these bars?
Storing the bars in an airtight container in the fridge keeps them fresh for up to a week, but they’re best when eaten within 3 days.
8. Can I freeze these bars?
For longer storage, wrap tightly and freeze the bars for up to 3 months. Thaw at room temperature for the best texture.
9. The bars are too soft—what’s the fix?
If the bars seem too soft after refrigeration, a quick blast in the freezer for 10 minutes firms them right up.
10. Can I add other flavors or spices?
Adding a pinch of sea salt enhances the sweetness and balances the richness of the coconut and dates beautifully.
These no-bake coconut date bars are a simple way to satisfy that sweet craving without the fuss of baking. They carry a natural, caramel-like richness that’s hard to beat, especially when you want something quick and wholesome.
Plus, they’re a reminder that sometimes, the best treats come from just a handful of pantry staples and a little patience in the fridge. You can almost smell that toasted coconut and warm coconut oil as they set, promising a chewy, flavorful bite.

I’m Emily Richardson, the heart and soul behind Playing with Flavors. Cooking isn’t just a hobby for me – it’s a passion that I’ve cultivated for years, and it’s become the driving force of my life.
From the kitchen of my cozy café to the pages of this blog, every dish I create is a reflection of my love for food and the joy it brings to people.


