
Sometimes you just need a treat that doesn’t demand turning on the stove or waiting around for things to bake. These no bake peanut oat bars are that kind of simple, honest snack—just a handful of ingredients mixed together and pressed into shape. It’s almost like a little kitchen meditation, feeling the sticky peanut butter and honey bind the oats into something satisfying and a bit addictive.
What I love most about this recipe is how flexible it feels—no fuss, no mess, just straightforward goodness that you can tweak to suit what’s in your pantry. It’s a recipe I turn to on busy mornings, or when I want a quick, nourishing bite without the cleanup. And let’s be honest, nothing beats that crunchy, peanutty aroma filling the kitchen as you press these bars into the pan.
This recipe is inspired by those times when I need a quick, satisfying treat without turning on the stove. It’s about harnessing the natural richness of peanut butter and the hearty crunch of oats in a way that feels almost meditative—no fuss, just raw ingredients coming together. It’s a reminder that sometimes the simplest bites are the most rewarding, especially when they’re made with a bit of mindful effort.
The story behind this recipe
- This recipe came from a chaotic morning when I needed something quick, filling, and a bit nostalgic. I remember the smell of roasted oats and peanut butter filling the kitchen, reminding me of childhood snacks but with a grown-up twist. It’s funny how simple ingredients can bring back those moments, even in the busiest of days.
- I often make these bars when I want a break from the usual baking routine. They’re like a little kitchen rebellion—no oven, no fuss, just ingredients that stick together with a bit of love and patience. Sometimes, I press in a handful of chocolate chips or a drizzle of honey on top, just for extra flair. It’s in those small adjustments that these bars feel completely personal.
- heading
- story_type
Key Ingredient Insights
- Creamy peanut butter: I like to use natural, runny peanut butter to get that rich, oozing texture. If yours is too thick, warm it slightly to loosen it up for easier mixing.
- Old-fashioned oats: I prefer the hearty chew of rolled oats rather than quick oats—they give the bars more bite and texture. Toast them lightly for a nuttier flavor if you like.
- Honey: I love the floral sweetness of local honey, but maple syrup works as a good vegan swap. Keep an eye on the sweetness level if you’re using a different syrup.
- Dark chocolate chips: Adding a handful melts into the mixture beautifully, giving a hint of bitter-sweetness. For a nut-free version, skip or substitute with dried cranberries for a tart punch.
- Salt: Just a pinch elevates the peanut flavor and balances the sweetness. Don’t skip it, even if you’re used to sweet-only treats—it’s that little boost of flavor.
- Vanilla extract: A splash of vanilla brightens the whole batch, making the peanut butter taste more vibrant. If you don’t have any, a tiny bit of almond extract can add a different dimension.
Spotlight on key ingredients
Peanut butter:
- Creamy peanut butter: I like to use natural, runny peanut butter to get that rich, oozing texture. If yours is too thick, warm it slightly to loosen it up for easier mixing.
- Old-fashioned oats: I prefer the hearty chew of rolled oats rather than quick oats—they give the bars more bite and texture. Toast them lightly for a nuttier flavor if you like.
- Honey: I love the floral sweetness of local honey, but maple syrup works as a good vegan swap. Keep an eye on the sweetness level if you’re using a different syrup.
Chocolate chips & flavorings:
- Dark chocolate chips: Adding a handful melts into the mixture beautifully, giving a hint of bitter-sweetness. For a nut-free version, skip or substitute with dried cranberries for a tart punch.
- Salt: Just a pinch elevates the peanut flavor and balances the sweetness. Don’t skip it, even if you’re used to sweet-only treats—it’s that little boost of flavor.
- Vanilla extract: A splash of vanilla brightens the whole batch, making the peanut butter taste more vibrant. If you don’t have any, a tiny bit of almond extract can add a different dimension.
Notes for ingredient swaps
- Nuts-Free: Use sunflower seed butter instead of peanut butter, for a nut-free version that still delivers creamy richness.
- Sweetener Swap: Maple syrup or agave nectar can replace honey, with a slightly different, more floral or neutral sweetness.
- Gluten-Free: Ensure oats are certified gluten-free, or swap with puffed rice for a lighter, crunchier texture.
- Vegan: Swap honey for maple syrup or coconut nectar, keeping the bars fully plant-based without losing sweetness.
- Chocolaty Twist: Use cacao nibs or dairy-free chocolate chips for a less sweet, more intense cocoa flavor.
- Add-ins: Toss in dried cranberries, chopped dates, or toasted coconut instead of chocolate chips for varied textures and flavors.
- Oats: Try steel-cut oats for a different chew, but toast them first for a nuttier aroma and better binding.
Equipment & Tools
- 20x20cm (8×8 inch) square pan: Holds the mixture while setting and gives the shape.
- Parchment paper: Prevents sticking and makes removal easier.
- Microwave-safe bowl: Melts the peanut butter and honey evenly.
- Spatula or spoon: Stirs ingredients and presses the mixture into the pan.
- Sharp knife: Cuts cleanly through the firm bars.
Guide to No Bake Peanut Oat Bars
- Gather your equipment: a 20x20cm (8×8 inch) square pan, a sturdy spatula or spoon, a microwave-safe bowl, and parchment paper to line the pan.
- Line the pan with parchment, leaving some overhang for easy removal. Set aside.
- In the microwave-safe bowl, combine 1 cup (250g) peanut butter and 1/4 cup (60ml) honey. Microwave in 20-second bursts, stirring each time, until smooth and runny, about 1 minute total.
- Add 1 teaspoon vanilla extract and a pinch of salt to the peanut mixture. Stir well to incorporate.
- In a separate large bowl, measure 2 cups (180g) old-fashioned oats. Pour the warm peanut mixture over the oats.
- Stir thoroughly with a spatula or spoon for about 2–3 minutes, ensuring all oats are coated and sticky.
- Transfer the mixture into your prepared pan. Use the spatula to press it evenly into the corners, applying gentle pressure for a compact layer.
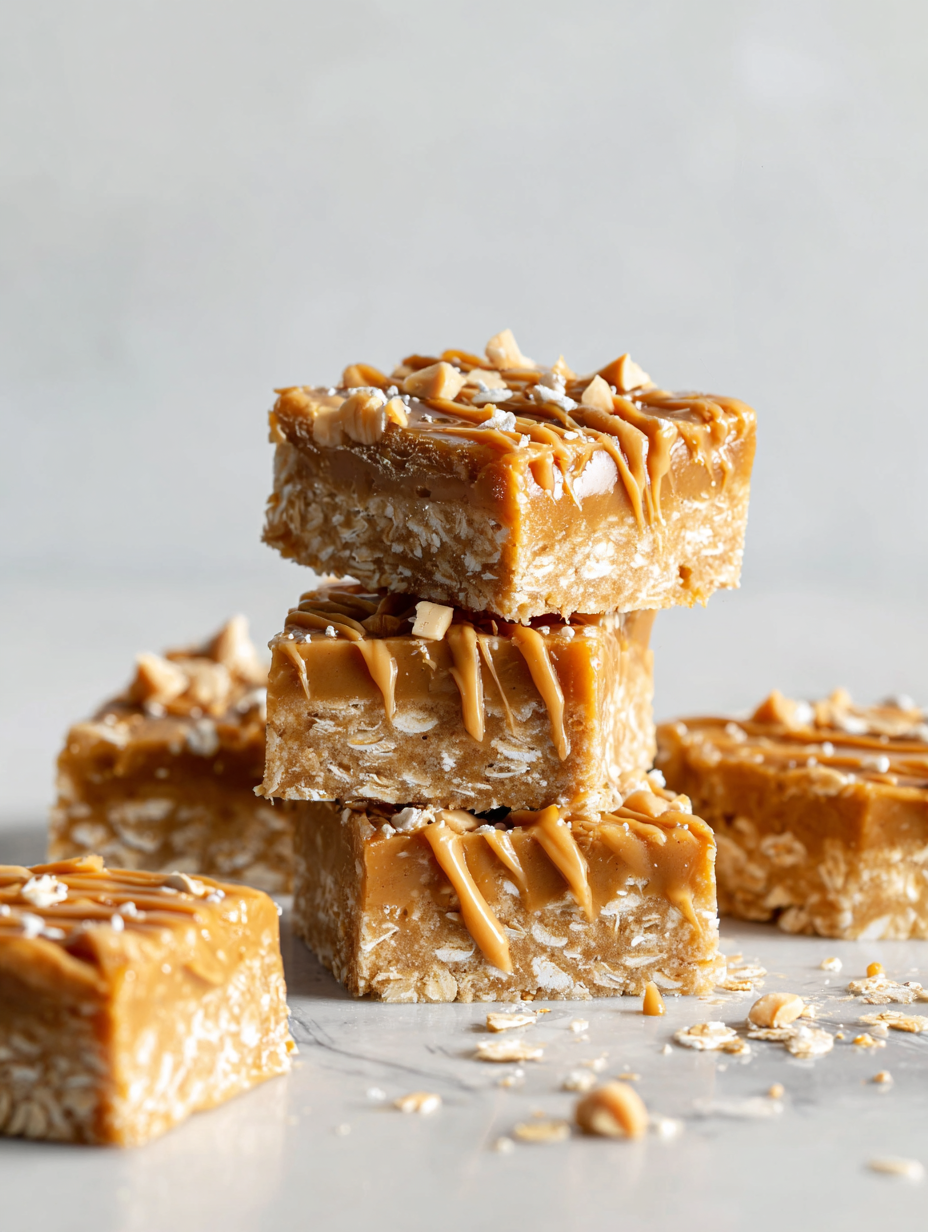
- Once pressed, sprinkle 1/4 cup (45g) chocolate chips on top if using. Gently press them into the surface.
- Place the pan in the refrigerator for at least 2 hours, or until the mixture is firm and set. For faster setting, freeze for about 1 hour.
- Lift the bars out using the parchment overhang. Cut into 8-10 bars with a sharp knife. If the mixture cracks, press it back together gently.
Refrigerate for at least 2 hours until firm. Lift the bars out using parchment, then cut into desired sizes. Serve immediately or store wrapped in foil for later.
How to Know It’s Done
- The mixture should be firm but still slightly tacky when pressed.
- Chocolate chips are melted and slightly shiny after pressing in.
- Bars feel solid and hold shape when lifted from the pan.
No Bake Peanut Oat Bars
Ingredients
Equipment
Method
- Combine the peanut butter and honey in a microwave-safe bowl and microwave in 20-second bursts, stirring each time until smooth, warm, and runny, about 1 minute total.
- Add vanilla extract and a pinch of salt to the warm mixture, stirring well to incorporate all the flavors.
- In a large bowl, measure out the oats and pour the warm peanut mixture over them.
- Thoroughly stir with a spatula or spoon for about 2–3 minutes, ensuring all oats are coated and sticky.
- Line your square pan with parchment paper, leaving overhang for easy removal.
- Transfer the oat mixture into the prepared pan and press down firmly with the back of a spatula or your fingers to create an even, compact layer.
- Sprinkle the chocolate chips over the top and gently press them into the surface for a glossy finish.
- Place the pan in the refrigerator and chill for at least 2 hours, or until the mixture is firm and set.
- Lift the set mixture out of the pan using the parchment overhang and cut into 8-10 bars with a sharp knife.
- Serve immediately or store wrapped in plastic wrap in the fridge for up to a week. Enjoy the crunchy, chewy texture and peanutty aroma!
Tips for perfect no-bake bars
- Bolded mini-head: Use room temperature peanut butter for smoother mixing and a more cohesive texture.
- Bolded mini-head: Toast oats lightly before mixing to enhance their nutty aroma and add crunch.
- Bolded mini-head: Warm honey slightly to make it easier to blend with peanut butter and oats.
- Bolded mini-head: Press mixture firmly into the pan to prevent crumbling; use the back of a spatula for even pressure.
- Bolded mini-head: Chill the bars until fully set; the fridge helps them firm up and makes cutting cleaner.
- Bolded mini-head: Add chocolate chips on top and press in gently for a glossy, melty finish after chilling.
- Bolded mini-head: Use a sharp knife and wipe it clean between cuts for neat, even bars.
Common mistakes and how to fix them
- FORGOT to measure ingredients precisely → Use a scale for accuracy.
- DUMPED in all ingredients at once → Mix liquids first, then oats for even binding.
- OVER-TORCHED the mixture → Stir constantly over low heat, remove once smooth and fragrant.
- MISSED the chill time → Allow at least 2 hours in fridge for proper setting.
Quick Fixes for Smooth Bars
- When mixture is too sticky, splash a little warm water and stir again.
- If bars crack while cutting, patch cracks with a tiny bit of warm peanut butter.
- DUMPED in too much salt? Rinse quickly with a damp cloth, then adjust sweetness.
- Splash a few drops of vanilla extract if flavor feels flat after chilling.
- Patch dry edges by pressing in a tiny dollop of warm peanut butter for extra richness.
Prep, store, and reheat tips
- Prepare the mixture and line the pan ahead of time; it saves time and keeps everything neat. The flavors develop slightly as they sit, becoming richer and more cohesive.
- Bars can be wrapped tightly in plastic wrap or stored in an airtight container in the fridge for up to a week. The texture stays firm, but they may become slightly chewier.
- For longer storage, freeze the bars for up to 3 months. Wrap each bar in foil or plastic, then place in a freezer bag. Thaw in the fridge for a few hours before serving.
- Reheat by letting the bars sit at room temperature for 10-15 minutes or briefly warming in the microwave at 50% power in 10-second bursts. The peanut butter aroma will intensify, and the bars will soften just enough to bite into comfortably.
Top questions about peanut oat bars
1. Can I use any peanut butter?
Use natural peanut butter for a richer, smoother texture that blends well. Skippy or Jif works, but the natural kind feels more wholesome.
2. Can I substitute honey?
Yes, honey gives a sticky, floral sweetness. Maple syrup is a good vegan alternative but might make the bars slightly more crumbly.
3. How do I know when it’s set?
Chill the mixture for at least 2 hours until firm. It should feel solid and hold shape when pressed, not sticky or soft.
4. Can I use quick oats?
Use rolled oats for texture and chew. Quick oats can work but will produce a softer, less chewy bar.
5. How do I keep the bars from crumbling?
Press the mixture firmly into the pan to avoid crumbling. Use the back of a spatula for even pressure and a compact bar.
6. How long do they last?
Wrap bars in plastic wrap or store in an airtight container in the fridge for up to a week. Freeze for longer storage.
7. What if the mixture is too sticky?
If mixture is too sticky, add a bit more oats or refrigerate it for 10 minutes before pressing into the pan.
8. When should I add chocolate chips?
Add chocolate chips after pressing the mixture into the pan, pressing them gently for a glossy, melty top after chilling.
9. How do I cut clean bars?
Use a sharp knife and wipe it clean between cuts for neat, even bars. Chilling helps prevent sticking and crumbling.
10. My bars cracked—what now?
If the bars crack or break, gently press the pieces back together with your fingers or a spatula. Slight cracks are normal.
These no-bake peanut oat bars are more than just a quick snack; they’re a little reminder that simplicity can be truly satisfying. The smell of peanut butter and honey mingling as they set is almost nostalgic, bringing back childhood afternoons in a flash. They’re perfect for when you need something honest, easy, and genuinely good.
Making these bars doesn’t demand much fuss, but the reward is real—crunchy, salty, sweet bites that come together with minimal effort. Once chilled, they’re ready to share or stash away for later. Sometimes, it’s those small, straightforward pleasures that make the busiest days feel a little more manageable.

I’m Emily Richardson, the heart and soul behind Playing with Flavors. Cooking isn’t just a hobby for me – it’s a passion that I’ve cultivated for years, and it’s become the driving force of my life.
From the kitchen of my cozy café to the pages of this blog, every dish I create is a reflection of my love for food and the joy it brings to people.


