
This no bake ricotta cheesecake is a revelation on hectic weeknights when I crave something creamy but don’t want to turn on the oven. It’s about using what I have in the fridge—plump, fresh ricotta that’s just waiting to be turned into something special. The texture is airy and smooth, with a subtle tang that feels both luxurious and familiar.
What I love most is how forgiving it is. No crust to fuss over, no baking anxiety, just a simple mix, a quick chill, and you’re set. It’s a dessert that feels like a small act of kindness after a long day, a creamy moment that’s easy to pull together and impossible to resist.
Focusing on the simplicity and freshness of ricotta, this recipe is about embracing a no-fuss, creamy dessert that highlights natural dairy sweetness without the need for baking might seem intimidating to some, but it’s actually a relief. I love how it transforms a busy weeknight into a special moment of indulgence with minimal effort, just the way I like to cook when I want comfort and quickness combined.
The creamy comfort of ricotta
- I used to think no-bake desserts were too simple to satisfy, but this one changed my mind completely.
- There’s a quiet joy in pulling this together after a long day, knowing I’m about to indulge in something creamy and fresh.
- The first time I made this, I was surprised how beautifully the ricotta’s mild tang balanced the sweetness—no fuss, just honest flavor.
- It’s become my go-to when I want something quick, elegant, and made with ingredients I trust—no oven needed.
- Sharing this cheesecake with friends always prompts that ‘wow, how did you make this so easy?’ look—proof that simplicity has its charm.
The inspiration behind this cheesecake
This recipe was born out of a moment of frustration with complicated desserts that demand too much time and effort. I was craving something creamy and satisfying but wanted to keep it simple, no baking, just pure, fresh flavors. One day, I stumbled on the idea of using ricotta as the star—its mild, milky richness felt just right for a no-fuss cheesecake that could come together in minutes and chill while I got on with other things. It’s become a little ritual of mine—an easy treat that feels indulgent without the fuss.
Trivia and Origins of Ricotta Cheesecake
- Ricotta cheese has roots in Italy, dating back centuries where it was made from the leftover whey of cheese-making.
- This no-bake cheesecake style gained popularity in the 20th century as a quick, fresh alternative to traditional baked desserts.
- Historically, ricotta was valued not just for taste but also for its versatility in both sweet and savory dishes across Mediterranean cuisines.
Ingredient breakdown: key components
- Ricotta cheese: I love how its mild, milky flavor makes the filling feel rich yet light—use fresh, high-quality ricotta for the best texture and taste. If it’s watery, drain it first so the cheesecake stays firm.
- Heavy cream: I whip it just until soft peaks form, giving the cheesecake a silky, airy feel. For a lighter version, try coconut cream—just keep an eye on the sweetness level.
- Lemon zest: Adds a bright, zesty punch that cuts through the richness. If you don’t have fresh, a dash of lemon extract works, but zest really brightens the flavor.
- Sugar: I prefer superfine sugar—it dissolves quickly and seamlessly. If you want less sweetness, cut back slightly or try honey for a floral note.
- Vanilla extract: It deepens the overall flavor and adds warmth. Use good quality vanilla—imitation can taste flat and artificial. If you’re out, a splash of almond extract is a nice twist.
- Gelling agent (optional): Sometimes I add a tiny bit of gelatin dissolved in warm water if I want extra firmness. Skip it if you prefer a softer, more mousse-like texture—cheesecake will be creamier without it.
- Crust or topping (optional): I sometimes sprinkle crushed biscotti or candied ginger on top for texture. Keep it simple or get creative—whatever adds a little crunch or zing to the creamy base.
Spotlight on key ingredients
Ricotta cheese:
- I love how its mild, milky flavor makes the filling feel rich yet light—use fresh, high-quality ricotta for the best texture and taste. If it’s watery, drain it first so the cheesecake stays firm.
- Heavy cream: I whip it just until soft peaks form, giving the cheesecake a silky, airy feel. For a lighter version, try coconut cream—just keep an eye on the sweetness level.
- Lemon zest: Adds a bright, zesty punch that cuts through the richness. If you don’t have fresh, a dash of lemon extract works, but zest really brightens the flavor.
Key flavorings and stabilizers:
- Vanilla extract: It deepens the overall flavor and adds warmth. Use good quality vanilla—imitation can taste flat and artificial. If you’re out, a splash of almond extract is a nice twist.
- Sugar: I prefer superfine sugar—it dissolves quickly and seamlessly. If you want less sweetness, cut back slightly or try honey for a floral note.
- Gelling agent (optional): Sometimes I add a tiny bit of gelatin dissolved in warm water if I want extra firmness. Skip it if you prefer a softer, more mousse-like texture—cheesecake will be creamier without it.
Notes for ingredient swaps
- Dairy-Free: Swap ricotta for blended silken tofu or cashew cheese. Keeps the creaminess but loses a bit of that milky tang.
- Sugar Alternatives: Use honey, maple syrup, or agave for a more floral, less granular sweetness. Adjust quantity to taste.
- Heavy Cream: Replace with coconut cream for a subtly coconutty, rich texture. It may add a slight coconut aroma.
- Lemon Zest: Lime zest gives a slightly more tart, aromatic punch, while orange zest adds sweetness and warmth.
- Gelling Agents: Gelatin can be replaced with agar-agar for a vegetarian option—just dissolve and boil briefly.
- Crust Variations: Crushed graham crackers or digestive biscuits can substitute for any crunchy topping or base if you want more texture.
- Flavor Boosts: Add a splash of vanilla bean paste or a pinch of cinnamon to deepen flavor profiles without overpowering the ricotta’s mildness.
Equipment & Tools
- springform pan: For assembling and easy removal of the cheesecake
- parchment paper: To prevent sticking and facilitate removal
- mixing bowl: To blend the filling ingredients
- whisk: To achieve a smooth, airy mixture
- spatula: To fold ingredients and smooth the surface
Step-by-step guide to no bake ricotta cheesecake
- Gather your equipment: a 20cm (8-inch) springform pan, a mixing bowl, a spatula, and a whisk. The pan is for assembling, the bowl for mixing, and the whisk to blend smoothly.
- Line the springform pan with parchment paper to prevent sticking. Set aside for now.
- In a large bowl, add the ricotta cheese. Use a spatula to break it apart and make it easier to mix.
- Add the superfine sugar to the ricotta. Whisk until smooth, about 2-3 minutes. It should be creamy and slightly fluffy.
- Zest a lemon directly into the mixture—about 1 teaspoon. The bright citrus aroma should lift the whole bowl.
- Pour in the heavy cream. Whisk gently until just soft peaks form, about 30 seconds. It should look airy and smooth.
- Stir in vanilla extract and lemon juice. Mix until well combined and the mixture is uniform in texture.
- If using optional gelling agent, dissolve a tiny pinch of gelatin in 2 tablespoons warm water, then fold into the filling. Skip if you want a softer texture.
- Pour the filling into the prepared pan. Use a spatula to smooth the top evenly. Lightly tap the pan on the counter to remove air bubbles.
- Cover with plastic wrap and refrigerate for at least 4 hours, preferably overnight. The mixture should set and firm up, with a slight jiggle.
- Before serving, run a knife around the edge of the pan to loosen the cheesecake. Carefully remove the sides of the springform pan.
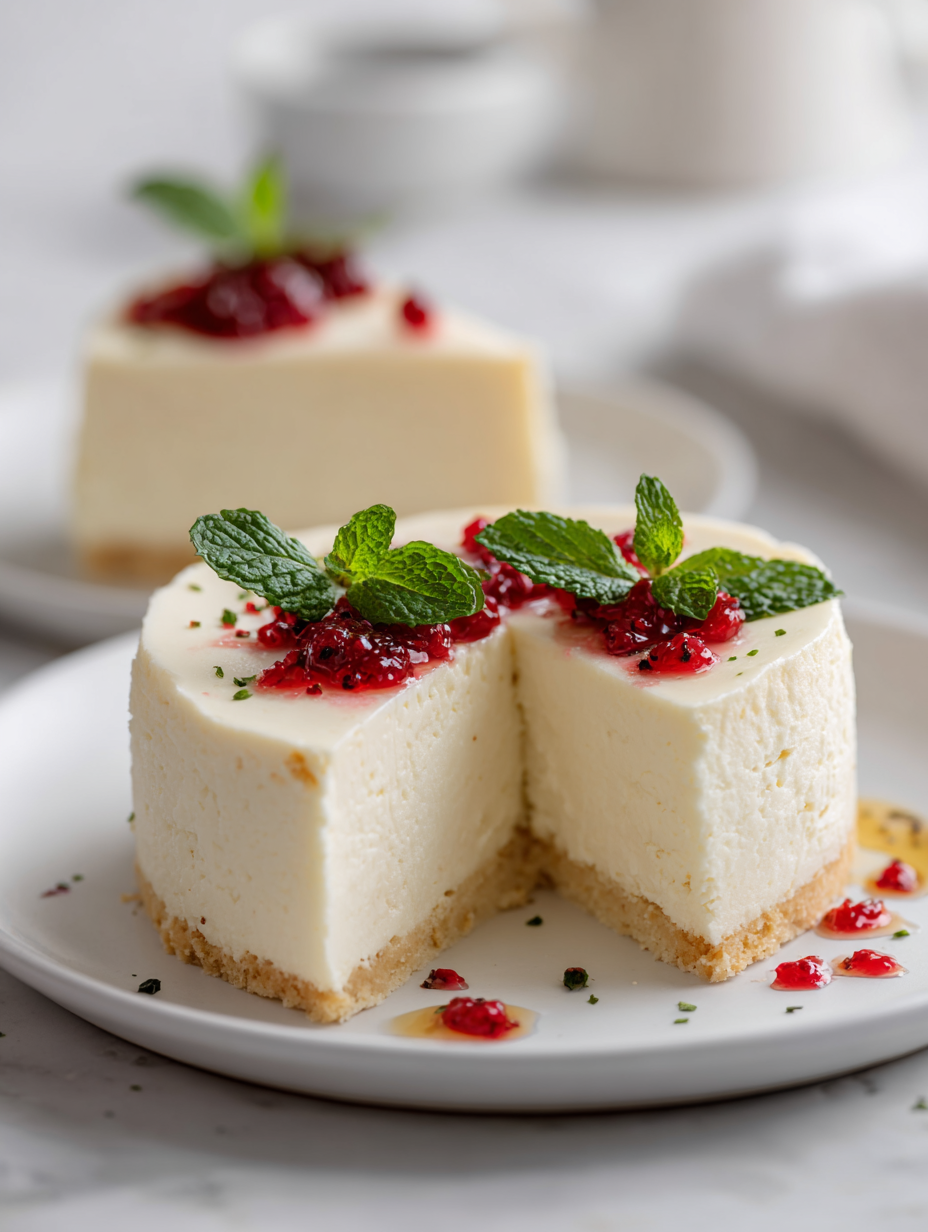
- Finish with a dusting of powdered sugar or fresh berries if desired. Slice and serve chilled.
Refrigerate the cheesecake covered for at least 4 hours or overnight. Before serving, loosen the edges with a knife, then remove the springform. Finish with toppings if desired, then slice and enjoy while well-chilled.
How to Know It’s Done
- The filling should be smooth and creamy, free of lumps.
- The mixture should hold a gentle jiggle when you shake the pan lightly.
- The edges should be firm and slightly pull away from the pan when set.
No-Bake Ricotta Cheesecake
Ingredients
Equipment
Method
- Line a springform pan with parchment paper, gently pressing it into the sides and bottom for easy removal later.
- In a large mixing bowl, add the drained ricotta cheese. Use a spatula to break it apart and make it easier to blend.
- Add the superfine sugar to the ricotta and whisk together until the mixture is smooth and creamy, about 2-3 minutes. You should see a slight sheen and no lumps.
- Zest a lemon directly into the mixture, releasing fragrant oils that brighten the flavor. Mix until evenly incorporated.
- Pour in the heavy cream and gently whisk until soft peaks form, creating a light, airy texture that lifts the filling.
- Stir in the vanilla extract and lemon juice, blending until the mixture is smooth and uniform.
- If using gelatin for added firmness, dissolve a tablespoon of gelatin in warm water according to package instructions, then fold it into the mixture. Otherwise, proceed without it for a softer texture.
- Pour the creamy filling into the prepared springform pan and use a spatula to smooth the surface evenly. Tap the pan gently on the counter to release any trapped air bubbles.
- Cover the pan with plastic wrap and refrigerate for at least 4 hours, preferably overnight, until the filling is set and a gentle jiggle is still noticeable in the center.
- Once chilled and set, run a knife around the edges of the pan to loosen the cheesecake. Carefully remove the sides of the springform to reveal the elegant, creamy dessert.
- Finish with a dusting of powdered sugar or fresh berries for a decorative touch. Slice with a sharp knife and serve chilled for the best texture and flavor.
Notes
Tips to perfect your cheesecake
- Bolded mini-head: Chill your mixing bowls and tools to keep the ricotta mixture cool and prevent melting.
- Bolded mini-head: Use superfine sugar for seamless incorporation—grainy sugar can leave a gritty texture.
- Bolded mini-head: Whip the cream just until soft peaks form—over-whipping can make it grainy and difficult to fold in.
- Bolded mini-head: When adding lemon zest, do it last to preserve its bright, aromatic oils and prevent bitterness.
- Bolded mini-head: Tap the filled pan on the counter gently to release trapped air bubbles and ensure a smooth top.
- Bolded mini-head: For a firmer cheesecake, dissolve a tiny pinch of gelatin in warm water before folding in—skip if you prefer softness.
- Bolded mini-head: Chill the assembled cheesecake in the fridge for at least 4 hours; an overnight rest helps flavors meld and texture set.
Common mistakes and how to fix them
- FORGOT to drain excess moisture from ricotta → Drain well for firm texture.
- DUMPED in cold cream instead of whipping → Whip cream until soft peaks form.
- OVER-TORCHED the mixture, causing curdling → Mix gently and avoid high heat.
- MISSED the chill time, resulting in a runny cheesecake → Chill for at least 4 hours for proper set.
Quick fixes and pantry swaps
- When mixture appears watery → Drain ricotta thoroughly before mixing.
- If filling cracks when unmolding → Chill longer for a firmer set.
- Splash lemon juice if flavor is dull → Brighten with fresh zest just before serving.
- Patch a runny cheesecake with fresh berries or fruit compote for added texture and flavor.
- Shield edges from cracking by smoothing the surface with a warm spatula after pouring.
Prep, store, and reheat tips
- Prepare the filling up to a day in advance; it firms up better after a night in the fridge, and the flavors meld beautifully.
- Cover the cheesecake tightly with plastic wrap and keep it refrigerated for up to 24 hours. The texture remains creamy and fresh, with a slight tang that intensifies overnight.
- For longer storage, can be frozen for up to 1 month. Wrap well in plastic, then foil. Thaw in the fridge before serving to maintain its smooth texture.
- Reheating is not necessary; serve chilled for the best experience. If slightly softened, a quick 10-minute chill in the fridge firms it up without losing creaminess.
- The flavor can deepen over time, so taste before serving and adjust toppings or sweetness if needed—sometimes a squeeze of lemon brightens it right before presentation.
Top questions about ricotta cheesecake
1. Can I use a different pan?
Yes, using a springform pan makes it easier to remove without breaking. Line it with parchment for a clean edge.
2. Can I substitute the ricotta?
Absolutely. You can swap ricotta for mascarpone for a richer, creamier texture, or use cottage cheese for a budget-friendly option.
3. Can I omit the cream?
Yes, you can skip the whipped cream and just use extra ricotta for a denser, more traditional texture.
4. How do I know when it’s ready?
It should jiggle slightly in the center and feel firm but not hard when set. It also shouldn’t crack or look dry.
5. How long should I chill it?
Cover with plastic wrap and refrigerate for at least 4 hours, ideally overnight. It tastes better and firms up over time.
6. What toppings work well?
You can add fresh berries, fruit compote, or a drizzle of honey on top. Keep toppings simple to highlight the creamy filling.
7. How important is the ricotta quality?
Use fresh, high-quality ricotta—it makes a big difference in flavor and texture. Drain excess moisture for best results.
8. My mixture is too runny, what do I do?
If it’s too watery, drain the ricotta a little longer or add a small amount of gelatin to firm it up.
9. Can I make it dairy-free?
For a dairy-free version, use blended silken tofu or cashew cheese. It’s not quite as rich but still satisfying.
10. It cracks when I unmold, how do I fix it?
If it cracks while cooling, chill it longer or smooth out surface with a warm spatula before chilling fully.
This no-bake ricotta cheesecake isn’t just a quick fix; it’s a reminder that sometimes, simplicity yields the most comforting flavors. The gentle tang of ricotta and the creamy texture make it feel like a special treat, even on the busiest nights.
In a season when lighter, fresher desserts are more appealing than ever, this recipe offers a little moment of ease and delight. It’s a small, honest dessert that fits right into a hectic life, without sacrificing that satisfying, creamy finish.

I’m Emily Richardson, the heart and soul behind Playing with Flavors. Cooking isn’t just a hobby for me – it’s a passion that I’ve cultivated for years, and it’s become the driving force of my life.
From the kitchen of my cozy café to the pages of this blog, every dish I create is a reflection of my love for food and the joy it brings to people.


