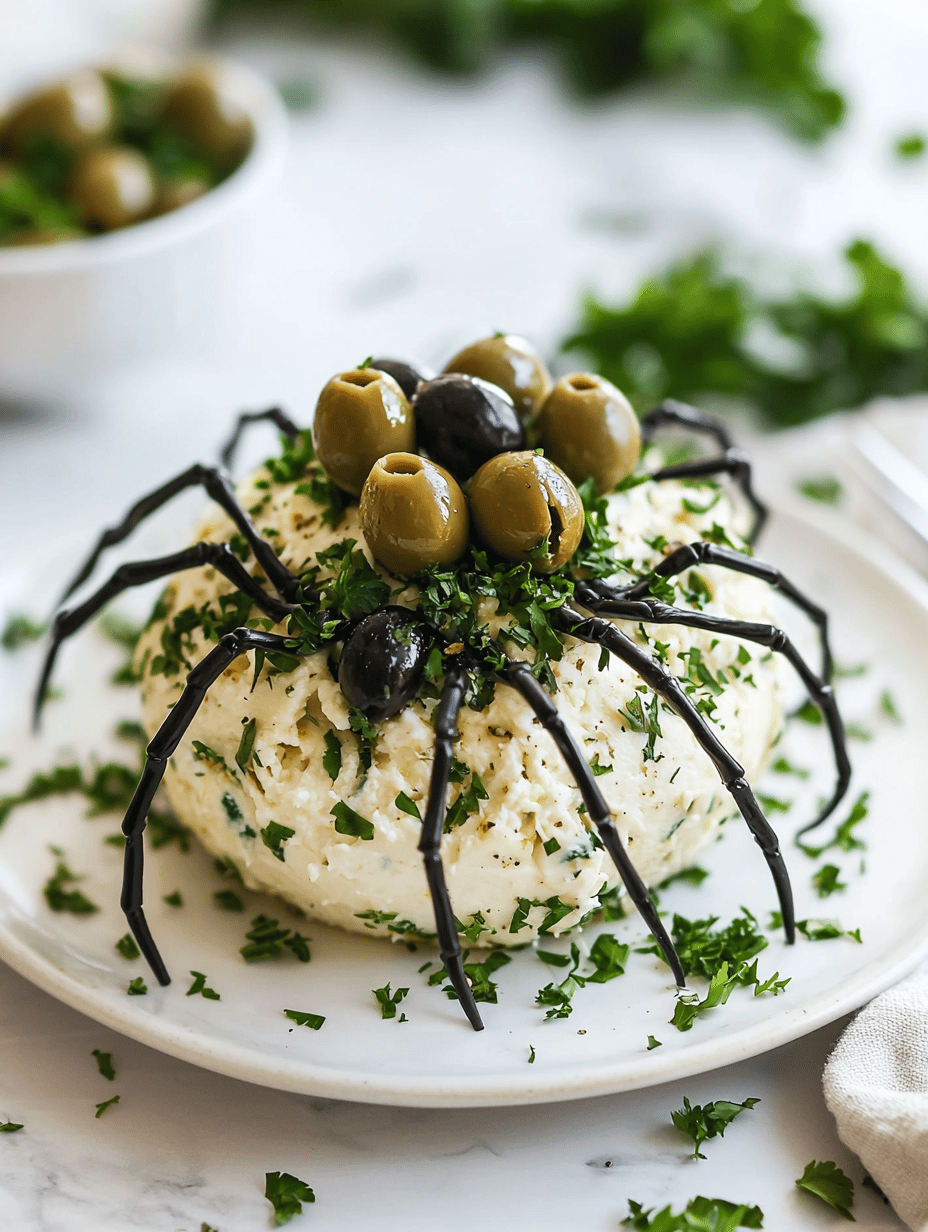
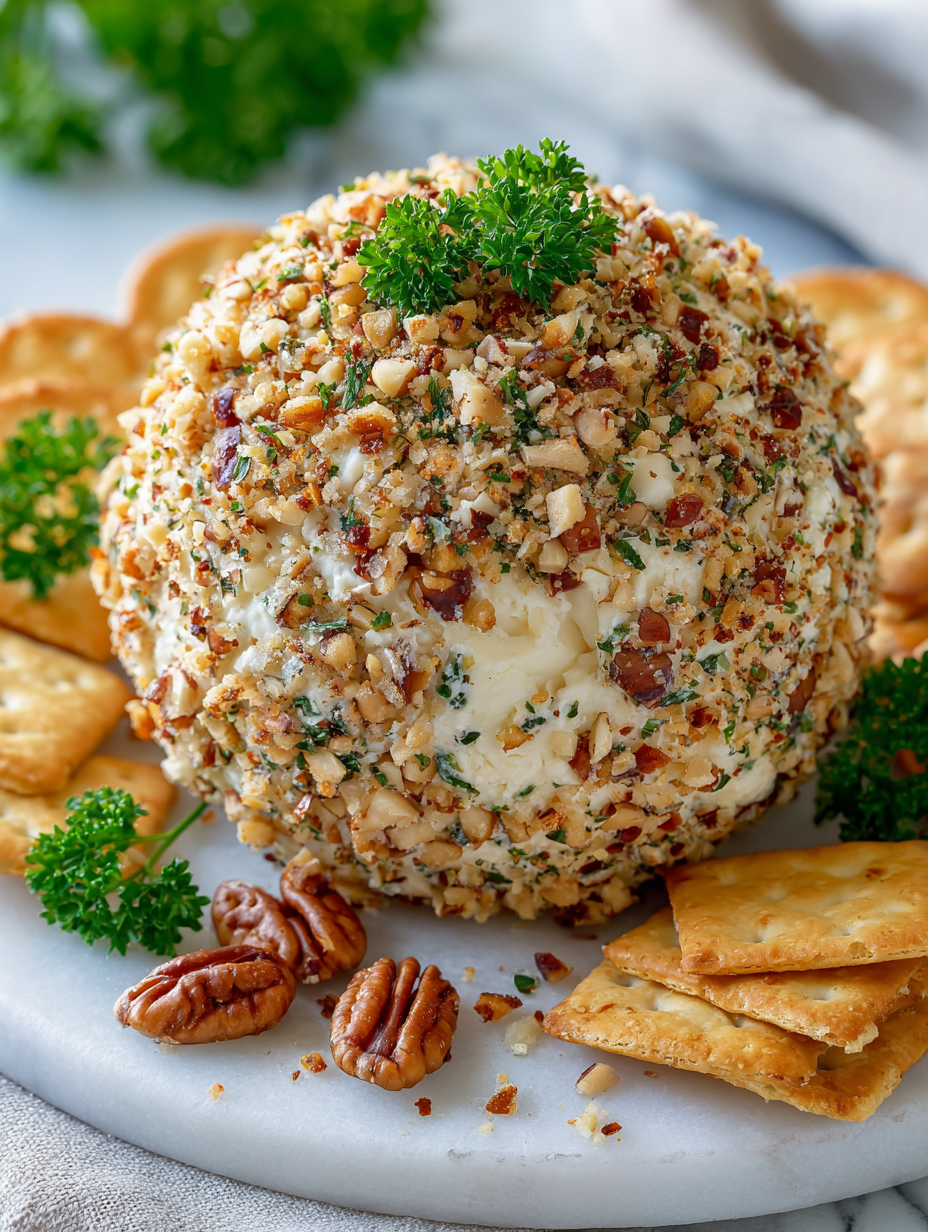
Category: Appetizers

  • Halloween Mummy Meatballs: A Spooky Twist for Your Table

    Halloween Mummy Meatballs: A Spooky Twist for Your Table

    As fall settles in, I find joy in turning simple ingredients into festive wonders. This year, I decided to give my classic meatballs a hilarious, spooky makeover inspired by creepy mummies from ancient tombs. The moment these little morsels came to life with strips of mozzarella and googly eyes, I knew I had struck holiday gold.

    This recipe isn’t just about the taste—though garlic, herbs, and a hint of Parmesan make them irresistible—it’s about creating a fun experience. Kids and adults alike will giggle at the sight of these little mummies crawling onto their plates. Perfect for a party or cozy movie night, they bring a dash of chaos and a lot of flavor to your Halloween table.

    Spooky Mummy Meatballs

    This dish features seasoned meatballs baked until tender, then decorated to resemble tiny mummies with strips of mozzarella for bandages and googly eyes for a spooky face. The meatballs have a savory flavor with garlic, herbs, and Parmesan, and their final appearance is playful and creepy, perfect for Halloween celebrations.
    Prep Time 20 minutes
    Cook Time 25 minutes
    Total Time 45 minutes
    Servings: 4
    Course: Main Course
    Cuisine: American
    Calories: 220

    Ingredients
      

    • 1 ½ pounds ground beef or other ground meat
    • 1 cup bread crumbs
    • 2 cloves garlic minced
    • ¼ cup Parmesan cheese grated
    • 2 tabs fresh herbs chopped parsley or basil
    • 1 teaspoon salt
    • ½ teaspoon black pepper
    • 1 tablespoon olive oil for baking
    • 4 oz mozzarella cheese cut into thin strips
    • Googly eyes plastic or edible googly eyes for decorating

    Equipment

    • Mixing bowl
    • Baking Sheet
    • Parchment paper
    • Small knife
    • Cheese grater
    • Toothpick

    Method
     

    1. Preheat your oven to 400°F (200°C). Line a baking sheet with parchment paper and set aside.
    2. In a large mixing bowl, combine ground beef, bread crumbs, minced garlic, grated Parmesan, chopped herbs, salt, and pepper. Mix gently until all ingredients are evenly incorporated.
    3. Use your hands to shape the mixture into small meatballs, about 1 to 1.5 inches in diameter. Place each on the prepared baking sheet.
    4. Bake the meatballs in the preheated oven for 20-25 minutes or until they are cooked through and browned on the outside.
    5. Remove the meatballs from the oven and let them cool slightly until they are comfortable to handle. Carefully cut small strips of mozzarella cheese to resemble bandages.
    6. Gently wrap thin strips of mozzarella around each meatball in a random pattern, mimicking mummy bandages. Press lightly to secure the cheese in place.
    7. Decorate each mummy with two googly eyes, sticking them onto the cheese strips with a small dab of toothpick or edible glue for a spooky face.
    8. Arrange the decorated meatballs on a serving platter, and serve warm or at room temperature for your Halloween gathering.

    Notes

    For a fun presentation, add extra cheese strips or face decorations. You can also bake the cheese slightly for a melting effect if desired.

    These mummy meatballs are proof that holiday food can be playful and delicious at once. Their simple ingredients and easy assembly mean you can focus on the fun and not the fuss. Plus, they smell incredible—garlic and herbs mingling with warm, savory notes—as they bake to perfection.

    As the season deepens, embracing these little culinary monsters makes the celebration more memorable. They’re a fun way to mingle chaos with comfort, and they sure make the dining table more lively. Remember, the best part isn’t just their spookiness, but how they make everyone smile amidst the chaos of holiday prep.

  • Spooky Delight: Halloween Mummy Hot Dogs That Fool and Delight

    Spooky Delight: Halloween Mummy Hot Dogs That Fool and Delight

    Halloween is a time for playful food that sparks joy and nostalgia. This year, I stumbled upon a whimsical idea—transforming everyday hot dogs into spooky mummies that look like they stepped out of a haunted house.

    These mummy hot dogs are not only easy to make but also bring out the chaos of Halloween with their quirky, bandaged appearance. Plus, they fill the kitchen with the warm, savory aroma of baking bread and sizzling sausage, perfect for a festive night.

    Why not add a little spooky charm to your table? Whether for kids or adults, these little creatures make every bite a fun surprise. And, they’re so simple, even the most chaotic chef can whip them up without a fuss.

    Halloween Mummy Hot Dogs

    This dish features hot dogs wrapped in strips of pre-made biscuit dough to resemble bandaged mummies. The wrapped hot dogs are baked until golden brown, creating a crispy exterior with a savory sausage interior. Finished with small eye decorations, resulting in a whimsical, spooky presentation perfect for Halloween festivities.
    Prep Time 15 minutes
    Cook Time 15 minutes
    Total Time 30 minutes
    Servings: 8
    Course: Main Course
    Cuisine: Halloween
    Calories: 250

    Ingredients
      

    • 8 pieces hot dogs beef or pork hot dogs
    • 1 can canned biscuit dough or pre-made dough sheets
    • little bits small candies or peppercorns for eyes

    Equipment

    • Baking Sheet
    • Parchment paper
    • Cooking spray
    • Knife
    • Small spoon or toothpick for eyes

    Method
     

    1. Preheat the oven to 375°F (190°C) and line a baking sheet with parchment paper. Lightly spray the paper with cooking spray to prevent sticking.
    2. Unroll the biscuit dough and cut it into thin strips, about 1/4-inch wide. This creates the bandage strips for the mummy wrapping.
    3. Wrap each hot dog tightly with the dough strips, overlapping as needed to resemble a bandaged mummy. Leave a small space at the top for the face.
    4. Place the wrapped hot dogs on the prepared baking sheet, spacing them evenly apart. Gently press small candies or peppercorns onto the top for the eyes.
    5. Bake in the preheated oven for about 12-15 minutes, or until the dough is golden brown and crispy. Check often to avoid over-browning.
    6. Remove from the oven and let cool slightly. Serve warm, allowing the crispy, bandaged appearance to surprise and delight your guests.

    Notes

    For extra spookiness, use edible food markers to draw spooky faces on the bandages before baking.
    As the oven chatters away and everyone gathers around the table, these mummy hot dogs add a playful touch to the evening. They’re a reminder that food can be fun, creative, and a little mischievous.

    Enjoy crafting these little spooky creatures and watch as they become the highlight of your Halloween spread. Sometimes, the simplest recipes bring the biggest smiles and the best memories.

  • Spooky Delight: Halloween Stuffed Bell Pepper Jack-o’-Lanterns

    Spooky Delight: Halloween Stuffed Bell Pepper Jack-o’-Lanterns

    Halloween is the perfect time to let your creativity run wild in the kitchen. Instead of the usual candies and sweets, these stuffed bell peppers shaped like jack-o’-lanterns add a fun and savory twist to your celebrations. The aroma of roasted peppers with spiced filling fills the air, making your home feel festive and warm.

    Transforming ordinary peppers into glowing pumpkins turns dinner into a delightful spectacle. Kids and adults alike will marvel at how you brought spooky cheer to your table with just a few simple ingredients. It’s an easy, playful way to enjoy a veggie dish without sacrificing flavor or fun.

    Stuffed Jack-o’-Lantern Bell Peppers

    These stuffed bell peppers are carved to resemble miniature jack-o’-lanterns, filled with a flavorful spiced meat and rice mixture. Roasted until tender and slightly caramelized, they showcase a festive appearance with a savory filling inside crisp, roasted pepper shells, creating a playful and colorful presentation.
    Prep Time 20 minutes
    Cook Time 40 minutes
    Total Time 1 hour
    Servings: 4
    Course: Main Course
    Cuisine: American
    Calories: 350

    Ingredients
      

    • 4 large bell peppers preferably orange or yellow for festive look
    • 1 lb ground beef or turkey/chicken
    • 1 cup cooked rice white or brown
    • 1 small onion finely chopped
    • 2 cloves garlic minced
    • 1 teaspoon ground cumin
    • 1 teaspoon paprika
    • to taste salt and pepper
    • 2 tablespoons olive oil
    • 1 cup shredded cheese cheddar or mozzarella

    Equipment

    • Baking Sheet
    • Sharp Knife
    • Spoon
    • Mixing bowl
    • Small paring knife

    Method
     

    1. Preheat your oven to 375°F (190°C). Slice off the tops of the bell peppers and carefully scoop out the seeds and membranes, creating pumpkin-like cavities. Place the hollowed peppers upside down on a paper towel to drain excess moisture.
    2. Using a small paring knife, carve faces into the outer shells of the peppers to resemble jack-o’-lanterns, with eyes, nose, and a jagged mouth. Set aside.
    3. Heat olive oil in a skillet over medium-high heat. Add the chopped onion and minced garlic, cooking until fragrant and translucent, about 2-3 minutes. The mixture should smell savory and the onions slightly golden.
    4. Add the ground beef to the skillet, breaking it apart with a spoon, and cook until browned and cooked through, about 5-7 minutes. Drain excess fat if necessary.
    5. Stir in the cumin, paprika, salt, and pepper, letting the spices toast slightly and fill the air with warming aromas, about 1 minute.
    6. Fold in the cooked rice and shredded cheese into the meat mixture, mixing until evenly combined. The filling should be moist and flavorful, with melted cheese starting to bind everything together.
    7. Spoon the filling into each carved pepper, pressing gently to pack the mixture inside. Fill them generously almost to the top, encouraging a rounded, pumpkin-like shape.
    8. Arrange the stuffed peppers upright on a baking sheet lined with parchment paper. Bake in the preheated oven for about 35-40 minutes, until the peppers are tender and the filling is bubbling and slightly caramelized on top.
    9. Remove from the oven and let cool for a few minutes. The peppers will have softened and taken on a nice roasted, slightly charred appearance, enhancing their pumpkin-like look.
    10. Serve the jack-o’-lantern peppers warm, showcasing their carved faces and savory filling. Enjoy the playful presentation and hearty flavors.

    Notes

    You can customize the filling with other vegetables or seasonings to suit your taste. For extra spookiness, add small edible ‘candies’ or herbs to mimic pumpkin features.
    These Halloween stuffed bell pepper jack-o’-lanterns aren’t just cute—they’re also a satisfying, veggie-packed meal. Each bite offers a blend of smoky peppers and seasoned filling that’s perfect for celebrating the season.

    As the night falls and your porch lights flicker, your table will be lit by these cheerful, edible lanterns. Plus, they’re a charming conversation starter for any spooky gathering or family dinner during October. Happy haunting and happy cooking!

  • Spooky Delight: The Halloween Spider Cheese Ball

    Spooky Delight: The Halloween Spider Cheese Ball

    Halloween is the perfect time to embrace the playful chaos of food artistry. This Spider Cheese Ball turns simple cheese into a spooky centerpiece that walks the line between creepy and cute. Its crumbly texture invites you to dive in, chasing the indulgent flavor as it melts on your tongue.

    Crafting this recipe offers a delightful mix of nostalgia and creative chaos, a chance to unleash your inner munchkin. The smell of sharp cheddar mingling with the earthy hint of herbs makes the kitchen a scene of excited anticipation. Plus, it’s a crowd-pleaser for both kids and adults craving a little culinary mischief.

    Spider Cheese Ball

    The Spider Cheese Ball is a savory cheese spread shaped into a rounded form and decorated to resemble a spider with web-like details. It has a crumbly yet creamy texture, with a rich cheesy flavor enhanced by herbs, making it an eye-catching appetizer. The final presentation features a spherical cheese center with spider legs and web accents crafted from edible ingredients.
    Prep Time 20 minutes
    Total Time 20 minutes
    Servings: 8
    Course: Main Course
    Cuisine: American
    Calories: 150

    Ingredients
      

    • 8 oz cream cheese, softened
    • 1 cup shredded sharp cheddar cheese
    • 2 tbsp chopped fresh herbs (parsley, chives, or thyme)
    • 1 tsp garlic powder
    • to taste Salt and pepper
    • 10 pretzel sticks or breadsticks pretzel sticks for spider legs
    • 3 black olives or peppercorns eyes for the spider
    • 2 tbsp tomato sauce or red pepper jelly for spider web decoration

    Equipment

    • Mixing bowl
    • Hand mixer or spoon
    • Plastic wrap
    • Serving platter
    • Pretzel sticks or breadsticks
    • Olives or black peppercorns

    Method
     

    1. In a mixing bowl, combine the softened cream cheese and shredded cheddar until well blended and smooth, using a spatula or hand mixer. This creates a creamy, cheesy base for your sphere.
    2. Mix in chopped herbs and garlic powder to add flavor and a touch of color, then season with salt and pepper to taste. Fold everything together until evenly incorporated.
    3. Gather the cheese mixture onto a large piece of plastic wrap and shape it into a tight ball or oval, pressing gently to firm up the shape. Wrap it tightly and refrigerate for at least 15 minutes to set.
    4. Unwrap the chilled cheese ball and place it on a serving platter. Use a spatula to smooth the surface if needed.
    5. Insert pretzel sticks into the sides of the cheese ball to form spider legs, arranging them evenly around the sides for a balanced look. Press gently so they stay embedded.
    6. Slice the olives or peppercorns in half and place two as eyes on the front of the cheese ball, positioning them to give your spider a cute face.
    7. Using a small spoon, drizzle tomato sauce or red pepper jelly across the top of the cheese ball in concentric circles or a web pattern to mimic a spider web design.
    8. If desired, add extra web details by piping additional sauce or jelly for more intricate web patterns.
    9. Arrange the completed spider cheese ball on a platter, place the pretzel legs outward, and ensure eyes are visible for a playful, spooky effect.
    10. Serve immediately with additional pretzels, crackers, or vegetables for dipping, or refrigerate until ready to enjoy.

    Notes

    For a more textured look, lightly crush some nuts or herbs and sprinkle on top before serving.

    This Halloween treat isn’t just about aesthetics. It’s a fun way to bring friends together around the table, sharing laughs and spooky bites. When the day winds down, this cheese ball remains a conversation starter and a reminder of how playful cooking can be.

    So gather your ingredients and let your imagination run wild. This Spider Cheese Ball is sure to become a memorable part of your spooky celebrations—messy, joyful, and delicious to the last bite.

  • Spooky Delights: Halloween Deviled Egg Eyeballs

    Spooky Delights: Halloween Deviled Egg Eyeballs

    As a food blogger obsessed with all things spooky, I love transforming classic snacks into creepy Halloween treats. These deviled egg eyeballs are a perfect example, blending familiar flavors with a touch of graphically horrifying fun. The moment I unveil them at parties, I hear delighted squeals and see wide-eyed reactions.

    Creating edible eyeballs was initially a joke my friends loved, but now it’s a seasonal tradition. The tactile experience of slicing into these egg-eyes, revealing their vividly colored centers, elevates any festive table. Plus, they’re surprisingly easy to whip up once you have the ingredients ready.

    Deviled Egg Eyeballs

    Deviled egg eyeballs are a spooky Halloween appetizer featuring halved boiled eggs filled with a savory, creamy yolk mixture. The finished dish resembles bloodshot eyeballs with vividly colored centers, combining smooth textures with a striking visual effect.
    Prep Time 15 minutes
    Cook Time 10 minutes
    Total Time 25 minutes
    Servings: 12
    Course: Main Course
    Cuisine: Halloween
    Calories: 70

    Ingredients
      

    • 6 large eggs for boiling
    • 2 tablespoons mayonnaise adds creaminess
    • 1 teaspoon yellow mustard for tangy flavor
    • 1/4 teaspoon paprika optional, for color
    • few drops red food coloring for bloodshot appearance
    • 1 small olive for the

    Equipment

    • Saucepan
    • Mixing bowl
    • Slotted spoon
    • Piping bag or plastic sandwich bag
    • Small spoon
    • Knife

    Method
     

    1. Place the eggs in a saucepan and cover with cold water. Bring to a boil over medium-high heat, then turn off the heat and cover. Let sit for 10 minutes to cook through, then transfer to ice water to cool completely.
    2. Peel the cooled eggs carefully, then slice each egg in half lengthwise. Gently remove the yolks and place them in a mixing bowl.
    3. Mash the yolks with mayonnaise, mustard, and a pinch of paprika until smooth and creamy. The mixture should be thick but spreadable.
    4. Add a few drops of red food coloring to the yolk mixture, stirring until the center appears vividly red, mimicking an eyeball “pupil.”
    5. Spoon the red-colored yolk mixture into a piping bag or plastic sandwich bag fitted with a small tip. Pipe or spoon the mixture back into the hollowed egg whites, filling them fully.
    6. Slice the olive into tiny rounds to create realistic pupils. Carefully place an olive slice in the center of each filled egg half.
    7. Using strips of red bell pepper, create bloodshot “veins” by placing small bits across the egg whites around the pupils for a bloodshot eye effect.
    8. Arrange the egg halves on a serving platter. Optionally, sprinkle with extra paprika for color or add more red accents for a more realistic bloodshot look.
    9. Chill the deviled egg eyeballs in the refrigerator for 10-15 minutes to set and serve chilled for a spooky, creepy presentation.

    Notes

    You can customize the bloodshot effect with more or fewer red accents or different colored centers for a variety of spooky looks.
    These creepy but delightful deviled egg eyeballs are more than just a festive dish; they tell a story of simple ingredients turned into a visual scare. Whether for a Halloween party or a themed dinner, they bring both joy and a little chaos.

    Making these was a reminder that food is best when it surprises and delights. They’re a conversation-starting centerpiece that’s as fun to eat as they are to craft. Who knew something so ghoulish could be so delicious?

  • Spooky Bats & Guacamole: A Halloween Snack with a Twist

    Spooky Bats & Guacamole: A Halloween Snack with a Twist

    Every October, I get that itch to create something playful and a little bit daring in the kitchen. This Halloween Guacamole with Tortilla Chips shaped as bats transforms a simple dip into a creepy-cute centerpiece. The aroma of ripe avocados mixed with zesty lime and garlic fills my kitchen, hinting at the fun to come.

    Using just a few ingredients, I craft a vibrant green guacamole that’s both beautifully spooky and irresistibly tasty. The crunchy bat-shaped tortilla chips add a delightful texture contrast, making it perfect for party snacking. It’s a cheerful way to bring a burst of color and chaos to any Halloween gathering.

    Halloween Guacamole with Bat-Shaped Tortilla Chips

    This guacamole features ripe mashed avocados blended with lime, garlic, and seasonings to create a creamy, vibrant green dip. The final presentation includes bat-shaped tortilla chips that add a playful, crunchy element, perfect for festive gatherings. The dish combines smooth textural contrast with bold colors for a fun, eye-catching appetizer.
    Prep Time 15 minutes
    Total Time 15 minutes
    Servings: 8
    Course: Main Course
    Cuisine: American
    Calories: 150

    Ingredients
      

    • 3 ripe avocados halved, pitted
    • 1 lime lime for juice
    • 2 cloves garlic minced
    • 0.5 teaspoon salt
    • 1 tablespoon olive oil
    • 6 small tortilla chips for shaping into bats and serving

    Equipment

    • Mixing bowl
    • Fork or potato masher
    • Lime juicer
    • Knife
    • Cutting Board
    • Baking Sheet
    • Parchment paper

    Method
     

    1. Scoop the ripe avocados into a mixing bowl and mash them with a fork or potato masher until smooth but slightly chunky for texture.
    2. Juice the lime over the mashed avocados to add zest and help prevent browning, then stir in the minced garlic, salt, and olive oil for flavor.
    3. Mix everything until well combined and the guacamole is bright green, creamy, and slightly textured.
    4. Preheat your oven to 350°F (175°C). Using parchment paper, place the tortilla chips on a baking sheet in a single layer.
    5. Arrange the tortilla chips into bat shapes, using cookie cutters or freehand cutting to create wings and bodies for a spooky effect.
    6. Bake the shaped chips for about 10 minutes or until crispy and golden brown, watching carefully to prevent burning.
    7. Remove the chips from the oven and let them cool slightly so they become crunchy.
    8. Serve the guacamole in a bowl with the crunchy bat-shaped tortilla chips arranged around or on top for a playful presentation.

    Notes

    For extra fun, decorate the bat chips with small edible eyes or add a drizzle of sour cream for more contrast.

    Creating these bat-shaped chips is as fun as eating them, especially with kids or anyone young at heart. The blend of creamy guacamole and crispy chips makes every bite festive and satisfying. I love how a simple idea can turn into a memorable, Instagram-worthy moment.

    Come Halloween night, this colorful dip will definitely steal the spotlight. It’s a playful reminder that food is best when it’s a little spooky and a lot delicious. Plus, it’s a perfect way to celebrate the season with a touch of culinary chaos.

  • Spooky and Cute: The Halloween Ghost Veggie Platter That Will Charm Every Guest

    Spooky and Cute: The Halloween Ghost Veggie Platter That Will Charm Every Guest

    Halloween is not just about costumes and candy; its also about creative, spooky snacks that bring the celebration to life. This year, I wanted to share a veggie platter thats as adorable as it is creepy, perfect for both kids and adults. The key? Using simple ingredients to craft ghosts that seem to float right off your cutting board.

    Creating the Ghost Veggie Platter is an exercise in playful presentation. It transforms ordinary vegetables into spooky specters, with a dash of humor and a sprinkle of seasonal charm. Plus, it offers a healthy alternative that doesns fun for everyone around the table; no more guilt over greasy dips or processed snacks.

    Ghost Veggie Platter

    The Ghost Veggie Platter features fresh vegetables crafted into spooky ghost shapes using cheese and olives for added detail. The vegetables are arranged on a platter to resemble floating ghosts with playful facial features, creating a fun and healthy Halloween snack. The final presentation has a whimsical, eerie appearance perfect for parties or gatherings.
    Prep Time 15 minutes
    Total Time 15 minutes
    Servings: 4
    Course: Main Course
    Cuisine: Halloween
    Calories: 50

    Ingredients
      

    • 2 cups carrot sticks for the ghost bodies
    • 1 cup cauliflower florets to add volume for the ghost heads
    • 12 small black olives for eyes and mouths
    • 4 ounces mozzarella cheese cut into small round discs for facial features

    Equipment

    • Cutting Board
    • Chef’s knife
    • Serving platter

    Method
     

    1. Arrange the cauliflower florets on the platter in small clusters to serve as the heads of the ghosts.
    2. Cut the carrot sticks into long, thin strips that will serve as the ghost bodies, and position them upright behind the cauliflower heads.
    3. Slice the mozzarella cheese into tiny rounds to create eyes and mouths for each ghost.
    4. Place two small mozzarella rounds onto each cauliflower head as eyes, pressing gently so they adhere.
    5. Use half a black olive for each mouth, pressing it onto the cauliflower to give each ghost a spooky smile or expression.
    6. Arrange additional black olives on the cauliflower heads to resemble pupils if desired, or to add extra detail to the faces.
    7. Adjust the carrot sticks so they remain straight and slightly curved to look like floating ghostly apparitions.
    8. Repeat the process for all cauliflower heads and carrot bodies, creating a whimsical floating ghost scene on your platter.
    9. Serve immediately or refrigerate briefly to help the faces set before display.

    Notes

    Feel free to add additional facial expressions with different olive shapes or cheese cuts for more variety.
    This ghostly veggie arrangement adds a whimsical touch to any Halloween gathering, sparking smiles and conversation. Its as much a feast for the eyes as it is for the taste buds, with fresh, crunch signals packed into each spooky figure.

    Even if your kitchen skills arent legendary, this platter is forgiving and fun to make. And best of all, it keeps the healthy vibe alive amid all the sugary treats. So, when the ghosts are ready, gather your guests and let the haunting begin.

  • Spooky Spectacle: Halloween Eyeball Caprese Bites

    Spooky Spectacle: Halloween Eyeball Caprese Bites

    Halloween is the perfect time to indulge in playful, eye-catching treats that spark both joy and a little chill. These Eyeball Caprese Bites turn simple mozzarella balls and cherry tomatoes into creepy perfect eyeballs that seem almost alive. The burst of basil pesto and balsamic glaze adds a ghoulishly delicious flavor that will turn any party into a spooky spectacle.

    What I love about this recipe is its unexpected mix of freshness and fright, all in one tiny bite. They’re absurdly easy to assemble, making them a great project for last-minute holiday prep. Plus, the vibrant reds, whites, and greens look so spooky and inviting on a platter — like Halloween magic made edible.

    Eyeball Caprese Bites

    These Eyeball Caprese Bites consist of mozzarella balls topped with cherry tomatoes, creating a spooky-eyed appearance. The bites are finished with basil pesto and a drizzle of balsamic glaze, resulting in a fresh, creamy, and tangy appetizer with a visually striking presentation.
    Prep Time 15 minutes
    Total Time 15 minutes
    Servings: 8
    Course: Main Course
    Cuisine: American
    Calories: 80

    Ingredients
      

    • 8 pieces mozzarella balls about the size of a cherry tomato
    • 8 pieces cherry tomatoes small and round
    • 2 tbsp basil pesto for topping
    • 1 tbsp balsamic glaze for drizzling
    • 8 small small fresh basil leaves optional garnish

    Equipment

    • Toothpicks or small skewers
    • Small spoon or piping bag for sauces
    • Plate or serving tray

    Method
     

    1. Arrange mozzarella balls on a serving tray, spacing them evenly apart.
    2. Place a cherry tomato on top of each mozzarella ball, pressing gently to secure it as the ‘eyeball’.
    3. Using a small spoon or piping bag, carefully add a small dollop of basil pesto onto the top of each cherry tomato, creating the iris of the eyeball.
    4. Drizzle balsamic glaze over each eyeball bite, mimicking a bloodshot or dripping effect to add a spooky touch.
    5. If desired, garnish each with a small basil leaf to enhance the eerie look and add fresh aroma.
    6. Serve immediately for the freshest appearance and enjoy these spooky, bite-sized treats.

    Notes

    For an extra creepy effect, you can add a tiny black olive as the pupil in the basil pesto.
    As the night falls and creepy costumes fill the streets, these eyeball bites add a dash of fun and flair to your celebration. They’re not just a party game but a conversation starter, blending chaos and charm effortlessly.

    Whether you’re hosting a spooky soirée or just looking to brighten up your Halloween snack table, these bites deliver impact with minimal effort. The combination of tangy pesto and sweet cherry tomatoes will keep your guests guessing and craving more, long after the night’s costumes come off.