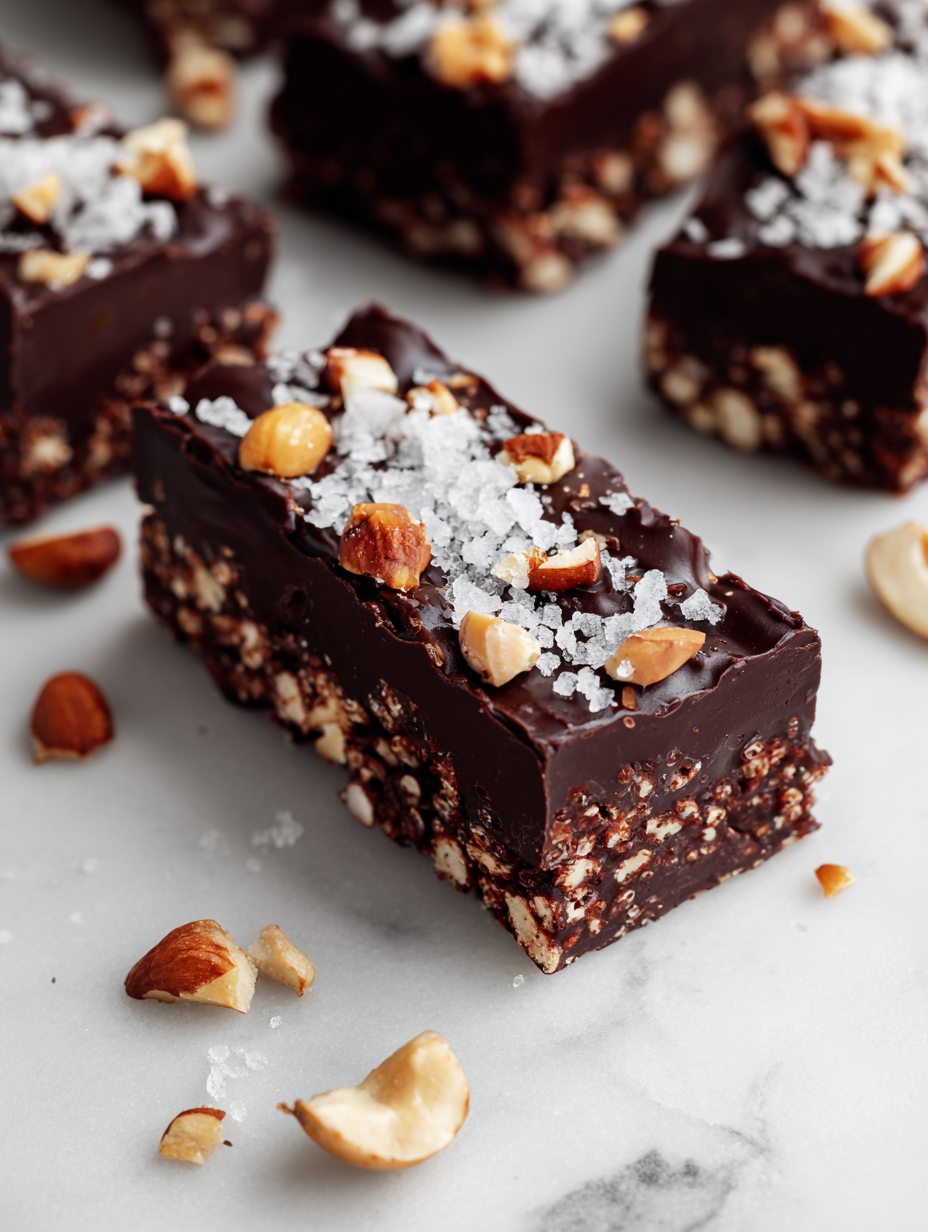
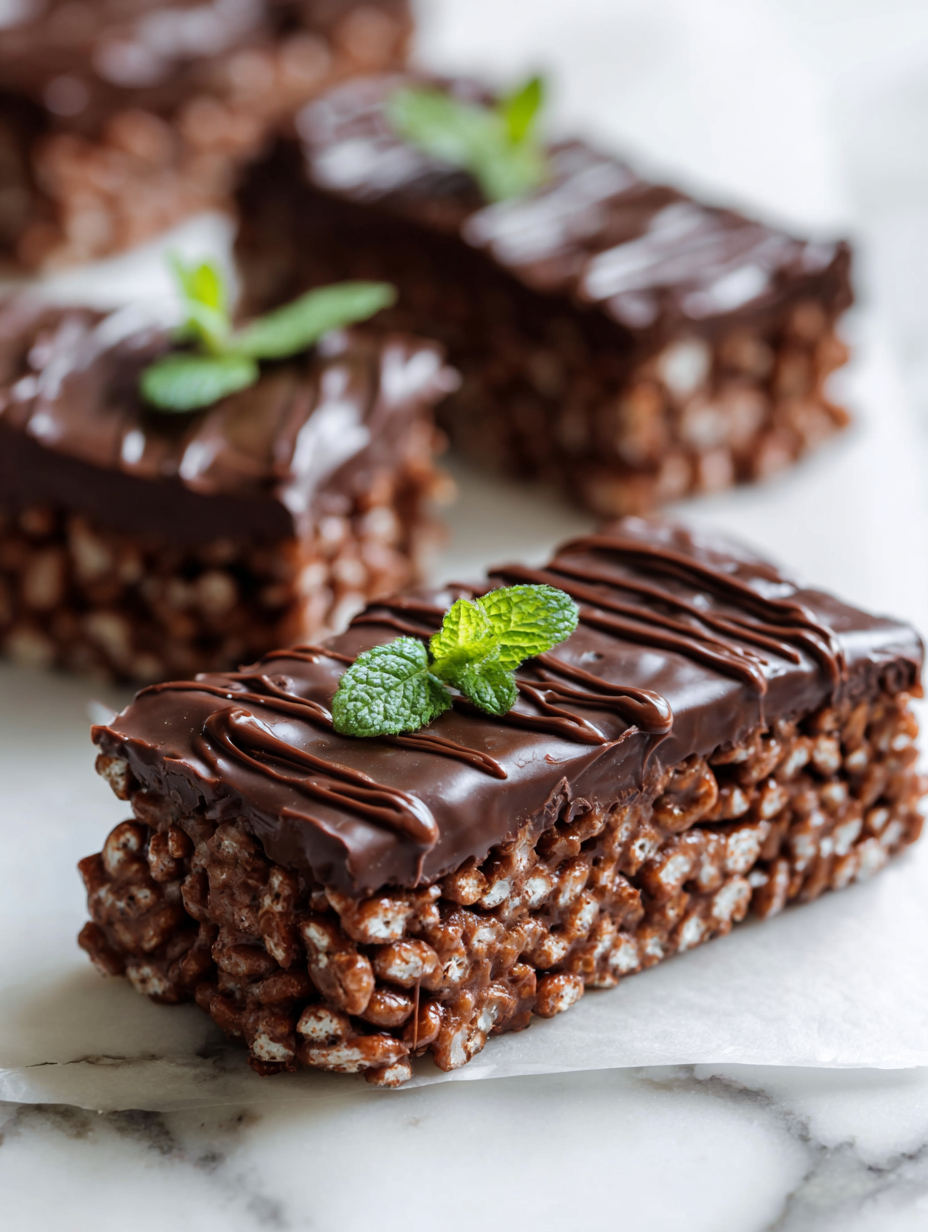
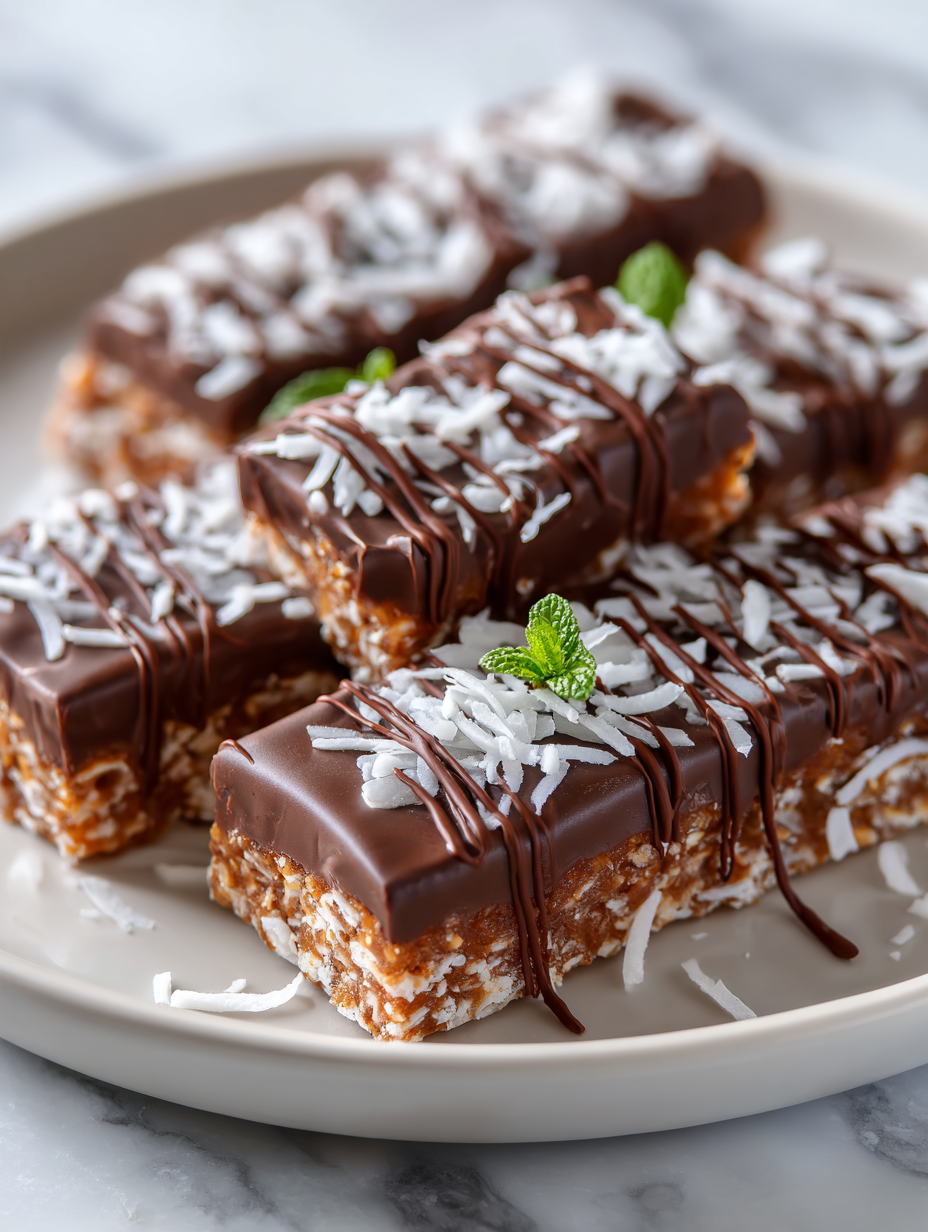
Category: Desserts

  • Spooky Spider Web Cake: A Halloween Showstopper

    Spooky Spider Web Cake: A Halloween Showstopper

    Halloween is the perfect time to embrace playful chaos in the kitchen. Imagine a cake that not only tastes delicious but also acts as a visual trick, mimicking a creepy spider web. This Spider Web Cake combines sweet, moist layers with intricate web patterns made of royal icing, turning your dessert into a haunting masterpiece.

    Decorating this cake feels like weaving a spider’s web — a bit messy but utterly satisfying. It’s a delightful challenge that rewards you with oohs, and aahs from friends and family. Plus, the smell of vanilla and chocolate wafting through your home sets the perfect Halloween mood.

    Spider Web Cake

    This Spider Web Cake features moist vanilla and chocolate cake layers decorated with intricate royal icing web patterns. The cake’s appearance resembles a creepy spider web, creating a striking centerpiece for Halloween. Its tender crumb and sweet frosting make it both visually impressive and delicious.
    Prep Time 30 minutes
    Cook Time 40 minutes
    Total Time 1 hour 10 minutes
    Servings: 12
    Course: Main Course
    Cuisine: Halloween
    Calories: 450

    Ingredients
      

    • 2 cups all-purpose flour sifted
    • 1 1/2 cups granulated sugar
    • 1/2 cup unsalted butter softened
    • 1 cup milk room temperature
    • 3 large eggs at room temperature
    • 2 teaspoons vanilla extract
    • 1 1/2 cups unsweetened cocoa powder sifted
    • 2 cups powdered sugar for royal icing
    • 2 tablespoons meringue powder or egg white powder
    • 4 cups confectioners’ sugar
    • 1/4 cup water for royal icing

    Equipment

    • Mixing bowls
    • Electric mixer
    • Cake pans
    • Cooling rack
    • Piping bags
    • Round piping tips (small)

    Method
     

    1. Preheat your oven to 350°F (175°C). Grease and flour two 9-inch round cake pans to prevent sticking.
    2. In a large mixing bowl, beat the softened butter and sugar together until light and fluffy, about 3–4 minutes. The mixture should look pale and creamy.
    3. Add eggs one at a time, beating well after each addition to incorporate air and ensure a smooth batter.
    4. Stir in the vanilla extract for a fragrant aroma.
    5. In a separate bowl, sift together the flour, cocoa powder, and baking soda. Gradually add this dry mixture to the wet ingredients, alternating with milk, beginning and ending with dry ingredients. Mix until just combined.
    6. Divide the batter evenly between the prepared pans and smooth the tops with a spatula. Bake for 35–40 minutes, or until a toothpick inserted into the center comes out clean.
    7. Remove the cakes from the oven and let them cool in the pans for 10 minutes. Then, transfer to a wire rack and cool completely before frosting.
    8. In a mixing bowl, combine the powdered sugar, meringue powder, and confectioners’ sugar. Slowly add water and beat with an electric mixer until stiff peaks form, about 7 minutes. This royal icing should be thick and glossy.
    9. Transfer the royal icing into piping bags fitted with small round tips. Tint the icing black if desired for contrast.
    10. Place one cake layer on a serving plate and spread a thin layer of frosting or icing if desired. Top with the second layer, then cover the entire cake with a smooth layer of frosting.
    11. Using the piping bag, carefully draw concentric circles with the royal icing on the top of the cake. Then, drag a toothpick from the center outward through the circles to create a web pattern.
    12. Allow the decorated cake to set for a few minutes, then serve and enjoy your spooky, web-themed Halloween treat!

    Notes

    You can prepare the royal icing a day ahead and keep it covered at room temperature. For added effect, pipe tiny spiders or decorative elements on the web pattern.
    Once the web is perfectly spun, this cake becomes the highlight of any celebration. It’s a fun project that sparks creativity and a love of baking. Plus, it keeps the spirit of Halloween alive with every slice you serve.

    Whether you’re hosting a party or just craving some seasonal baking, this Spider Web Cake adds a touch of spooky charm. It’s a reminder that treats can be both beautiful and delicious, a sweet symbol of the season’s playful spirit.

  • Sun-Kissed Peach Crumble: A Summer’s Warm Embrace

    Sun-Kissed Peach Crumble: A Summer’s Warm Embrace

    As summer winds down and markets brim with ripe peaches, I find myself craving a dessert that captures their juicy sweetness in every bite. This peach crumble isn’t just about comfort; it’s a celebration of the fleeting season’s bounty, crafted with a hint of chaos and a lot of love. The scent of caramelizing peaches mingling with toasted oats is a nostalgic reminder of childhood afternoons and lazy Sunday afternoons.

    Few desserts combine simplicity with such rustic charm. The crispy topping contrasts beautifully with the soft, fragrant fruit beneath. Each forkful releases a burst of sunshine, making it perfect for casual family gatherings or a solo moment of bliss. Let’s embrace the warmth and the mess that makes this recipe truly ours.

    Peach Crumble

    This peach crumble features ripe peaches baked under a crispy oat topping. The dish involves mixing sliced peaches with sugar and lemon juice, then topping them with a buttery, oat-based crumble before baking until golden and bubbly. The final presentation has a warm, rustic appearance with a crunchy topping and soft, fragrant fruit inside.
    Prep Time 15 minutes
    Cook Time 40 minutes
    Total Time 55 minutes
    Servings: 6
    Course: Main Course
    Cuisine: American
    Calories: 320

    Ingredients
      

    • 4 cups ripe peaches, sliced pitted and peeled
    • 0.5 cup granulated sugar
    • 1 tablespoon fresh lemon juice to enhance peach flavor
    • 1 cup rolled oats
    • 1 cup all-purpose flour
    • 0.75 cup brown sugar
    • 1 cup unsalted butter, cold and cubed
    • 0.5 teaspoon salt
    • 1 teaspoon vanilla extract

    Equipment

    • Mixing bowls
    • Baking dish
    • Pastry cutter or fork
    • Measuring cups and spoons

    Method
     

    1. Preheat your oven to 375°F (190°C). Grease a baking dish and set aside.
    2. In a large mixing bowl, gently toss the sliced peaches with granulated sugar and fresh lemon juice until well coated. Spread them evenly in the prepared baking dish.
    3. In another bowl, combine rolled oats, all-purpose flour, brown sugar, salt, and vanilla extract. Mix briefly to distribute evenly.
    4. Add the cold, cubed butter to the dry ingredients. Using a pastry cutter or fork, cut the butter into the mixture until it forms coarse crumbs with pea-sized pieces. This creates a flaky, crumbly topping.
    5. Sprinkle the crumble mixture evenly over the peaches, covering them completely.
    6. Place the baking dish in the preheated oven and bake for about 40 minutes, or until the topping is golden brown and bubbling around the edges.
    7. Remove the peach crumble from the oven and let it cool slightly. The aroma of baked peaches and toasty oats will fill your kitchen.
    8. Serve the warm crumble with a scoop of vanilla ice cream or a dollop of whipped cream, if desired, and enjoy the juicy, crunchy contrast.

    Notes

    For extra flavor, add a pinch of cinnamon or nutmeg to the crumble topping.

    Creating this peach crumble during the late summer feels like sealing a warm memory in flaky, fruity layers. It’s a dish that invites chaos in the best way, with juices bubbling over and oats crunching under a spoon. Celebrating seasonal produce like this keeps cooking honest and exciting, especially when peaches are at their sweetest and juiciest.

    Enjoy this dessert fresh from the oven, paired with a scoop of vanilla ice cream or a dollop of whipped cream. It’s a simple pleasure that knows no fuss — just the joy of sweet, caramelized fruit and a satisfying crunch. Sometimes, the unpolished moments are what make a recipe truly memorable.

  • Eerie Elegance: Halloween Ghost Brownies to Spook Your Sweets

    Eerie Elegance: Halloween Ghost Brownies to Spook Your Sweets

    Every October, I find myself hunting for treats that are not only delicious but also delightfully spooky. This year, I stumbled upon a peculiar inspiration: transforming classic brownies into ghostly apparitions that haunt your taste buds. It’s a whimsical project that combines the rich, chocolatey comfort we all crave with creepy, charming aesthetics.

    Creating these Halloween Ghost Brownies isn’t just about decorating; it’s about embracing the chaos and nostalgia of childhood costume parties. The smell of melting chocolate mingles with the playful anticipation of biting into a ghost’s round, sugary face. These treats turn any party into a spectral spectacle, with smiles guaranteed for both kids and adults alike.

    Halloween Ghost Brownies

    These ghostly brownies are made with rich, fudgy chocolate batter baked until moist and dense. Once cooled, they are decorated with sugary faces to resemble spooky ghosts, creating a fun and festive Halloween treat. The final appearance features shiny, crackly tops with cute, smiling or spooky ghost faces on each brownie.
    Prep Time 20 minutes
    Cook Time 25 minutes
    Total Time 45 minutes
    Servings: 12
    Course: Main Course
    Cuisine: American
    Calories: 230

    Ingredients
      

    • 1/2 cup unsalted butter melted
    • 1 cup granulated sugar
    • 2 large eggs
    • 1 teaspoon vanilla extract
    • 1/3 cup unsweetened cocoa powder sifted
    • 1/2 cup all-purpose flour
    • 1/4 teaspoon baking powder
    • 1/4 teaspoon salt
    • 1 cup chocolate chips semisweet or dark optional, for added richness
    • sugar powder and white chocolate or icing for decorating faces or edible markers

    Equipment

    • Mixing bowls
    • Spatula
    • 9×13 inch baking pan
    • Parchment paper
    • Cooling rack
    • Food-safe marker or melted white chocolate for faces

    Method
     

    1. Preheat your oven to 350°F (175°C). Line a 9×13-inch baking pan with parchment paper for easy removal.
    2. In a large mixing bowl, whisk together the melted butter and granulated sugar until smooth and glossy.
    3. Add the eggs one at a time, beating well after each addition to incorporate the eggs fully into the mixture.
    4. Stir in the vanilla extract, then sift the cocoa powder over the wet ingredients, folding gently until the mixture is uniform and shiny.
    5. In a separate bowl, combine the flour, baking powder, and salt. Gradually fold the dry ingredients into the chocolate mixture, just until blended.
    6. Stir in the chocolate chips if using, spreading them evenly through the batter for extra chocolatey pockets.
    7. Pour the batter into the prepared pan and spread evenly with a spatula. Bake for 25 minutes, or until the edges are set but the center remains moist when tested with a toothpick.
    8. Remove from the oven and let the brownies cool completely on a cooling rack. Once cooled, lift out of the pan and cut into 12 squares.
    9. Use edible markers, white chocolate, or icing to draw spooky ghost faces on each brownie. Make large, friendly eyes and wide mouths for a playful look.
    10. Arrange the decorated brownies on a platter and prepare to serve these charming Halloween treats at your party.

    As the night winds down, these ghostly treats linger in the air, their sweet aroma a final nod to the season’s magic. They’re perfect for parties or simply a fun weekend baking adventure that pays homage to all things spooky and sweet. Whatever the occasion, these brownies create a moment of joy and a dash of horror—just right for Halloween’s playful spirit.

    In the end, baking these ghostly goodies reminds us that celebration often lives in the little chaos of colors, textures, and flavors. Plus, they make a striking centerpiece that’s as much a conversation starter as a dessert. Here’s to a fun, festive, and delightfully creepy Halloween!

  • Spooky Good Witch Finger Cookies for a Haunted Halloween

    Spooky Good Witch Finger Cookies for a Haunted Halloween

    Halloween baking often leans on the spooky and the sweet, but these Witch Finger Cookies add a chilling touch with their disturbingly realistic appearance. As I rolled the dough, the aroma of toasted almonds and vanilla filled the kitchen, creating a cozy contrast to the eerie look. The best part? Watching these tiny fingers seem to come alive before my eyes.

    These cookies are perfect for those who love a little chaos on their platter—crunchy, nutty, and surprisingly easy to make. They offer a moment of playful horror that kids and adults alike will adore. They’re just the right balance of creepy and delicious, making your Halloween spread truly memorable.

    Witch Finger Cookies

    These Witch Finger Cookies are nutty, crunchy treats crafted from a rich dough that is shaped into thin, finger-like cookies. Once baked, they develop a golden-brown exterior with realistic knuckles and nails, resembling spooky, gnarled fingers perfect for Halloween parties. Their crisp texture and detailed appearance make them a fun and eerie addition to any spooky spread.
    Prep Time 30 minutes
    Cook Time 15 minutes
    Total Time 45 minutes
    Servings: 24
    Course: Main Course
    Cuisine: Halloween
    Calories: 180

    Ingredients
      

    • 1 cup unsalted butter softened
    • 1 cup granulated sugar
    • 1 large egg large
    • 1 teaspoon vanilla extract
    • 2 1/2 cups all-purpose flour sifted
    • 1/2 cup ground almonds for flavor and texture
    • 1/4 teaspoon almond extract
    • an appropriate amount none almonds or edible nails for fingernails
    • optional none red gel food coloring for blood effect on nails
    • as needed none cornstarch for dusting and shaping

    Equipment

    • Mixing bowls
    • Baking Sheet
    • Parchment paper
    • Knife or almond for nails
    • Fork or toothpick for knuckles

    Method
     

    1. Cream together the softened butter and granulated sugar in a large bowl until the mixture is light and fluffy, and smells sweet and buttery.
    2. Add the egg and vanilla extract, then beat until well incorporated and the mixture is smooth.
    3. Gradually fold in the sifted flour, ground almonds, and almond extract, stirring until a soft dough forms.
    4. Transfer the dough onto a lightly floured surface dusted with cornstarch, and knead it gently until it’s firm but pliable.
    5. Divide the dough into small portions and roll each portion into a thin, elongated finger shape—about 4 inches long and very slender.
    6. Using a knife or an almond, press a fingernail-shaped cut into one end of each finger, and use a fork or toothpick to create knuckle indentations along the finger for realism.
    7. If desired, dab a tiny bit of red gel food coloring onto the nail end to mimic blood or bruising.
    8. Place the shaped cookies onto a parchment-lined baking sheet, spacing them well apart as they expand slightly in baking.
    9. Bake in a preheated oven at 350°F (175°C) for about 12-15 minutes, until they turn a light golden brown and look slightly cracked, like real fingers.
    10. Remove from the oven and let cool on the baking sheet for a few minutes to firm up.
    11. Transfer the cookies to a wire rack to cool completely. The cracks and knuckles will give them a realistic, creepy look.
    12. Enjoy these crunchy, realistic Witch Finger Cookies that are perfect for Halloween, adding a spooky touch to any dessert table.
    As the last finger crumbles on the plate, I feel a rush of pride. These cookies aren’t just treats; they’re conversation starters, story tellers, that add a dash of spooky magic to the night. Plus, they remind me that baking can be both fun and fatally adorable.

    This year, I plan to make these again, maybe with a splash of red jam for a bloody effect or extra almond for that haunting aroma. Halloween is fleeting, but the memories—and the slightly freaked-out friends—stick around longer. Happy haunting, and happy baking.

  • Unexpected Pumpkin Bread Hack: A Toasted Twist You'll Adore

    Unexpected Pumpkin Bread Hack: A Toasted Twist You'll Adore

    When I first baked pumpkin bread, I was enchanted by its moist crumb and spiced aroma that wafted through my kitchen. But I wanted to take it a step further, adding a little surprise that elevates the experience. Instead of just slicing and serving, I found myself toasting pieces for a crispy, caramelized edge that enhances every bite.

    This approach turns an ordinary loaf into a multi-layered treat, perfect for breakfast or an afternoon snack. It’s wonderful how a simple change—like toasting—can redefine something so familiar. Believe me, it’s like discovering your favorite flavor all over again, but with a little extra crunch.

    Toasted Pumpkin Bread Slices

    This recipe involves baking a moist pumpkin bread infused with warm spices, then slicing it and toasting the pieces until they develop a crispy, caramelized edge. The final result features a tender crumb with a golden-brown, crunchy exterior, ideal for breakfast or a snack with added flavor and texture contrast.
    Prep Time 15 minutes
    Cook Time 1 hour
    Total Time 1 hour 15 minutes
    Servings: 8
    Course: Main Course
    Cuisine: American
    Calories: 210

    Ingredients
      

    • 2 cups all-purpose flour sifted
    • 1 cup granulated sugar
    • 1/2 cup unsalted butter melted
    • 1 cup canned pumpkin purée
    • 3 large eggs
    • 1 1/2 teaspoons baking soda
    • 2 teaspoons ground cinnamon
    • 1/2 teaspoon ground nutmeg
    • 1/2 teaspoon salt

    Equipment

    • Mixing bowls
    • Loaf pan
    • Wire rack
    • Toaster or oven

    Method
     

    1. Preheat your oven to 350°F (175°C) and grease a standard loaf pan. In a large mixing bowl, whisk together the sifted flour, baking soda, ground cinnamon, nutmeg, and salt until evenly combined.
    2. In a separate bowl, beat the eggs, then mix in the melted butter, pumpkin purée, and granulated sugar until the mixture is smooth and slightly frothy.
    3. Pour the wet mixture into the dry ingredients and gently fold everything together with a spatula until just combined. Be careful not to overmix; the batter will be thick and moistened.
    4. Pour the batter into the prepared loaf pan, spreading it evenly with a spatula. Bake in the oven for about 55-60 minutes, or until a toothpick inserted into the center comes out clean.
    5. Remove the loaf from the oven and let it cool in the pan for 10 minutes. Then transfer it onto a wire rack and allow it to cool completely before slicing.
    6. Once cooled, use a sharp serrated knife to slice the pumpkin bread into 1/2-inch thick pieces. Arrange the slices on a baking sheet or cooling rack.
    7. Preheat your toaster or oven to 375°F (190°C). Place the slices in the toaster or on a baking sheet and toast for about 3-4 minutes until the edges turn golden brown and become crispy.
    8. Remove the toasted slices from the heat once they are crispy and fragrant. Serve immediately with your favorite toppings like butter, cream cheese, or jam.

    As the leaves turn and pumpkin season arrives, this bread becomes my go-to baking project. Its warm spices and subtle sweetness evoke cozy mornings and spirited gatherings. I love how easy it is to prepare, yet it feels delightfully indulgent each time I bake it.

    Next time you find yourself with a little extra pumpkin puree, give this recipe a try. Whether eaten plain or topped with cream cheese, it’s a comforting treat that holds a special place on my seasonal table. Plus, the toasting step makes it irresistible for anyone who loves a hint of crunch in their baked goods.

  • Whimsical Pumpkin Cookie Secrets That Surprise and Delight

    Whimsical Pumpkin Cookie Secrets That Surprise and Delight

    As autumn leaves start to carpet the ground, I find myself craving more than just the usual pumpkin pie. Instead, I delve into making pumpkin cookies that bring a playful twist to seasonal festivities. These cookies are not just treats; they’re tiny spells of nostalgia and joy tucked into each bite.

    There’s something magical about the aroma they release—spicy, sweet, with a hint of warm pumpkin. Baking them feels like a cozy ritual, perfect for chilly mornings or lazy weekends. They’re more than a cookie; they’re a celebration of fall’s fleeting beauty.

    Pumpkin Cookies

    Pumpkin cookies are soft, chewy treats made with pureed pumpkin, warm spices, and butter or sugar, resulting in a moist and tender texture. The dough is typically rolled or scooped into rounds and baked until lightly golden with a fragrant aroma. They have a rustic appearance with a slightly cracked surface, showcasing their fall-inspired flavors.
    Prep Time 20 minutes
    Cook Time 12 minutes
    Total Time 32 minutes
    Servings: 24
    Course: Main Course
    Cuisine: American
    Calories: 150

    Ingredients
      

    • 1 1/2 cups all-purpose flour
    • 1 cup pure pumpkin puree
    • 1/2 cup granulated sugar
    • 1/2 cup brown sugar
    • 1/2 cup unsalted butter melted
    • 1 large egg
    • 1 1/2 teaspoons ground cinnamon
    • 1/2 teaspoon ground ginger
    • 1/4 teaspoon ground cloves
    • 1/2 teaspoon salt
    • 1/2 teaspoon baking soda

    Equipment

    • Mixing bowls
    • Baking Sheet
    • Parchment paper
    • Measuring cups and spoons
    • Cooling rack

    Method
     

    1. Preheat the oven to 350°F (175°C) and line a baking sheet with parchment paper.
    2. In a large mixing bowl, whisk together the melted butter, granulated sugar, and brown sugar until the mixture looks creamy and slightly fluffy.
    3. Add the egg to the bowl and whisk again until fully incorporated and the mixture is smooth.
    4. Stir in the pumpkin puree until evenly blended into the wet ingredients.
    5. In a separate bowl, whisk together the flour, spices, salt, and baking soda to ensure even distribution of dry ingredients.
    6. Gradually add the dry mixture to the wet ingredients, folding gently with a spatula until just combined and a thick dough forms.
    7. Using a tablespoon or cookie scoop, portion out the dough and place it onto the prepared baking sheet, spacing cookies about 2 inches apart.
    8. Gently flatten each dough ball with the back of a spoon or your fingers to create a round shape.
    9. Bake in the preheated oven for 10 to 12 minutes, or until the edges turn golden and the tops appear set.
    10. Remove the cookies from the oven and let them cool on the baking sheet for a few minutes before transferring to a cooling rack.
    11. Once cooled slightly, enjoy the cookies warm or at room temperature, noting their soft, moist, and slightly cracked tops.

    Sharing these pumpkin cookies feels like creating little moments of happiness. Each batch reminds me how simple ingredients can craft something unexpectedly delightful. Whether for a family gathering or a quiet evening, these cookies never fail to charm.

    As the season winds down, I’ll hold onto their warm scent and crumbly texture. They’re a slice of autumn I can keep in my pocket, long after the last leaf falls.

  • Resurrect the Spookiest Dozen: A Halloween Brain Jello Mold Adventure

    Resurrect the Spookiest Dozen: A Halloween Brain Jello Mold Adventure

    Every October, I crave a truly gross and delightful treat to surprise my guests. This year, I stumbled upon an idea that tickled my nostalgic bone and challenged my patience—creating a realistic-looking brain jello mold. It’s a daring mix of art and science, with a splash of edible chaos.

    Crafting this brain was a journey through the uncanny valley of desserts. The jiggly texture and gooey looks make it perfect for horror parties or a fun kitchen experiment with kids. Believe me, it’s not just about the taste—it’s about the spectacle that leaves everyone talking long after the party ends.

    Brain Jello Mold

    This dish is a gelatin-based mold crafted to resemble a human brain, featuring a jiggly and gooey texture. The recipe involves boiling flavored gelatin, mixing in other ingredients to enhance the appearance, and setting it in a mold until firm and realistic-looking. The final presentation is a creepy, brain-like structure perfect for horror-themed parties or festive experiments.
    Prep Time 20 minutes
    Cook Time 10 minutes
    Total Time 30 minutes
    Servings: 8
    Course: Main Course
    Cuisine: specialty
    Calories: 50

    Ingredients
      

    • 3 cups fluid water for boiling the gelatin
    • 3 packages gelatin powder (unflavored) to set the mold
    • 2 cups fruit juice or flavored gelatin mix for color and flavor
    • 1 tablespoon red food coloring optional, for a more realistic brain appearance
    • 2 teaspoons active dry gelatin to help with the gooey texture

    Equipment

    • Saucepan
    • Molding tray or brain-shaped mold
    • Mixing bowl
    • Whisk
    • Refrigerator

    Method
     

    1. Bring the water to a boil in a saucepan, then remove from heat.
    2. Whisk in the unflavored gelatin powder until fully dissolved, creating a smooth, clear mixture.
    3. Add the fruit juice or flavored gelatin mix to the mixture, stirring well to combine. This will give the gelatin its color and flavor.
    4. Stir in the active dry gelatin to the mixture, ensuring it dissolves completely. This enhances the gooey, jiggly texture.
    5. If desired, add a few drops of red food coloring to intensify the brain-like appearance, then mix thoroughly.
    6. Pour the vibrant gelatin mixture into a brain-shaped mold or a mold with a similar intricate design.
    7. Place the mold in the refrigerator and allow it to set for at least 4 hours, preferably overnight, until firm and jiggle-ready.
    8. Once fully set, gently unmold the gelatin by loosening the edges and carefully flipping onto a serving platter to reveal a realistic brain appearance.
    9. Slice or serve the brain jello in irregular chunks for a gruesome, authentic look, and enjoy your spooky, wobbly creation.

    Notes

    For extra realism, use a dry brush with a little red food coloring to add ‘veins’ or ‘insides’ on the surface before unmolding.
    The process of transforming simple gelatin into a squishy, brain-like wonder has become my new seasonal tradition. It’s startling, a bit messy, but endlessly fascinating. Plus, it reminds me that a little creativity and a splash of horror can turn a regular dessert into a memorable centerpiece.

    As the night winds down, I find myself appreciating how food can stir the imagination and ignite joy in the weirdest ways. This brain jello isn’t just a treat; it’s a moment of playful art, perfect for celebrating the spooky season with a laugh and a shiver.

  • Spook-tacular Pumpkin Cheesecake Bars That Survive Every Ghostly Gathering

    Spook-tacular Pumpkin Cheesecake Bars That Survive Every Ghostly Gathering

    Halloween is the perfect excuse to embrace the fun chaos of fall flavors. But instead of the usual pumpkin pie, try these layered pumpkin cheesecake bars for a delightful twist that will surprise your guests. They’re irresistibly creamy, subtly spiced, and decorated with a cheeky candy eye—perfect for adding a little mischief to your spooky spread.

    These bars are my secret weapon for last-minute gatherings. They come together quickly, with a crust that crunches just right and a filling that’s rich without feeling heavy. Plus, the bright orange topping makes them as festive as they are delicious, turning any table into a haunted harvest festival.

    Baking them feels like casting a spell—transforming simple ingredients into something magical. The aroma of cinnamon, ginger, and roasted pumpkin fills the kitchen and sparks smiles before even the first bite. It’s a recipe that celebrates the spooky season with ease, style, and a touch of mischief.

    Layered Pumpkin Cheesecake Bars

    These layered pumpkin cheesecake bars feature a crisp graham cracker crust topped with a creamy, spiced pumpkin filling. They are decorated with bright orange icing and a candy eye, resulting in a visually fun and textured dessert with a smooth interior and a crunchy base.
    Prep Time 20 minutes
    Cook Time 30 minutes
    Total Time 50 minutes
    Servings: 12
    Course: Main Course
    Cuisine: American
    Calories: 350

    Ingredients
      

    • 1 1/2 cups graham cracker crumbs about 10-12 crackers crushed fine
    • 1/4 cup sugar granulated
    • 1/2 cup unsalted butter melted
    • 16 oz cream cheese softened
    • 1 cup canned pumpkin puree unsweetened
    • 1 cup granulated sugar
    • 3 large eggs
    • 1 1/2 teaspoons ground cinnamon
    • 1/2 teaspoon ground ginger
    • 1/4 teaspoon ground nutmeg
    • 1/4 teaspoon ground cloves
    • 1/2 cup heavy cream optional for extra creaminess
    • 1 cup orange frosting or icing for topping
    • 1 candy eye candy eye decorating piece for spooky decoration

    Equipment

    • Mixing bowls
    • 9×13 inch baking pan
    • Spatula
    • Measuring cups and spoons
    • Electric mixer or whisk
    • Parchment paper
    • Cooling rack

    Method
     

    1. Combine the graham cracker crumbs and sugar in a bowl and stir until evenly mixed. Pour in the melted butter and mix until the crumbs are coated and resemble wet sand. Press this mixture firmly into the bottom of your baking pan to form an even crust. Bake at 350°F (175°C) for 8-10 minutes until lightly golden, then let it cool.
    2. In a large mixing bowl, beat the softened cream cheese until smooth and fluffy with an electric mixer. Add the pumpkin puree, sugar, cinnamon, ginger, nutmeg, and cloves. Mix until well combined and the filling is smooth.
    3. Beat in the eggs one at a time, mixing on low speed after each addition. This ensures a silky, stable batter without overmixing. If using, add the heavy cream for an extra creamy texture and blend until just combined.
    4. Pour the pumpkin cheesecake filling over the cooled crust, spreading it out evenly with a spatula. Tap the pan lightly on the counter to remove air bubbles and smooth the top.
    5. Bake at 350°F (175°C) for 25-30 minutes, or until the edges are set and the center slightly jiggles when gently shaken. Let the bars cool completely on a cooling rack before decorating.
    6. Smooth the orange frosting or icing on top of the cooled pumpkin layer, creating a vibrant, even coating that resembles a sunset or harvest hue. Use a spatula or piping bag for clean lines and a decorative finish.
    7. Place a candy eye onto the icing for a spooky, whimsical touch, positioning it to appear as a cheeky
      1/4 cup sugar
    8. Enjoy these festive pumpkin cheesecake bars as a deliciously creamy and textured treat, perfect for any Halloween celebration.

    Notes

    For an extra touch, add additional piped decorations or sprinkles for a more festive look.
    As the evening winds down and the lanterns flicker, these pumpkin cheesecake bars are bound to be remembered. They bring a cozy yet playful touch to your haunted night, perfect for sharing stories and laughs. Keep a few extras hidden away—some ghosts might sneak into the goods after the door closes.

    In a season that’s all about embracing the whims of whimsy and nostalgia, these bars offer a tasty pause. Enjoy creating new memories—one bite at a time—while the season’s pumpkin glow lingers just a little longer in your home.

  • Spooky Season’s Secret: Pumpkin Cheesecake with a Twist

    Spooky Season’s Secret: Pumpkin Cheesecake with a Twist

    As autumn leaves swirl and crackle underfoot, I find myself craving more than just the usual pumpkin pie. This year, I decided to embrace the season with a pumpkin cheesecake that holds a surprise in every bite—an unexpected crunch of candied ginger. It’s a playful twist on a classic, turning a simple dessert into a conversation starter.

    The creamy texture of the cheesecake mingles perfectly with the spiced pumpkin, while the ginger adds a spicy kick that ignites the palate. This recipe isn’t just about satisfying sweet cravings; it’s about celebrating the cozy chaos of fall in every forkful. Perfect for those crisp evenings when you want your dessert to be as interesting as your sweater collection.

    Pumpkin Cheesecake with Candied Ginger

    This pumpkin cheesecake combines a creamy, spiced filling with a graham cracker crust, baked until smooth and set. Topped with crunchy candied ginger pieces, it offers a rich texture contrast and a warm, autumnal flavor profile, with a visually appealing golden surface and vibrant filling. The finished dessert is dense yet tender, with a slight chew from the ginger and a luscious, velvety interior.
    Prep Time 20 minutes
    Cook Time 1 hour
    Total Time 1 hour 20 minutes
    Servings: 8
    Course: Main Course
    Cuisine: American
    Calories: 420

    Ingredients
      

    • 1 1/2 cups graham cracker crumbs for crust
    • 1/4 cup granulated sugar for crust
    • 1/2 cup unsalted butter melted, for crust
    • 16 oz cream cheese softened
    • 1 cup granulated sugar for filling
    • 1/2 cup canned pumpkin pure pumpkin
    • 3 large eggs
    • 1 1/2 teaspoons ground cinnamon
    • 1/2 teaspoon ground ginger
    • 1/4 teaspoon nutmeg
    • 1/2 teaspoon salt
    • 1/4 cup candied ginger chopped

    Equipment

    • Mixing bowls
    • Springform pan

    Method
     

    1. Combine graham cracker crumbs and sugar in a bowl, then pour in the melted butter. Mix until all crumbs are evenly coated and the mixture is crumbly but holds together when pressed.
    2. Press the crumb mixture firmly into the bottom of a greased springform pan to form an even crust. Use the back of a spoon or measuring cup to smooth and compact it.
    3. In a large mixing bowl, beat the softened cream cheese until smooth and creamy, about 2-3 minutes, and it should be free of lumps and light in texture.
    4. Add sugar to the cream cheese and continue beating until well incorporated and fluffy, about another minute.
    5. Mix in the canned pumpkin and spices—cinnamon, ginger, nutmeg, and salt—until fully combined, resulting in a vibrant orange, fragrant filling.
    6. Add eggs one at a time, beating on low speed after each addition to prevent breaking the mixture. The batter should become smooth and slightly thickened.
    7. Pour the filling over the prepared crust, spreading it evenly with a spatula to create a smooth, level surface.
    8. Bake the cheesecake in a preheated oven at 325°F (160°C) for about 60 minutes, until the edges are set and a gentle jiggle remains in the center.
    9. Remove the cheesecake from the oven and let it cool in the pan for about 30 minutes, then transfer to a fridge to chill for at least 4 hours or overnight for best setting.
    10. Sprinkle chopped candied ginger evenly over the top of the chilled cheesecake for a spicy, crunchy finish.
    11. Slice and serve the cheesecake chilled, enjoying the creamy interior with bits of crispy ginger in every forkful.
    This pumpkin cheesecake isn’t just a dessert; it’s a tribute to fall’s bold flavors and my own inventive spirit. It’s ideal for a festive gathering or a quiet night when you need a little extra comfort. Either way, it’s guaranteed to bring a burst of seasonal cheer.

    Whipping up this cheesecake feels like a small act of rebellion against the ordinary—an ode to exploring flavors and textures. Plus, the warm aroma whenever it bakes makes the kitchen smell like a fall festival. Enjoy every spoonful and cherish those cozy moments of culinary adventure.

  • The Enchanting Twist on Classic Apple Cake

    The Enchanting Twist on Classic Apple Cake

    Beyond its unique flavor, this apple cake celebrates the changing seasons. As autumn’s chill sets in, this baked good offers a cozy moment of indulgence. It’s ideal for brunches, teatimes, or simply when the craving for that perfect apple dessert hits unexpectedly.

    Autumn Apple Cake

    This apple cake features tender sliced apples baked into a moist, golden sponge. Made by folding sliced apples into a batter and baking until golden, it has a soft crumb with caramelized fruit accents on top. The final cake presents a warm, rustic appearance with a moist crumb and lightly caramelized apple edges.
    Prep Time 20 minutes
    Cook Time 40 minutes
    Total Time 1 hour
    Servings: 8
    Course: Main Course
    Cuisine: American
    Calories: 250

    Ingredients
      

    • 2 large apples peeled, cored, and sliced
    • 1 1/2 cups all-purpose flour
    • 1 cup granulated sugar
    • 1/2 cup unsalted butter melted and cooled
    • 3 large eggs
    • 1 teaspoon vanilla extract
    • 1 1/2 teaspoons baking powder
    • 1/4 teaspoon salt

    Equipment

    • Mixing bowls
    • Whisk
    • Rubber spatula
    • 9-inch baking pan
    • Knife
    • Cutting Board
    • Oven

    Method
     

    1. Preheat your oven to 350°F (175°C). Grease a 9-inch baking pan and set aside.
    2. Peel, core, and thinly slice the apples. Spread the slices on a plate and set aside to prevent browning.
    3. In a large mixing bowl, whisk together the eggs, sugar, and vanilla until the mixture is smooth and slightly frothy.
    4. Pour in the melted and cooled butter, then whisk until fully incorporated and the mixture is silky.
    5. Sift the flour, baking powder, and salt into the wet ingredients. Fold gently with a spatula until just combined, avoiding overmixing.
    6. Carefully fold the sliced apples into the batter, making sure they are evenly distributed without deflating the mixture.
    7. Pour the batter into the prepared baking pan, spreading evenly with a spatula. Gently tap the pan on the counter to settle the batter and remove air pockets.
    8. Bake in the preheated oven for about 40 minutes, or until the top is golden brown and a toothpick inserted into the center comes out clean.
    9. Remove the cake from the oven and allow it to cool in the pan for 10 minutes, then transfer to a wire rack to cool completely.
    10. Slice the cake with a serrated knife, revealing tender apple slices embedded within a moist crumb. Serve warm or at room temperature.

    Notes

    For extra flavor, sprinkle with a little cinnamon or powdered sugar before serving.
    As the seasons shift, there’s something invigorating about adding a little mystery to classic flavors. Whether it’s for a quiet morning alone or a gathering that warrants a touch of elegance, this cake offers comfort with a side of unexpected charm. The warm spices and layered aromas make every slice a gentle celebration of tradition with a twist.