Category: Desserts

  • Enchanting Halloween Candy Corn Parfaits: A Retro Twist

    Enchanting Halloween Candy Corn Parfaits: A Retro Twist

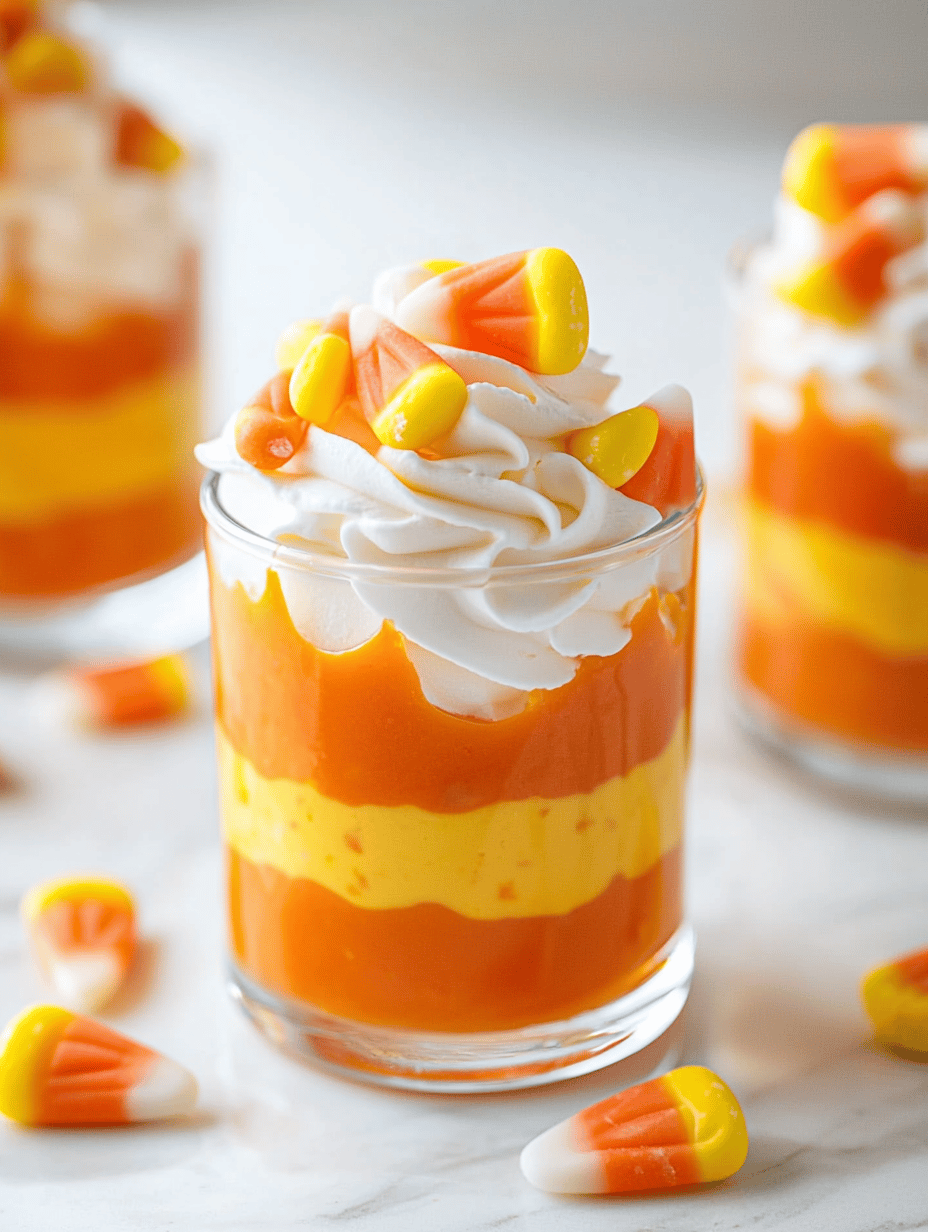
    Halloween is a time for playful treats and nostalgic flavors. This year, I wanted to create something that captures the whimsical spirit of the holiday while offering a surprising twist on the classic candy corn. These parfaits layer vibrant colors and textures that evoke childhood memories and elevate them for grown-up enjoyment.

    The beauty of this recipe lies in its simplicity and visual charm. With just a few ingredients and some crafty assembly, you get a dessert that’s as fun to look at as it is to taste. Plus, it’s perfect for parties, family gatherings, or a solo indulgence while binge-watching spooky movies.

    Halloween Candy Corn Parfaits

    These layered parfaits feature vibrant yellow, orange, and white colors that mimic candy corn. They are assembled with creamy layers and crunchy toppings, creating a fun, festive dessert with contrasting textures and eye-catching appearance. The dish combines smooth custard-like filling with crisp elements for a playful Halloween treat.
    Prep Time 15 minutes
    Cook Time 10 minutes
    Total Time 25 minutes
    Servings: 4
    Course: Main Course
    Cuisine: American
    Calories: 250

    Ingredients
      

    • 1 cup vanilla pudding or custard prepared and chilled
    • 1/4 cup granulated sugar for flavor and layering
    • 1 cup whipped cream folded into pudding for creaminess
    • 1 cup vanilla wafers crushed for crunch
    • 3 colors food coloring (yellow, orange, white) for coloring layers
    • to taste crushed candy canes or sprinkles optional for decoration

    Equipment

    • Mixing bowls
    • Whisk
    • Measuring cups and spoons
    • Clear glasses or jars
    • Spoon

    Method
     

    1. Begin by dividing the vanilla pudding into three separate bowls. Add yellow food coloring to the first bowl, orange to the second, and leave the third plain to keep it white. Mix each until the color is evenly distributed and the pudding is vibrant.
    2. Gently fold whipped cream into each colored pudding portion to lighten the texture, creating a smooth and fluffy layer for each color.
    3. Slice the vanilla wafers into small pieces and crush some for added crunch. Set aside for layering and topping.
    4. Spoon a bright yellow pudding layer into the bottom of each glass, smoothing the top with the back of a spoon.
    5. Add a handful of crushed vanilla wafers over the yellow layer for crunch.
    6. Pour an orange pudding layer on top of the wafers, smoothing it evenly.
    7. Repeat the process with more crushed wafers and then add a final layer of plain white pudding on top, creating a striped candy corn effect.
    8. Top each parfait with additional crushed wafers and, if desired, sprinkle with crushed candy canes or colorful sprinkles for festive decoration.
    9. Chill the parfaits in the refrigerator for at least 30 minutes before serving to allow flavors to meld and textures to set.
    10. Serve the parfaits cold with a colorful straw or spoon, revealing the layered candy corn colors and textures.

    Notes

    Feel free to customize the toppings with different candies or sprinkles for a creative touch.
    Sharing these candy corn parfaits is like giving a tiny piece of Halloween joy. They transform a simple candy into a charming and colorful dessert that sparks conversation and smiles.

    Enjoy these layered treats as a quick holiday project or a whimsical finale to your spooky feast. The bright colors and sweet crunch remind us that sometimes, the simplest ideas become the most memorable moments of the season.

  • Spooky Sweetness: Halloween Graveyard Pudding Cups That Haunted My Heart

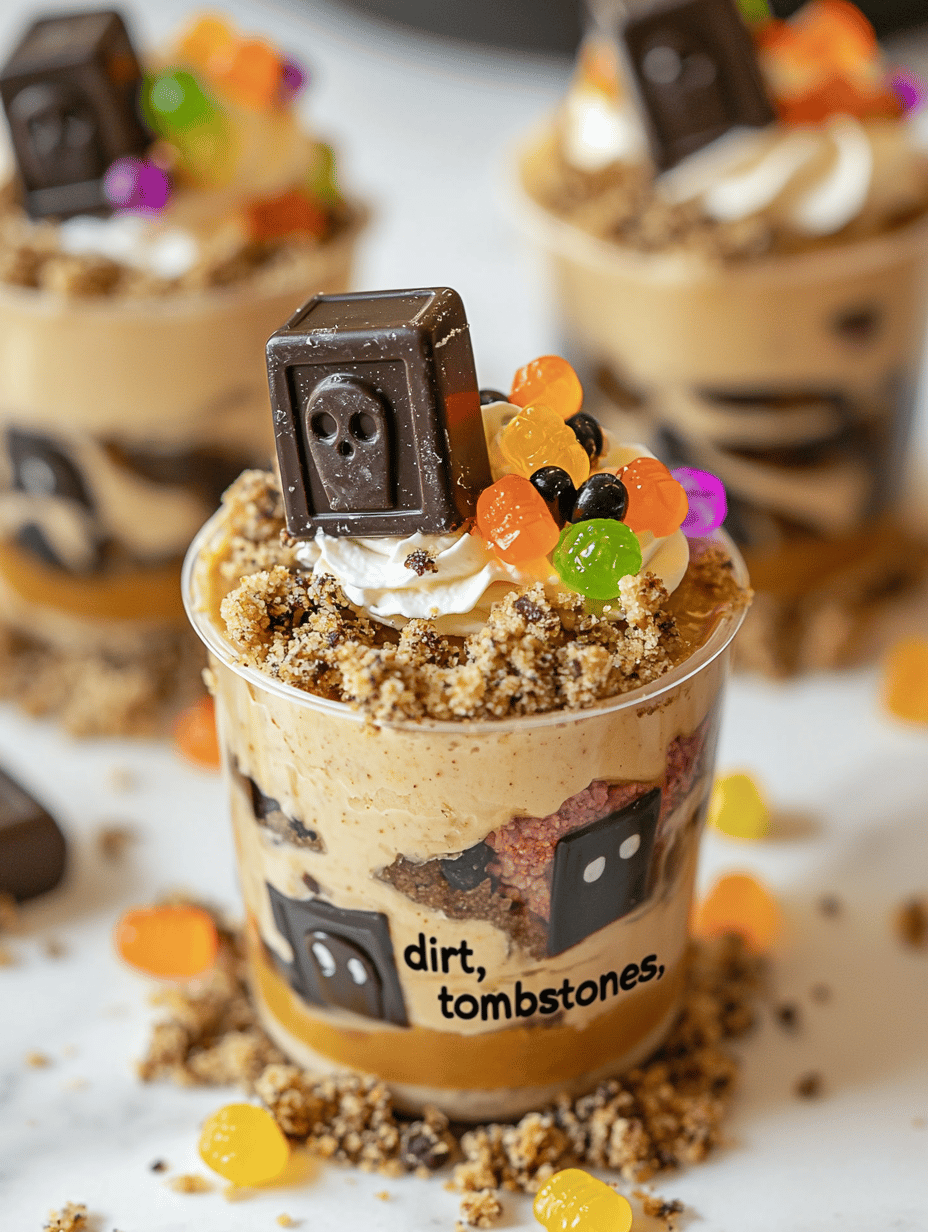
    Spooky Sweetness: Halloween Graveyard Pudding Cups That Haunted My Heart

    As the leaves turn crisp and the air takes on a whisper of frost, I find myself craving more than just pumpkins and costumes. I want edible illusions, tiny worlds hiding secrets beneath chocolate layers, perfect for a Halloween buffet. These graveyard pudding cups are a quirky twist on traditional treats, transforming simple ingredients into a mini haunted landscape.

    What’s magical about these cups isn’t just their creepy charm but how they evoke childhood memories of trick-or-treating with a dash of chaos and giggles. The moment when you sprinkle crushed cookies over creamy pudding feels like burying mini tombstones in a spooky, delicious plot. It’s this thoughtful mess that makes every spoonful a delightful scare.

    Graveyard Pudding Cups

    These graveyard pudding cups feature creamy chocolate pudding topped with crushed cookies to resemble dirt and tombstones made from cookies or candy. The layered textures and decorative elements create a spooky, bite-sized dessert that combines smooth pudding with crunchy toppings, giving a fun, eerie appearance suitable for Halloween celebrations.
    Prep Time 15 minutes
    Cook Time 10 minutes
    Total Time 25 minutes
    Servings: 4
    Course: Main Course
    Cuisine: Halloween
    Calories: 220

    Ingredients
      

    • 1 package instant chocolate pudding mix follow package instructions for preparation
    • 2 cups milk for pudding
    • 1 1/2 cups cookie crumbs graham crackers or chocolate cookies, crushed
    • 12 small cookies or candy tombstone cookies preferably in spooky shapes or plain cookies cut into shapes
    • optional for decoration candy eyes or edible markers to add creepy features on tombstones

    Equipment

    • Mixing bowls
    • Whisk
    • small glasses or cups
    • Spoon
    • Plastic wrap

    Method
     

    1. In a mixing bowl, whisk together the instant chocolate pudding mix with the cold milk until the mixture thickens and becomes smooth, about 2-3 minutes. This prepares the rich, creamy pudding.
    2. Spoon the prepared pudding into small glasses or cups, filling each about three-quarters full. Level the surface gently with the back of a spoon for a tidy look.
    3. Sprinkle a generous layer of crushed cookies over the pudding to resemble dirt, covering the surface evenly. The crumbs should look like loose soil or grave dirt.
    4. Place small cookies or candy shaped like tombstones into the crushed cookie layer, pressing slightly to anchor them. Arrange them randomly for a chaotic, spooky look.
    5. If desired, decorate the tombstones with tiny candy eyes or draw eerie details with edible markers to add a spooky character to each graveyard scene.
    6. Repeat the layering process with additional pudding and cookie crumbs if you want taller ‘graves,’ finishing with a generous topping of crumbs for a final dirt effect.
    7. Serve the graveyard pudding cups immediately, or refrigerate for up to 2 hours to firm up. They’re ready to be enjoyed with their creepy, crunchy look and delicious chocolate flavor.

    Notes

    For extra variety, add small gummy worms or other creepy candies to enhance the haunted graveyard effect.
    These pudding cups are more than just a fun activity; they’re a snapshot of childhood wonder mixed with the thrill of the spooky season. They make my Halloween table look playful, inviting giggles and gasps alike from every guest.

    No matter how many times I recreate them, I’m still surprised by how a few simple ingredients can come together to craft a little edible horror scene. It’s a celebration of chaos, creativity, and a touch of dark dessert magic that keeps my October filled with sweet, silly surprises.

  • Haunted Delight: Halloween Monster Eyeball Cake Pops

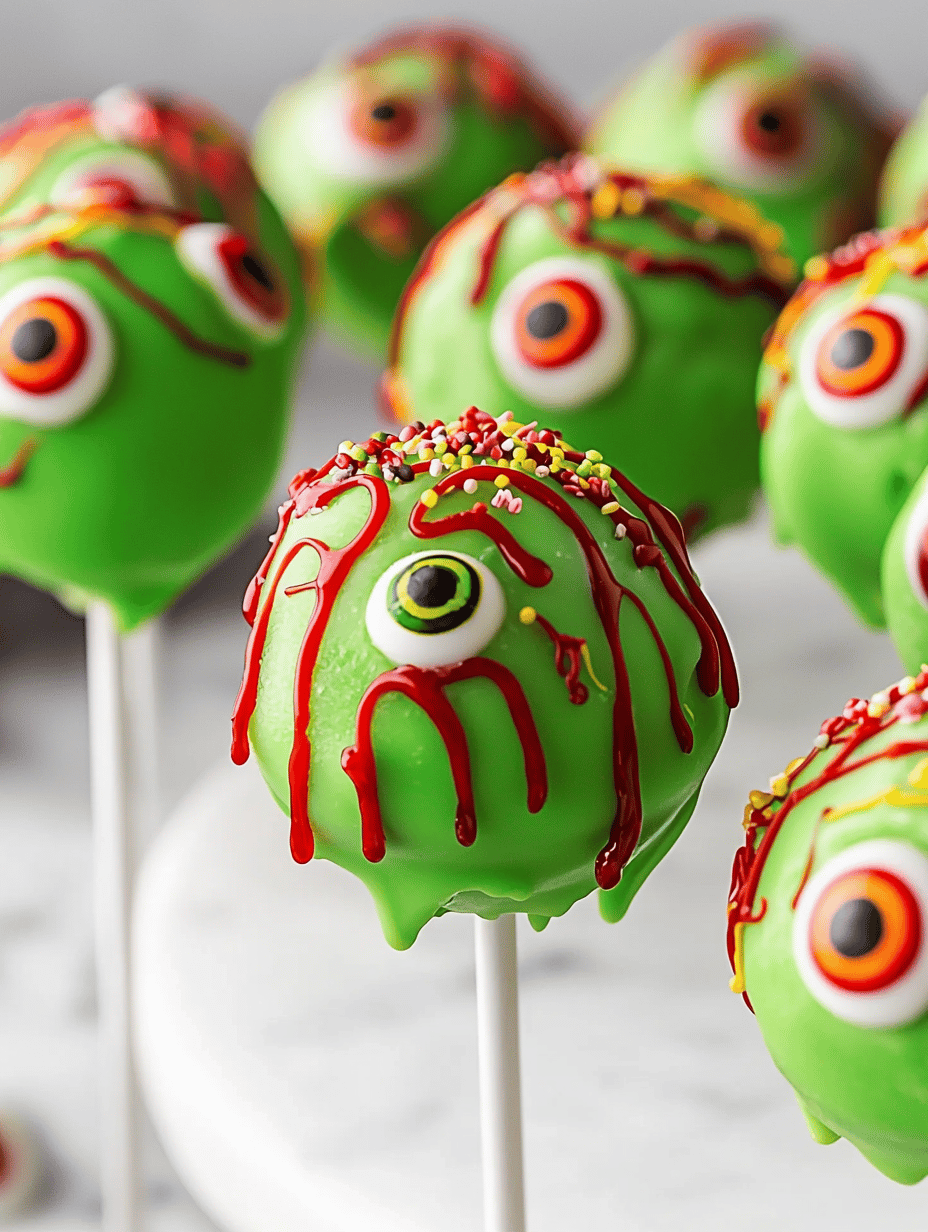
    Haunted Delight: Halloween Monster Eyeball Cake Pops

    Imagine walking into a Halloween party and being greeted by a tray of eerie, bloodshot eyeballs. These Monster Eyeball Cake Pops are not just tasty treats; they’re miniature monsters that instantly spark conversation and giggles.

    What sets these apart is their chilling yet adorable design, which makes them a perfect mix of spooky and sweet. Crafting them transforms simple cake and candy into tiny eyes that seem to watch your every move. It’s a fun project that beats dipping ordinary cake pops into chocolate.

    WHY I LOVE THIS RECIPE?

    • The original idea of turning cake into creepy eyeballs keeps my creativity alive.
    • The chaos of painting pupil details is oddly satisfying—like a tiny, edible horror show.
    • They bridge nostalgia with a creepy twist, reminding me of childhood monster stories.
    • The pride in showing off a batch of freaky but delicious pops is unmatched.
    • Such a quick project that adds maximum wow factor to any Halloween celebration.

    AVOID MY DISASTER (You’re Welcome)

    • FORGOT to chill the cake balls—crumbly pops, sweet smell of failure. Just freeze before dipping.
    • DUMPED melted chocolate all over the counter—sticky mess, quick wipe, microwave new batch.
    • OVER-TORCHED the chocolate—burnt aroma, start fresh with gentle heat and stirring.
    • LOST a few eyeballs in the fridge—pay attention, work in small batches to keep track.

    QUICK FIXES THAT SAVE YOUR DAY

    • When chocolate cracks, just add a tiny amount of coconut oil and stir for smoothness.
    • Splash a little edible red ink for bloodshot veins and spooky realism.
    • Patch a cracked eyeball with a dab of melted chocolate—silent repair, no one notices.
    • If eyes look dull, lightly dust with edible shimmer for a glazed effect.
    • Shield with a sprinkle of Halloween sprinkles to hide imperfections and add fun detail.

    These Monster Eyeball Cake Pops are perfect for this haunted season, blending creativity with delicious bites. They’re sure to become a standout in your Halloween spread, with just the right amount of creepy charm. Assembling them is part of the fun, and seeing the looks on friends’ faces makes it all worth it.

    So grab your ingredients and let your inner monster-maker run wild. These pops turn simple cake into petrifying edible art that all ages will enjoy. Happy haunting and baking!

    Monster Eyeball Cake Pops

    This treat features cake balls dipped in chocolate to resemble creepy eyeballs, with detailed pupils painted on for a spooky effect. The final appearance is small, round cake pops with bloodshot or glazed eyes, combining fun, creepy design with sweet, moist cake textures.
    Prep Time 30 minutes
    Cook Time 10 minutes
    Total Time 40 minutes
    Servings: 12
    Course: Main Course
    Cuisine: Halloween
    Calories: 150

    Ingredients
      

    • 1 box store-bought cake (or baked cake layers) crumbled after cooling
    • 1 cup cream cheese cream cheese softened
    • 2 cups powdered sugar powdered sugar for sweetness
    • 12 ounces dark or melting chocolate chocolate for dipping use good quality chocolate
    • 1-2 teaspoons edible red ink or gel edible bloodshot veins for realism
    • Optional edible shimmer dust for glazed effect

    Equipment

    • Mixing bowls
    • Cake pop sticks
    • Microwave-safe bowl
    • Baking Sheet
    • Parchment paper
    • Small paintbrush or piping bag
    • Refrigerator

    Method
     

    1. Crumble the cooled cake into a large mixing bowl until it resembles fine crumbs.
    2. Add softened cream cheese and mix thoroughly until the mixture is cohesive and can be shaped easily.
    3. Stir in powdered sugar to sweeten the mixture and help it hold together.
    4. Scoop out about one tablespoon of the mixture and roll it into a smooth ball with your hands. Repeat until all the mixture is used, then place the balls on a lined baking sheet.
    5. Insert a cake pop stick into each ball, about halfway through, and chill in the refrigerator for at least 30 minutes to firm up.
    6. Gently melt the chocolate in a microwave-safe bowl in short bursts, stirring between each until smooth and glossy.
    7. Dip each chilled cake ball into the melted chocolate, ensuring full coverage, then allow the excess to drip off before placing back on the parchment-lined sheet.
    8. Once all the cake pops are coated, refrigerate again for about 15 minutes until the chocolate sets completely.
    9. Using a small brush or piping tip, add red ink or gel to create bloodshot veins around the edge of each eyeball for a spooky, bloodshot look.
    10. For added realism, lightly dust the eyes with edible shimmer or sprinkle Halloween-themed decorations for a glossy or textured look.
    11. Enjoy your creepy, fun Monster Eyeball Cake Pops as a striking Halloween treat or spooky centerpiece.

    Notes

    Chill the cake mixture well to prevent crumbling during dipping. Use a small brush for detailed bloodshot veins. Decorate with edible shimmers or sprinkles to enhance the spooky effect.

    Building these eyeball cake pops is a playful way to celebrate Halloween’s spooky spirit. Each creepy eye is a small work of art and a tasty treat wrapped into one. Watching everyone marvel at your creativity never gets old.

    This recipe is a reminder that baking can be a little chaos, a lot of fun, and totally worth the mess. The best parts are the laughs, surprises, and the twisted sense of pride that comes with these ghoulish treats. Enjoy turning your kitchen into a monster’s workshop and sharing the spooky joy with friends and family.

  • Hauntingly Delicious: Halloween Poison Toffee Apples

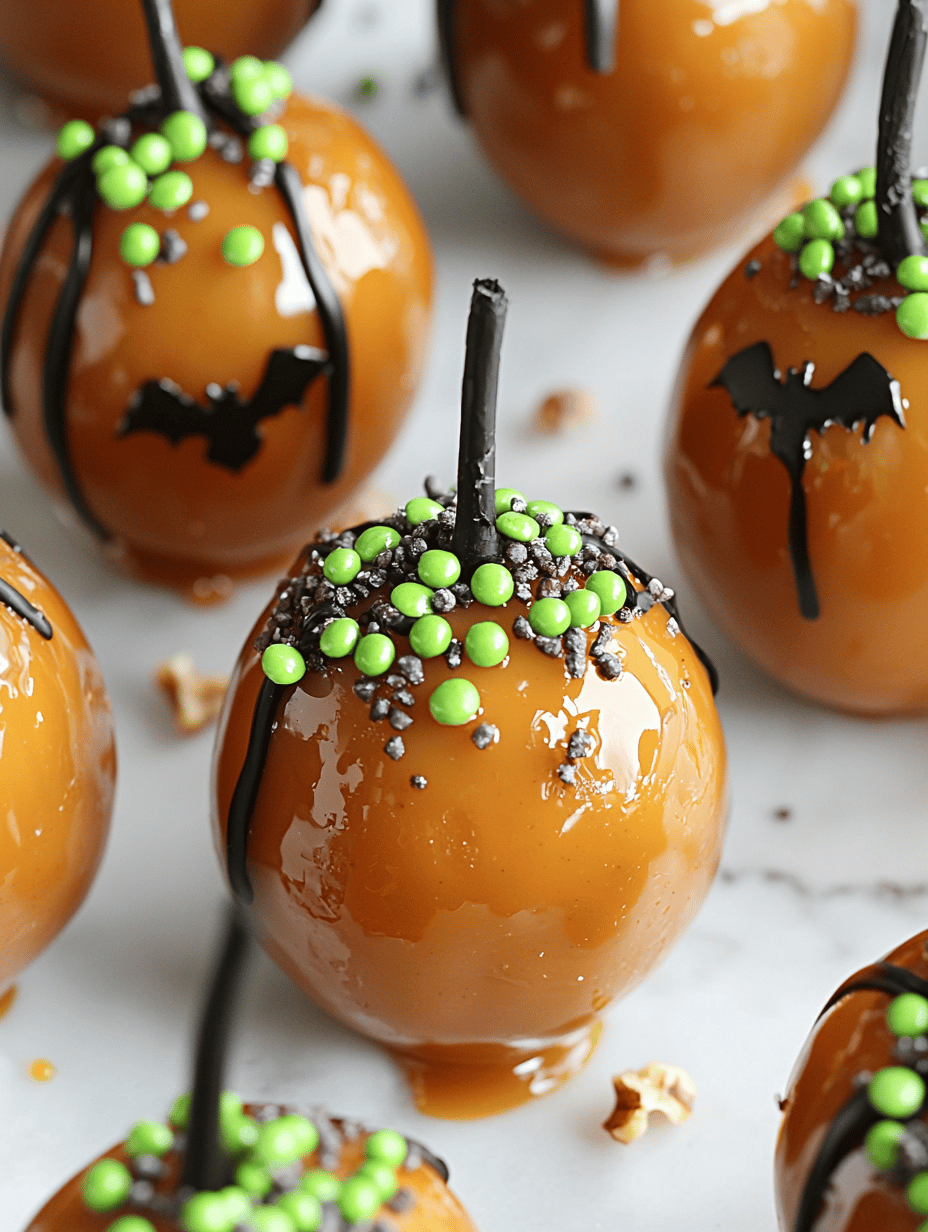
    Hauntingly Delicious: Halloween Poison Toffee Apples

    Every October, I find myself craving a treat that’s as playful as it is sinister. These Halloween Poison Toffee Apples do just that, with a touch of dark charm and a crunch that echoes childhood Mischief. They’re not your typical caramel apples—they have a wicked twist that will make your spooky party unforgettable.

    What makes these apples so uniquely eerie is the deep, glossy toffee coating that looks like a shiny potion. Topped with a little splash of edible black color and drizzled with bright, unsettling candy melts, they seem to glow in the dim candlelight. Perfect for adding a dash of chaotic joy to your seasonal spread.

    While they appear menacing, making these toffee apples is surprisingly straightforward. With just a few ingredients and a dash of daring, you’ll conjure a treat that’s as fun to make as it is to eat. Plus, they’re ideal for sharing—or for sneaking a secret midnight bite.

    Halloween Poison Toffee Apples

    These Halloween Poison Toffee Apples feature crisp, fresh apples coated with a glossy, dark toffee shell that looks like a sinister potion. Topped with edible black coloring and drizzled with colorful candy melts, they have a shiny, eerie appearance and a crunchy texture. The combination of smooth toffee, crunch of apple, and decorative toppings creates a playful and creepy seasonal treat.
    Prep Time 20 minutes
    Cook Time 15 minutes
    Total Time 35 minutes
    Servings: 8
    Course: Main Course
    Cuisine: seasonal
    Calories: 220

    Ingredients
      

    • 4 large fresh apples preferably tart varieties like Granny Smith
    • 200 g granulated sugar for the toffee
    • 60 ml water to dissolve sugar
    • 100 g glucose syrup to prevent crystallization
    • 1/2 tsp black edible food coloring for the sinister look
    • 100 g bright candy melts (orange, green, or purple) for drizzling
    • Optional sprinkles or edible glitter for decoration

    Equipment

    • Silicone baking mat or parchment paper
    • Candy thermometer
    • Heavy-bottomed saucepan
    • Wooden spoon or heatproof spatula
    • Skewers or apple sticks

    Method
     

    1. Wash and thoroughly dry the apples, then insert skewers or apple sticks into the stems, ensuring they’re secure.
    2. Line a baking sheet with parchment or a silicone mat and set aside.
    3. Combine the sugar, water, and glucose syrup in a heavy-bottomed saucepan over medium heat. Stir gently until the sugar dissolves completely and the mixture comes to a boil. Attach a candy thermometer and cook without stirring until it reaches 150°C (302°F), or a hard crack stage.
    4. Once the toffee reaches the desired temperature, remove the pan from heat. Carefully stir in a few drops of black edible food coloring to create a dark, sinister hue, mixing until evenly incorporated.
    5. Working quickly, dip each apple into the toffee, tilting the pan if needed to coat evenly. Use a spoon to help cover the apple if necessary. Allow the excess to drip off and place the coated apple on the prepared baking sheet.
    6. Let the toffee-coated apples sit until the toffee hardens completely, about 10-15 minutes.
    7. While the toffee sets, melt the candy melts in a microwave-safe bowl in 30-second bursts, stirring until smooth. Divide the melted candy into separate bowls and tint with food coloring as desired.
    8. Using a fork or spoon, drizzle the colored candy melts over the hardened toffee apples in zigzag patterns for a spooky, chaotic effect.
    9. If desired, sprinkle with edible glitter or small candies to add extra eerie flair. Let everything set for a few minutes until the candy melts firm up.
    10. Serve the Poison Toffee Apples at room temperature. They have a glossy, dark coating with a crunchy exterior and a juicy apple inside, perfect for a Halloween celebration.

    Notes

    Work quickly when handling hot toffee to maintain the right temperature. Use gloves if desired for safety and easier handling of the hot coating.

    These Poison Toffee Apples are more than just a spooky snack—they’re a playful reminder that Halloween is all about embracing the creepy and the kooky. Each bite crunches with that satisfying sweet-toffee snap that keeps everyone guessing. Plus, they add a splash of dramatic flair to any themed table.

    Enjoy making these eerie treats as much as you’ll enjoy the chaos they cause at your festivities. They’re perfect for transforming ordinary apples into something wickedly memorable. Let your imagination run wild—after all, that’s what Halloween is all about.

  • Spiced Pumpkin Muffins with a Twist: A Cozy Fall Favorite

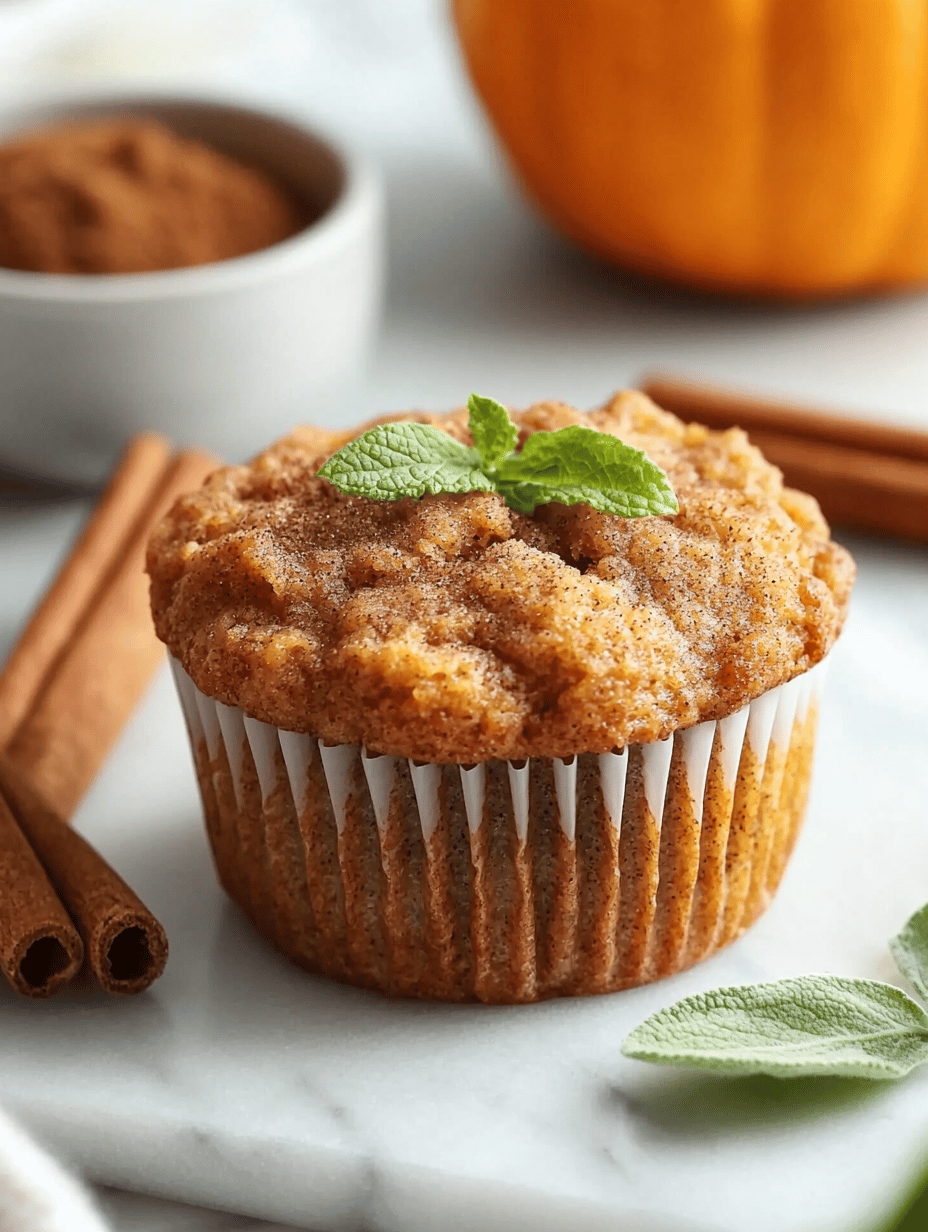
    Spiced Pumpkin Muffins with a Twist: A Cozy Fall Favorite

    As the leaves turn and the air cools, I find myself craving the comforting aroma of pumpkin baked goods. But this recipe isn’t your typical pumpkin muffin; it features a secret sprinkle of chai spices that transforms it into a warm, spicy hug. The minute these muffins come out of the oven, the scent alone beckons everyone into the kitchen.

    This twist on pumpkin muffins captures the nostalgic essence of fall while adding a burst of unexpected flavor. They’re perfect for spontaneous mornings or when you need a little seasonal magic in your day. Plus, they’re so simple to whip up with pantry staples, making every bake feel like a small celebration.

    Pumpkin Chai-Spiced Muffins

    These muffins are made by mixing pumpkin puree with dry and wet ingredients, then adding a blend of chai spices. They are baked until golden and have a moist, tender crumb with a slightly domed top, accented by warm spices and a spicy aroma. The final appearance is a batch of neatly risen, fragrant muffins ready to enjoy.
    Prep Time 15 minutes
    Cook Time 20 minutes
    Total Time 35 minutes
    Servings: 12
    Course: Main Course
    Cuisine: American
    Calories: 210

    Ingredients
      

    • 1 1/2 cups all-purpose flour sifted
    • 1/2 cup granulated sugar
    • 1 teaspoon baking soda
    • 1/2 teaspoon salt
    • 2 teaspoons chai spice blend or pumpkin pie spice, a mix of cinnamon, ginger, cardamom, cloves
    • 3/4 cup pumpkin puree unsweetened
    • 1/3 cup vegetable oil
    • 2 large eggs
    • 1 teaspoon vanilla extract

    Equipment

    • Mixing bowls
    • Whisk
    • Muffin tin
    • Paper or silicone muffin liners
    • Cooling rack

    Method
     

    1. Preheat the oven to 375°F (190°C) and line a muffin tin with paper liner or lightly grease it.
    2. In a large mixing bowl, whisk together the sifted flour, sugar, baking soda, salt, and chai spice blend until evenly combined. This ensures the spices are evenly dispersed throughout the dry ingredients.
    3. Add the pumpkin puree, vegetable oil, eggs, and vanilla extract to a separate bowl. Whisk until the mixture is smooth, slightly thickened, and starts to get glossy, about 30 seconds.
    4. Pour the wet mixture into the dry ingredients. Gently fold the batter together with a spatula until just combined; do not overmix, as this can make the muffins dense.
    5. Divide the batter evenly among the muffin cups, filling each about 2/3 full. The batter will be thick but scoopable.
    6. Bake in the preheated oven for 18-20 minutes, or until the muffins are golden and a toothpick inserted into the center comes out clean. Fill the kitchen with a warm, spicy aroma as they bake.
    7. Remove the muffins from the oven and place on a cooling rack. Let them cool for at least 10 minutes to firm up before serving.
    8. Enjoy these soft, moist muffins with a warm cup of tea or coffee, basking in their comforting fall flavors and fragrant spice aroma.

    These pumpkin muffins are more than just a seasonal treat; they’re a reminder of cozy mornings and those fleeting fall afternoons. Sharing them with loved ones makes the season feel a bit more special, with every bite bringing a swirl of warmth and spice. Whether enjoyed with a cup of coffee or as a quick snack, they’re sure to become a fall staple.

    There’s something satisfying about transforming humble ingredients into something that feels like a little piece of seasonal cheer. Keep this recipe handy for those crisp mornings or lazy weekend brunches. It’s a simple pleasure that never loses its comforting, nostalgic charm.

  • Spooky Grits & Gummy Worms: Halloween Dirt Cake Secrets

    Spooky Grits & Gummy Worms: Halloween Dirt Cake Secrets

    As a food blogger obsessed with nostalgic twists, I love exploring the surprising textures and tales behind our favorite childhood treats. Halloween is the perfect time to revamp classic desserts with a dash of chaos—and what better way than with a dirt cake topped with squirmy gummy worms? This dessert is not just sweet; it’s a playful adventure for the senses.

    The smell of rich chocolate mingling with crunchy cookie debris instantly transports me to fond Halloween memories. Layered with creamy pudding and hidden beneath a messy coat of crushed cookies, each bite offers a satisfying crunch before melting into smooth richness. The gummy worms peek out like tiny, edible surprises—best enjoyed with a mischievous grin.

    Halloween Dirt Cake with Gummy Worms

    This no-bake dessert combines layered chocolate pudding and crushed cookies to create a textured, soil-like appearance. Topped with gummy worms that peek out, it offers a crunchy, creamy, and playful treat with a messy, earthy look. The final result is a visually fun and flavor-rich dessert perfect for Halloween gatherings.
    Prep Time 20 minutes
    Total Time 20 minutes
    Servings: 8
    Course: Main Course
    Cuisine: American
    Calories: 350

    Ingredients
      

    • 1 package chocolate pudding mix instant, to be prepared with milk
    • 2 cups cold milk
    • 1 package random cookie crumbs Oreo cookies or chocolate wafers, crushed
    • 1 cup graham cracker crumbs
    • Gummy worms gummy worms for topping and decoration

    Equipment

    • Mixing bowls
    • Whisk
    • Measuring cups and spoons
    • Food processor or plastic bag and rolling pin
    • Serving dish or individual cups

    Method
     

    1. Pour the instant chocolate pudding mix into a mixing bowl. Add cold milk and whisk until the pudding is thick and smooth, about 2 minutes. This creates a rich, creamy base for your dirt dessert.
    2. Transfer the prepared pudding to the refrigerator and let it chill for about 10 minutes to thicken further.
    3. While the pudding chills, take your cookie crumbs and graham cracker crumbs. If using whole cookies, place them in a plastic bag and crush with a rolling pin until you have fine crumbs that resemble soil.
    4. Once the pudding is set and thick, gently fold in half of the cookie and graham cracker crumbs to add texture and earthy color to the mixture.
    5. Spoon the pudding mixture into a serving dish or individual cups, smoothing the top with a spatula or the back of a spoon.
    6. Sprinkle the remaining cookie and graham cracker crumbs over the top to resemble dirt and create a layered, textured appearance.
    7. Decorate the surface with gummy worms, inserting some partially into the crumbs to give the look of squirmy creatures hiding beneath the soil.
    8. Let the assembled dirt cake sit in the refrigerator for at least 30 minutes before serving to allow the flavors to meld and the texture to firm up.
    9. Once chilled, serve the dirt cake with gummy worms peeking out and enjoy the playful, crunchy, and creamy layers.
    This dirt cake isn’t just about the fun visuals; it’s about how it transforms simple ingredients into a moment of joy and chaos. Perfect for Halloween parties or a spooky family treat, it brings out the kid in all of us.

    Making it is quick, messy, and utterly satisfying, especially when those gummy worms wiggle with every spoonful. As the seasons shift and the nights grow longer, this dessert becomes a sweet reminder that sometimes, a little chaos is exactly what we need to celebrate. Happy haunting and indulging!

  • A Rustic Twist on Peach Crisp with an Unexpected Spice

    A Rustic Twist on Peach Crisp with an Unexpected Spice

    Imagine biting into a warm, bubbling peach crisp where the fruit is perfectly tender, and the topping is golden and crispy. Today, I want to share a version that celebrates the fleeting peak of peach season by adding a hint of surprise—an unexpected touch of fiery ginger that awakens the senses. The aroma alone, a blend of sweet peaches and spicy heat, makes the entire kitchen feel like a summer festival.

    This recipe is more than just a dessert; it’s a nostalgic nod to lazy afternoons in sunlight and the irresistible allure of fresh fruit. It’s an easy way to elevate simple ingredients into something memorable, especially when peaches reach their juicy, fragrant prime. Plus, it’s a fantastic way to bring friends together, confident in the comfort of a classic with a lively twist.

    ## WHY I LOVE THIS RECIPE?
    – It balances sweet and spicy, creating a flavor that’s both familiar and exciting.
    – Perfect for late summer gatherings with friends, laughter, and lingering smells of caramelized fruit.
    – It’s forgiving and adaptable, forgiving accidental overcooking with a quick sprinkle of extra peaches.
    – Reminds me of childhood summers, yet feels fresh enough for dinner parties.
    – The aroma alone sparks joy and makes even the simplest night feel special.

    ## AVOID MY DISASTER (You’re Welcome)
    – FORGOT to drain the peach syrup and ended up with a runny topping. I added a touch more oats and flour to firm it up.
    – DUMPED in too much sugar on the fruit once, which made it cloying. I balanced it with a squeeze of lemon juice.
    – OVER-TORCHED the topping once when distracted. I lowered the oven temp and kept a close eye for the next batch.
    – MISSED adding the ginger due to rushing. A quick sprinkle just before baking saved the flavor.

    ## QUICK FIXES THAT SAVE YOUR DAY
    – When the topping is too soft, sprinkle with extra oats and bake 5 more minutes.
    – Splash lemon juice on overly sweet peaches to brighten their flavor.
    – Patch overly burnt topping with a fresh layer of crumbs and bake briefly.
    – Shield your peaches from drying out by covering with foil during the last 10 minutes.
    – When in streaks of chaos, keep some extra peach slices on hand to fill in gaps or cover imperfections.

    This peach crisp isn’t just a treat; it’s a conversation starter. The combination of sweet, spicy, and crispy elements echoes the joys of summer while offering a dash of daring that keeps everyone guessing. It’s the kind of dessert that feels just a little rebellious, yet wonderfully grounded in tradition.

    Crafted with seasonal peaches and a touch of fiery ginger, it’s a reminder to embrace the imperfect and savor each bite. Whether it’s a quiet night or a lively table, this dish invites warmth and spontaneity into every scoop and crumble.

    Peach Ginger Crisp

    This peach ginger crisp features tender, juicy peaches topped with a golden, crispy crumble infused with fiery ginger. The dish combines baking methods to create a bubbling fruit filling and a crunchy topping, resulting in a warm dessert with contrasting textures. Its vibrant aroma and caramelized appearance make it an inviting addition to late summer gatherings.
    Prep Time 15 minutes
    Cook Time 40 minutes
    Total Time 55 minutes
    Servings: 4
    Course: Main Course
    Cuisine: American
    Calories: 250

    Ingredients
      

    • 4 cups peach slices preferably ripe and juicy
    • 1 tablespoon fresh ginger finely grated
    • 1/4 cup sugar preferably organic or raw
    • 1 teaspoon lemon juice freshly squeezed
    • 1 cup rolled oats lightly toasted
    • 1/2 cup all-purpose flour
    • 1/2 cup unsalted butter cold and cubed
    • 1/4 cup brown sugar

    Equipment

    • Mixing bowls
    • Baking dish
    • Knife
    • Peeler or fruit slicer
    • Measuring cups and spoons
    • Oven

    Method
     

    1. Preheat your oven to 375°F (190°C) and lightly grease a baking dish.
    2. Peel and slice the peaches into thin, even pieces, then place them in a mixing bowl.
    3. Add finely grated fresh ginger, sugar, and lemon juice to the peaches, then gently toss everything together until the fruit is coated and fragrant.
    4. Pour the coated peaches into your prepared baking dish, spreading them out evenly.
    5. In a separate mixing bowl, combine rolled oats, flour, brown sugar, and cold, cubed butter.
    6. Use your fingers or a pastry cutter to rub the butter into the dry ingredients until the mixture resembles coarse crumbs.
    7. Sprinkle the crumble evenly over the peaches, covering the fruit completely with a golden, textured layer.
    8. Bake in the preheated oven for about 40 minutes, or until the topping is crisp and golden, and the peach filling is bubbling around the edges.
    9. Remove from the oven and let sit for a few minutes so the filling can thicken slightly.
    10. Serve warm, optionally with a scoop of vanilla ice cream or a dollop of whipped cream for extra indulgence.
    As the oven cools, the lingering fragrance of caramelized peaches and toasted oats can bring a comforting glance back to the day’s adventures. This recipe isn’t about perfection but about creating a memorable moment, one spoonful at a time.

    Enjoy this twist on a classic while peaches are at their peak. It’s perfect for making with what you have on hand and sharing with the people you hold dear. Sometimes, the simplest desserts can become the most cherished memories.

  • Spook-tacular Pumpkin Rice Krispie Treats with a Twist

    Spook-tacular Pumpkin Rice Krispie Treats with a Twist

    As October winds down, I look for ways to make Halloween parties unforgettable. This year, I decided to transform the classic rice Krispie treats into something festive and surprising—pumpkin-shaped treats that burst with seasonal flavor. The whole house smells like caramelized sugar and warm spices as I work on these little jack-o’-lanterns.

    What sets these treats apart is the playful way they blend childhood nostalgia with Halloween fun. Whether you’re tossing a spook-themed bash or just craving something sweet and cheesy, these pumpkin treats fit right into the fall mood. Plus, they’re surprisingly easy to make, even with a touch of creative chaos in the kitchen.

    Pumpkin-Shaped Rice Krispie Treats

    These pumpkin-shaped Rice Krispie treats are made by combining melted marshmallows with crispy rice cereal, then shaping the mixture into small pumpkins. The final treats have a soft, chewy texture with a festive appearance, often decorated with streaks of caramel or chocolate to resemble pumpkins. They are quick to prepare and fun to customize with Halloween-themed details.
    Prep Time 15 minutes
    Cook Time 10 minutes
    Total Time 25 minutes
    Servings: 12
    Course: Main Course
    Cuisine: Fall, Halloween
    Calories: 120

    Ingredients
      

    • 10 cups marshmallows large mini or regular marshmallows
    • 4 tablespoons unsalted butter
    • 6-7 cups rice cereal rice Krispies
    • orange food coloring orange food coloring for coloring the treats
    • optional chocolate or caramel for decorating pumpkin faces or streaks
    • to taste sprinkles or edible glitter for added decoration

    Equipment

    • Large saucepan
    • 16-inch silicone mold or hands for shaping

    Method
     

    1. Grease your silicone mold or prepare a clean, flat work surface for shaping the treats.
    2. Melt the butter in a large saucepan over low heat until it is just melted and begins to bubble lightly.
    3. Add the marshmallows to the melted butter, stirring constantly until completely melted and smooth, filling the air with a sweet vanilla aroma.
    4. Remove the saucepan from heat, then add a few drops of orange food coloring, stirring until the mixture is a vibrant pumpkin orange.
    5. Gradually fold in the rice cereal, stirring gently until evenly coated and the mixture is thick and slightly sticky.
    6. Once the mixture is combined, let it cool slightly so it’s easier to handle.
    7. Take a handful of the mixture and press it into a small, rounded pumpkin shape, about 2-3 inches in diameter, using your hands or a mold.
    8. Repeat with the remaining mixture, placing each shaped treat on a baking sheet lined with parchment paper.
    9. Use a toothpick or small piping bag to add decorative streaks of caramel or chocolate to mimic pumpkin ridges or faces for a spooky touch.
    10. Let the treats set at room temperature for about 15-20 minutes until firm to the touch.
    11. Optionally, add sprinkles or edible glitter on top for extra festive flair before serving.
    12. Enjoy these soft, chewy pumpkin treats that are perfect for Halloween parties or cozy fall gatherings.

    Notes

    Make sure to work quickly when shaping the treats before they set. For best appearance, decorate with contrasting colors and fun facial features.
    These Halloween Pumpkin Rice Krispie Treats are more than just a sweet snack—they’re a conversation starter. Watching friends and family marvel at your spooky creations makes all the extra effort worthwhile.

    This season, let these treats add a bit of fun to your festivities. Their cheerful orange hue and crispy texture are perfect for any autumn gathering. After all, sometimes the simplest recipes make the biggest memories.