
Radishes often get a bad rap as just a crunchy, peppery snack. But when you roast them with garlic, they turn into something entirely different—soft, sweet, with a smoky edge that mimics the richness of roasted potatoes. I stumbled onto this trick by accident, trying to use up a bunch of radishes before they wilted, and I was hooked from the first bite.
This recipe is my go-to for transforming a humble vegetable into a side that surprises everyone at the table. It’s perfect for those days I want something simple but flavorful, no fuss, no fuss. Plus, the aroma of roasted garlic filling the kitchen? It’s a small joy that makes cooking feel like an event.
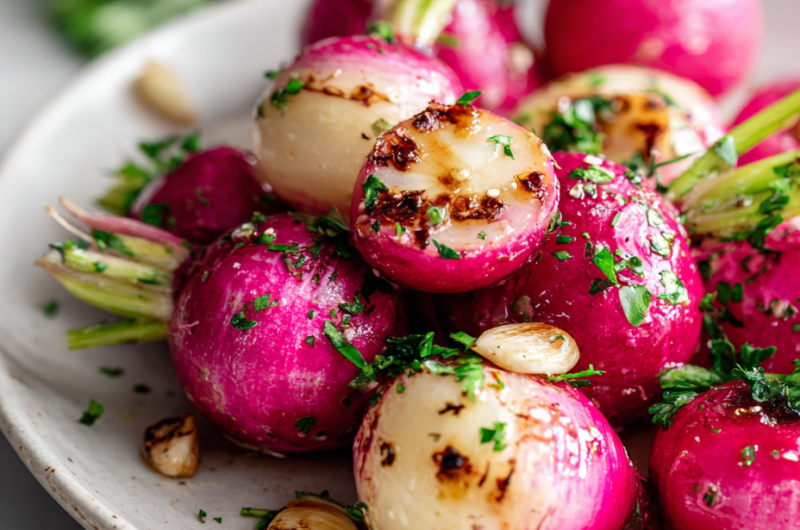
This recipe focuses on transforming humble radishes into a savory, garlic-infused side that mimics the indulgence of roasted potatoes, making a surprising and satisfying vegetable upgrade.
The story behind this recipe
- I was experimenting with root vegetables one chilly autumn weekend, digging through the fridge for inspiration. Radishes caught my eye—something bright and fresh, but I wanted to give them a warm, savory twist.
- Roasting radishes with garlic was an accidental discovery. The heat mellowed their peppery bite into sweet, tender bites, while the garlic brought a smoky, aromatic punch that made me think of roasted potatoes.
- Now, I keep this dish on rotation, especially when I crave something quick, comforting, and a little unexpected. It’s a reminder that humble ingredients can surprise us—if you give them a little heat and patience.
Ingredient breakdown: key components
- Radishes: I love the crunch and peppery snap, but roasting turns them sweet and mellow—try slicing smaller for quicker caramelization.
- Garlic: Roasted garlic becomes soft, smoky, and spreadable. Use a little more than you think—its aroma is worth it, and it balances the radish’s bite.
- Olive oil: I use good extra-virgin for that fruity, slightly peppery note. Skip it if you want a lighter finish, but it truly deepens flavor here.
- Salt: A pinch of flaky sea salt at the end highlights the natural sweetness and adds a pleasant crunch—don’t skip the finishing touch.
- Black pepper: Freshly cracked adds a subtle heat that complements the garlic’s richness—grind it just before serving for maximum punch.
- Optional herbs: A sprinkle of thyme or parsley can brighten the dish—fresh herbs add a fresh, slightly grassy contrast to the smoky radishes.
Spotlight on key ingredients
Radishes:
- Their firm, crisp texture softens beautifully, turning tender and slightly sweet when roasted—look for vibrant, unblemished bulbs for best flavor.
- They have a peppery bite that mellows into a subtle sweetness, with a smoky undertone developing as they caramelize—smaller radishes cook faster and more evenly.
Garlic:
- Roasted garlic becomes soft, spreadable, with a smoky, almost nutty aroma—using plenty boosts the depth of flavor and balances the radish’s pepperiness.
- During roasting, it transforms from sharp and pungent to mellow and sweet, filling your kitchen with a warm, inviting scent—crush or chop for maximum aroma release.
Notes for ingredient swaps
- Dairy-Free: Skip butter or cream—radishes and garlic stand strong on their own, but a splash of lemon juice adds brightness.
- Vegan: Use olive oil instead of butter for roasting—keeps the flavor rich and the dish plant-based.
- Herb Variations: Swap parsley for thyme or dill—each adds a different fresh, aromatic note to the dish.
- Oil Choices: Replace olive oil with avocado or grapeseed oil—both have high smoke points and neutral flavors.
- Salt Type: Use sea salt or flaky finishing salt—finer salts can be used during cooking, but flaky salt adds texture at the end.
- Garlic Prep: Roast whole garlic cloves for a milder, sweeter flavor—squeeze out the roasted garlic instead of mincing.
- Radish Varieties: Try watermelon radishes for a visual pop and a milder, slightly sweeter flavor—slice thinner for even roasting.
Equipment & Tools
- Baking sheet: To roast the radishes evenly in the oven.
- Parchment paper: To prevent sticking and make cleanup easier.
- Mixing bowl: To toss radishes with oil and garlic.
- Tongs or spatula: To turn radishes during roasting for even caramelization.
- Sharp knife: To trim, halve, or quarter radishes safely.
Step-by-step guide to garlic roasted radishes
- Preheat your oven to 200°C (390°F). Grab a baking sheet and line it with parchment for easy cleanup.
- Trim the radishes: cut off the greens and stems if attached, then halve or quarter larger radishes for uniform roasting.
- In a small bowl, mix 3 tablespoons of olive oil with 4 minced garlic cloves, a pinch of salt, and freshly ground black pepper.
- Toss the radishes in the garlic oil mixture until evenly coated. Spread them out in a single layer on the prepared baking sheet, cut side down where possible.
- Roast in the oven for 20-25 minutes. During the first 10 minutes, check that radishes are starting to caramelize and turn golden.
- Halfway through, give the pan a gentle shake or use tongs to turn the radishes for even cooking and color.
- The radishes are done when they are tender (a sharp knife or skewer slides in easily), golden, and fragrant with garlic.
- Remove from oven and let rest for 5 minutes. Finish with a pinch of flaky sea salt and a drizzle of extra virgin olive oil if desired.
- Serve warm, garnished with chopped fresh herbs if you like, or as a side to roasted meats or grains.
Let the radishes sit for 5 minutes after roasting to settle flavors. Finish with a sprinkle of flaky salt, a drizzle of oil, and fresh herbs if desired. Serve warm directly from the pan or transfer to a plate for a more polished presentation.
How to Know It’s Done
- Radishes are tender and easily pierced with a knife.
- Surface is golden and slightly caramelized, with some crispy edges.
- Aromatic smell of roasted garlic and radishes fills the kitchen.

Garlic Roasted Radishes
Ingredients
Equipment
Method
- Preheat your oven to 200°C (390°F). Line a baking sheet with parchment paper for easy cleanup and even roasting.
- Trim the greens and stems off the radishes, then cut any larger bulbs in half or quarters to ensure they cook evenly.
- In a small mixing bowl, whisk together olive oil and minced garlic cloves until well combined.
- Toss the radishes in the garlic oil mixture, making sure they are thoroughly coated and glistening with oil.
- Spread the coated radishes out on the prepared baking sheet in a single layer, cut side down where possible for maximum caramelization.
- Roast in the oven for 20-25 minutes, shaking the pan or turning the radishes with tongs halfway through to promote even browning and tenderization.
- The radishes are ready when they are tender when pierced with a skewer and have a golden, caramelized exterior with crispy edges and a fragrant aroma of roasted garlic.
- Remove the radishes from the oven and transfer to a serving dish. Sprinkle with flaky sea salt and freshly cracked black pepper while still warm.
- If desired, garnish with chopped fresh herbs like parsley or thyme for a bright, fresh contrast.
- Serve warm as a savory side that pairs beautifully with roasted meats or grains, enjoying the tender, caramelized, smoky bites.
Pro tips for perfect garlic roasted radishes
- Use small, evenly sliced radishes for faster, uniform caramelization—less chewy, more tender.
- Toss radishes in garlic oil thoroughly—ensure every piece is coated for maximum flavor infusion.
- Roast at 200°C (390°F) until edges are crispy—keep an eye to prevent over-browning.
- Shake the pan midway—this helps the radishes cook evenly and develop a beautiful color.
- Check tenderness with a skewer—should slide in easily without resistance.
- Finish with flaky salt and a drizzle of oil—amplifies flavor and adds a satisfying crunch.
Common mistakes and how to fix them
- FORGOT to check oven temperature → Use an oven thermometer for accuracy.
- DUMPED the radishes too early → Roast longer until they are golden and tender.
- OVER-TORCHED garlic → Add garlic later or cover with foil if browning too quickly.
- SLICED radishes unevenly → Cut uniformly for even roasting and consistent texture.
Quick fixes and pantry swaps
- When radishes are too peppery, splash them with lemon juice after roasting for brightness.
- If garlic burns and turns bitter, patch with a drizzle of honey or olive oil and continue roasting.
- DUMPED the radishes in too cold or too hot oven? Adjust oven to 200°C (390°F) and roast for even caramelization.
- Splash a little water or broth if radishes seem dry during roasting—creates steam and keeps them tender.
- When radishes stick or burn, swap parchment paper for a silicone baking mat to prevent sticking and shimmer better.
Prep, store, and reheat tips
- Prep the radishes: trim and halve them up to a day in advance, storing in an airtight container in the fridge—crisp and fresh for roasting.
- Garlic can be minced ahead and kept in a small jar or covered dish in the fridge—ready to toss with oil for instant flavor.
- Roasted radishes are best eaten fresh, but leftovers keep well for up to 2 days in the fridge—reheat gently in a warm oven or skillet, watching for a crispy edge and warm, tender interior.
- Reheating can cause loss of some crispness; to revive, broil for 2-3 minutes until lightly crisped, paying attention to avoid burning the garlic aroma.
FAQs about Garlic Roasted Radishes
1. How do roasted radishes taste compared to raw ones?
Radishes can taste quite sharp and peppery when raw, but roasting mellows their flavor and brings out a sweet, smoky note. The heat softens their crunch, making them tender and more complex.
2. How do I get crispy roasted radishes?
To achieve a crispy edge, spread radishes in a single layer on the baking sheet and avoid overcrowding. Roast at 200°C (390°F) for 20-25 minutes, shaking halfway to ensure even caramelization.
3. What kind of radishes work best for roasting?
Use fresh, firm radishes with vibrant color. Trim the greens and stems first, then cut into uniform halves or quarters for even cooking.
4. How do I know when roasted radishes are done?
Roast until they are tender when pierced with a skewer, golden, and fragrant with garlic. The edges should be slightly crispy and caramelized.
5. Can I use different oils for roasting radishes?
Yes, you can substitute olive oil with avocado or grapeseed oil for a neutral flavor and higher smoke point. Just keep in mind it might slightly alter the richness.
6. How can I enhance the flavor after roasting?
Adding a squeeze of lemon juice or a drizzle of balsamic vinegar after roasting brightens the dish and balances the smoky flavors. Fresh herbs like parsley or thyme also add freshness.
7. What if my garlic burns during roasting?
If the garlic becomes bitter or burns during roasting, add it later in the process or cover the pan loosely with foil to prevent over-browning.
8. Can I prepare roasted radishes in advance?
Radishes can be prepped up to a day ahead, stored in an airtight container in the fridge. Reheat gently in the oven or skillet to maintain their tender texture and flavor.
9. What if my roasted radishes aren’t tender or crispy enough?
When radishes turn too peppery or dry, splash them with a little water or broth during roasting to create steam and keep them tender, or broil briefly to re-crisp.
10. How do I fix sticking or burning radishes?
If the radishes seem to stick or burn, try lining your baking sheet with parchment paper or a silicone mat. A quick splash of water can also help loosen any stuck pieces during roasting.
This humble radish, transformed into a smoky, tender side, reminds me how simple ingredients can surprise us with the right heat and patience. The aroma of roasted garlic filling the kitchen is a small, grounding pleasure I always look forward to.
In times when I want something quick yet satisfying, this dish somehow feels like a tiny victory—proof that even the most unassuming vegetables can shine with a little roasting and a good splash of oil.

I’m Emily Richardson, the heart and soul behind Playing with Flavors. Cooking isn’t just a hobby for me – it’s a passion that I’ve cultivated for years, and it’s become the driving force of my life.
From the kitchen of my cozy café to the pages of this blog, every dish I create is a reflection of my love for food and the joy it brings to people.


