
Sometimes, I just need a quick fix of something sweet that doesn’t require turning on the oven. These no-bake chocolate almond bars are my go-to for those moments. They’re rich, crunchy, and satisfy that chocolate craving without any fuss.
What I love most is how adaptable they are—no fancy equipment needed, just a bit of patience in the fridge. Plus, they remind me of childhood treats, but with a grown-up twist thanks to the toasted almonds and deep cocoa flavor.
This recipe came together out of a chaotic weekend when I needed comfort fast. It’s become a standby, especially when I want something homemade and honest, with ingredients I always have around.
This recipe is inspired by the need for a comforting, no-fuss treat that combines nostalgic childhood flavors with the simplicity of minimal cooking, perfect for busy days or unexpected guests.
The story behind this recipe
- This recipe was born one rainy afternoon when I needed a treat that felt indulgent but didn’t require turning on the oven. I remember rummaging through my pantry, pulling out almonds and cocoa, just brainstorming. The simplicity of it appealed to me—no fuss, just good ingredients coming together quickly.
- I’ve always loved the idea of making something that feels special but is honestly just a handful of ingredients. It’s the kind of thing my grandma might have kept in her fridge for a quick snack, and I wanted to recreate that sense of cozy, effortless baking.
- heading: ‘The story behind this recipe’
Ingredient breakdown: key components
- Unsweetened cocoa powder: I always use a deep, rich cocoa that smells like dark chocolate—if yours is flat, try a different brand for that intense aroma.
- Almonds: Toasted almonds add a smoky crunch. Feel free to swap for hazelnuts if you want a different nutty note, but don’t forget to toast them for flavor.
- Medjool dates: They’re naturally sticky and sweet, giving the bars their chewy base. Skip or swap with dried figs if you prefer a fruitier, less caramelized flavor.
- Butter: I melt unsalted butter until it’s just shimmering—this helps everything bind. For a dairy-free version, try coconut oil, but expect a slightly different sheen and aroma.
- Chocolate chips: Use good-quality semi-sweet or dark chocolate. If you want a richer, more intense chocolate flavor, try chopping up a bar instead of chips for a more velvety texture.
- Sea salt: A pinch enhances all the flavors—don’t skip it, even if you’re tempted to go sweet all the way. It’s the little spark that makes the chocolate pop.
- Vanilla extract: A splash of vanilla adds warmth and depth. Vanilla bean paste works beautifully here if you want a more fragrant, speckled finish.
Spotlight on key ingredients
Almonds:
- Toasted almonds bring a smoky crunch and a fragrant nuttiness that lingers long after the bars are gone. Their texture contrasts beautifully with the chewy date base, adding a satisfying bite.
- Chocolate chips: I prefer semi-sweet because they melt into a glossy, velvety layer that’s just sweet enough. The chips soften and shimmer when melted, creating that irresistible, gooey chocolate topping.
Cocoa powder:
- Medjool dates: They’re naturally sticky and caramel-sweet, making the base rich and chewy. When blended, they turn into a luscious, oozing paste that binds everything together with a subtle fruitiness.
- Deep, intense, and slightly bitter, it’s what gives these bars their signature chocolate flavor. When mixed into the warm butter, it releases an earthy aroma that’s almost intoxicating.
Notes for ingredient swaps
- Dairy-Free: Swap butter for coconut oil. Expect a slightly different sheen and aroma, but still rich.
- Sweetener: Use honey or maple syrup instead of Medjool dates for a different flavor twist, but be mindful of moisture content.
- Nuts: Try hazelnuts or cashews if almonds aren’t available. Toast them first for extra flavor.
- Chocolate: Replace chips with chopped dark chocolate or vegan chocolate for a richer, more velvety top layer.
- Cocoa: Use Dutch-processed cocoa for a milder, smoother cocoa flavor, or natural cocoa for more punch.
- Flavor Boost: Add a teaspoon of espresso powder or chili flakes to intensify the chocolate depth.
- Texture: Incorporate shredded coconut or crushed graham crackers for extra crunch and flavor variation.
Equipment & Tools
- 20cm (8-inch) square pan: Holds the bars and makes slicing easier.
- Parchment paper: Prevents sticking and allows easy removal.
- Food processor: Chops and combines ingredients into a sticky mixture.
- Small saucepan: Melts butter gently without burning.
- Spatula: Presses mixture into the pan evenly.
- Microwave or double boiler: Melts chocolate smoothly.
- Sharp knife: Slicing the set bars cleanly.
Step-by-step guide to no-bake bars
- Equip a 20cm (8-inch) square pan with parchment paper, allowing some overhang for easy removal. Set aside.
- Combine 1 cup (150g) toasted almonds and 1 cup (150g) Medjool dates in a food processor. Blend until finely chopped and sticky, about 1-2 minutes. If mixture is too dry, add a teaspoon of water or a splash of almond milk and pulse again.
- Melt 1/4 cup (60g) unsalted butter in a small saucepan over low heat until just shimmering, about 2 minutes. Remove from heat.
- Pour melted butter into the food processor with the almond-date mixture. Add 1/2 cup (50g) cocoa powder, 1/2 teaspoon vanilla extract, and a pinch of sea salt. Pulse until well combined and sticks together when pressed. If too crumbly, add a tiny splash of water and pulse again.
- Transfer the mixture to the prepared pan. Press down firmly with the back of a spatula or your fingers to create an even, compact layer. Chill in the fridge for at least 2 hours, or until firm.
- Once set, melt 1/2 cup (90g) chocolate chips in a heatproof bowl over a double boiler or microwave in 20-second bursts, stirring until smooth. Pour over the chilled base and spread evenly.
- Sprinkle a pinch of sea salt or chopped toasted almonds on top if desired. Return to the fridge for another 30 minutes to set the chocolate topping.
- When ready, lift the bars out of the pan using the parchment overhang. Slice into squares with a sharp knife, wiping between cuts for clean edges.
- Serve immediately or store in an airtight container in the fridge for up to a week. For softer texture, let sit at room temperature for 10 minutes before serving.
Chill the assembled bars in the fridge for at least 2 hours, or until completely firm. Slice carefully with a warm, sharp knife. Serve directly from the fridge or let sit at room temperature for 10 minutes for softer bites.
How to Know It’s Done
- The base should be firm and hold together when pressed.
- Chocolate topping is glossy and set with no streaks or melting fingerprints.
- Bars are evenly sliced with clean edges, not crumbling.
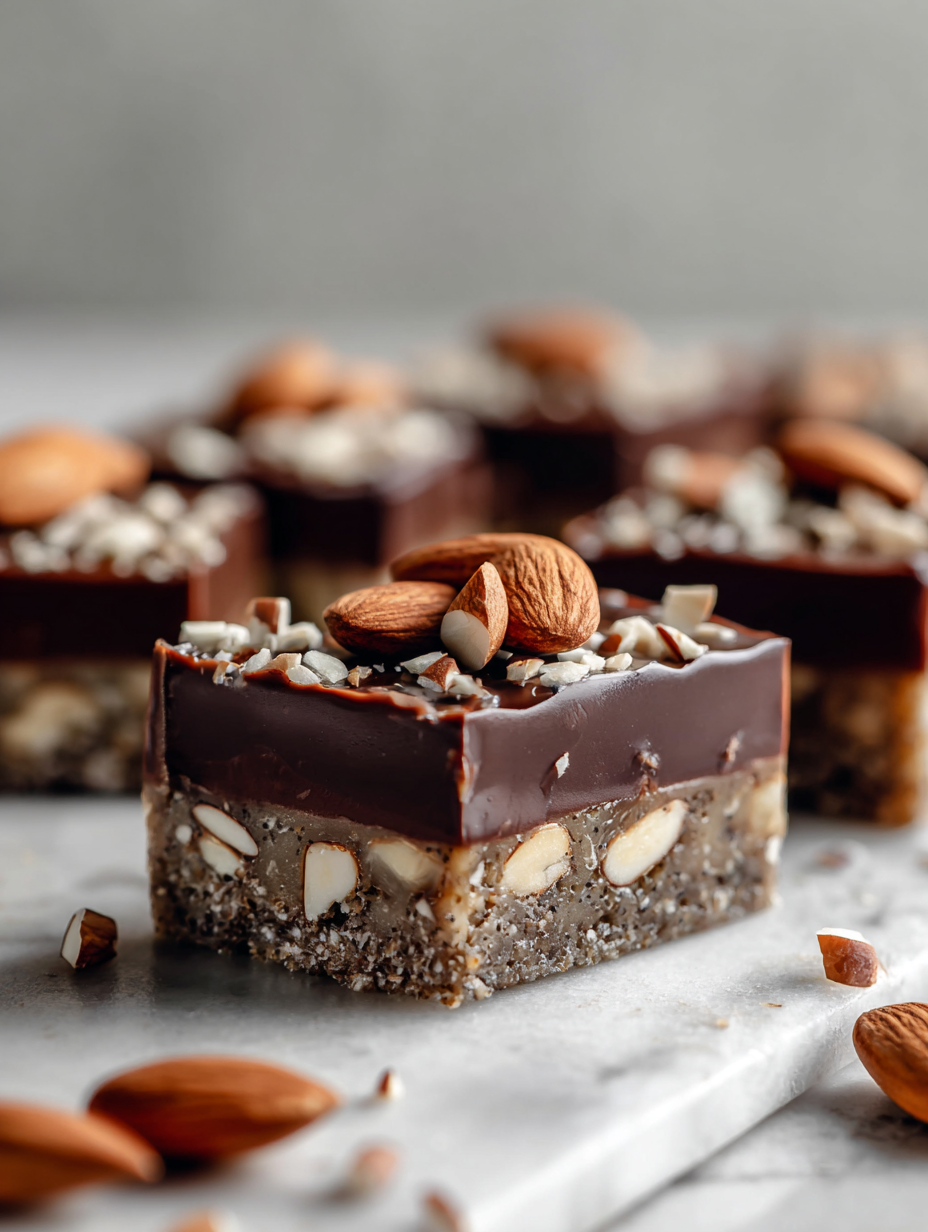
No-Bake Chocolate Almond Bars
Ingredients
Equipment
Method
- Line your square pan with parchment paper, leaving some overhang for easy removal, and set aside.
- Place the toasted almonds and pitted Medjool dates into your food processor.
- Pulse the mixture until it becomes finely chopped and sticky, about 1-2 minutes. If the mixture isn't coming together, add a tiny splash of water and pulse again.
- In a small saucepan, melt the butter over low heat until it shimmers and smells buttery, about 2 minutes.
- Pour the melted butter into the food processor with the almond-date mixture.
- Add the cocoa powder, vanilla extract, and a pinch of sea salt to the processor. Pulse until everything is well combined and the mixture sticks together when pressed.
- Transfer the mixture into the prepared pan and press down firmly with the back of a spatula or your fingers to create an even, compact layer.
- Chill the pan in the refrigerator for at least 2 hours until the mixture is firm.
- Once set, melt the chocolate chips using a microwave or double boiler until smooth and glossy.
- Pour the melted chocolate over the chilled base, spreading evenly with a spatula. Optionally, sprinkle a pinch of sea salt or chopped almonds on top.
- Return the pan to the fridge for another 30 minutes until the chocolate is fully set.
- Lift the set bars out of the pan using the parchment overhang. Slice into squares with a sharp, warm knife and enjoy!
Pro tips for perfect bars
- Bolded mini-head: Use room temperature butter for a smoother, more cohesive mixture that spreads easily.
- Bolded mini-head: Toast almonds until fragrant and slightly darker for a richer, smoky flavor in every bite.
- Bolded mini-head: Pulse dates and almonds just enough to keep some texture; over-blending leads to a mushy base.
- Bolded mini-head: Melt chocolate in short bursts and stir well; avoid overheating to keep that glossy, smooth pour.
- Bolded mini-head: Press the mixture firmly into the pan using the back of a spatula or your fingers for an even layer.
- Bolded mini-head: Chill the bars until completely set—at least 2 hours—so they slice cleanly without crumbling.
- Bolded mini-head: For a shiny top coat, pour melted chocolate over chilled bars and let it set in the fridge.
Common mistakes and how to fix them
- FORGOT to chill the mixture → Chill for at least 2 hours until firm.
- DUMPED in hot chocolate → Ensure melted chocolate is slightly cooled before pouring.
- OVER-TORCHED the chocolate → Melt chocolate gently in short bursts, stirring frequently.
- MISSED the pressing step → Press mixture firmly to prevent crumbling later.
Quick fixes and pantry swaps
- When mixture feels dry → Splash a tiny bit of water and pulse again.
- If chocolate is too thick to pour → Microwave in short bursts, stirring until smooth.
- When bars crumble while slicing → Chill longer, at least 2 hours, until firm.
- Splash melted chocolate when over-heated → Let it cool slightly before pouring.
- Patch sticky base → Add a few drops of water or almond milk for better binding.
Prep, store, and reheat tips
- Prepare the base mixture and press into the pan up to 24 hours ahead; keep covered in the fridge for freshness.
- Chill the assembled bars for at least 2 hours to fully set the chocolate topping, ensuring clean slices.
- Store the finished bars in an airtight container in the fridge for up to a week; their texture stays firm and chocolate glossy.
- Reheat slightly at room temperature for 10 minutes if you prefer softer bites; the chocolate will soften and shimmer.
- For longer storage, freeze the bars wrapped tightly for up to a month, then thaw in the fridge for best texture.
Top questions about no bake bars
1. Can I use different types of chocolate?
Use high-quality semi-sweet or dark chocolate chips for a richer, smoother topping that melts beautifully. Chopping a bar gives a velvety texture, while chips are more convenient.
2. What if I don’t have Medjool dates?
Medjool dates are sticky and caramel-sweet, perfect for binding. If you skip them, the base might be crumbly. Dried figs can be a good alternative with a less caramelized flavor.
3. How do I toast the almonds properly?
To toast almonds, spread them on a baking sheet at 180°C (350°F) for 8-10 minutes until fragrant. Let cool before chopping. Toasting brings out smoky, nutty flavors.
4. How do I know when the bars are ready to slice?
Chill the bars in the fridge for at least 2 hours until the chocolate is glossy and firm. For clean slices, use a sharp knife wiped between cuts and press firmly for even layers.
5. Can I make these dairy-free?
For a dairy-free version, swap butter for coconut oil. Expect a slight coconut aroma and a softer texture, but still rich and satisfying.
6. My melted chocolate won’t pour smoothly—what now?
If the chocolate is too thick to pour smoothly, microwave in short bursts (10-15 seconds), stirring until glossy and smooth. Avoid overheating to prevent seizing.
7. How should I store these bars?
Store the bars covered in the fridge for up to a week. For longer storage, freeze them wrapped tightly for up to a month, then thaw in the fridge.
8. The base is crumbly, what can I do?
When the mixture feels too dry and crumbly, add a teaspoon of water or almond milk, then pulse briefly. This helps it come together without over-processing.
9. The bars are crumbling when I cut them—how do I fix that?
If the bars crumble when slicing, chill them longer—about 2 hours—until firm. Use a warm, sharp knife to get clean edges.
10. Can I add other flavors or toppings?
For an extra flavor boost, add a pinch of sea salt on top of the chocolate layer. It enhances the chocolate’s richness and balances sweetness.
These no-bake chocolate almond bars are more than just a quick treat; they’re a little reminder that simplicity often yields the best flavor. Each bite delivers a satisfying crunch and deep cocoa richness that feels like a small, homemade victory. They’re perfect for when you need comfort or just want something honest and straightforward.
Sometimes, the best recipes are the ones you toss together on a whim, leaning into pantry staples and a bit of patience. No matter the occasion, these bars will make your kitchen smell like toasted almonds and melted chocolate—simple, honest, and just right.