
There’s something about the rush of grabbing a frozen chocolate bar from the freezer that feels like childhood rebellion. I remember sneaking into the kitchen late at night, the cold metal of the freezer door, and that first satisfying crackling snap as I broke off a piece. Turns out, you can capture that thrill in a no-bake recipe that’s just as easy as it is nostalgic.
This recipe is a quick fix for when a sweet craving hits but the oven’s off-limits or you’re just too busy to fuss. It’s honest, no fuss—just melting, mixing, and setting. Perfect for those days when you want a little comfort with minimal effort, and a lot of flavor that takes you back.
This recipe is inspired by the childhood thrill of sneaking a piece of frozen chocolate from the freezer, turning a simple treat into a nostalgic, no-bake adventure that’s perfect for busy days or when you crave something sweet without turning on the oven.
The story behind this recipe
- This recipe came from a lazy weekend afternoon when I was out of time but craving something chocolatey. I remembered how my grandmother used to keep a stash of simple, no-bake treats in the fridge for when she didn’t want to fuss. That memory stuck with me, and I started experimenting with what I had on hand—cereal, a bit of butter, and lots of chocolate.
- I love how these bars are a little rebellious—no oven, no fuss, just melt and pour. But they also carry a nostalgic charm, like a secret shortcut to childhood. Every time I make them, I think about those afternoons when you just want something sweet, quick, and honest. It’s like a little reward after a busy day, no guilt, just good chocolate.
- heading: ‘The story behind this recipe’
Key ingredients and tips
- Butter: I use unsalted butter for a clean, creamy base, but if you’re out, margarine can do the trick—just watch for a slightly different richness.
- Chocolate: I prefer dark chocolate for its deep, bittersweet flavor that melts smoothly and sets firm—try milk chocolate if you want a sweeter, creamier finish.
- Sweetener: I usually stick to honey or maple syrup, which add a subtle, natural sweetness and a hint of aroma—skip if you want a more neutral taste.
- Cereal: I love using crispy rice cereal for crunch, but graham crackers or crushed pretzels can add interesting texture or salty contrast—experiment with your favorites.
- Vanilla Extract: A splash of vanilla lifts the chocolate flavor and adds warmth—if you don’t have it, a pinch of salt can help enhance the richness.
- Optional Mix-ins: Nuts, dried fruit, or sea salt flakes—these add texture and surprise bursts of flavor, so toss in what you love or have at hand.
- Optional Toppings: Drizzle with extra melted chocolate or sprinkle flaky sea salt—these finishing touches make each bite feel special and layered.
Spotlight on key ingredients
Chocolate:
- I love using high-quality dark chocolate because it melts smoothly and gives a deep, rich flavor that really stands out in these bars.
- It can be a bit temperamental—overmelting can cause graininess, so melt slowly and stir often for that silky finish.
Butter:
- I prefer unsalted butter for a clean, creamy base, but if you only have margarine, it’ll work—just expect a slightly different richness and mouthfeel.
- When melting, smell for that warm, toasty aroma—if it smells burnt or acrid, start over with fresh butter to keep the flavor pure.
Notes for ingredient swaps
- Dairy-Free: Coconut oil or vegan butter can replace butter, but expect a slightly coconutty or different richness.**
- Chocolate: Dark chocolate with at least 70% cocoa gives a deep flavor; milk or white chocolate will be sweeter and creamier, softer when set.**
- Sweetener: Honey or maple syrup adds natural sweetness and a bit of chew; agave nectar is a neutral swap, though slightly thinner.**
- Cereal: Rice krispies are classic, but crushed graham crackers or pretzels add crunch and salt, changing the texture and flavor profile.**
- Flavor Boost: Vanilla extract brightens the chocolate; skip if you want a more intense cocoa taste.**
- Add-ins: Nuts or dried fruit lend texture and flavor; toast nuts first for extra aroma.**
- Toppings: Drizzle with extra melted chocolate or sprinkle sea salt for a finishing touch; flaky sea salt enhances sweetness.
Equipment & Tools
- 9×9 inch (23×23 cm) pan: Holds the mixture and shapes the bars.
- Parchment paper: Prevents sticking and makes removal easy.
- Microwave-safe bowl: Melts the chocolate evenly.
- Spatula: Spreads and presses the mixture smoothly.
- Sharp knife: Cuts the finished bars cleanly.
Step-by-step guide to no-bake bars
- Equipment & Tools: Prepare a 9×9 inch (23×23 cm) square pan, line with parchment paper for easy removal.
- In a microwave-safe bowl, melt 1 cup (175 g) of semi-sweet chocolate chips on 50% power in 30-second bursts, stirring in between until smooth. (Approx. 2 min total)
- Add 2 tablespoons (28 g) of unsalted butter to the melted chocolate, stir until glossy and fully incorporated. Smell for rich cocoa aroma, avoid overcooking.
- Mix in 1/4 cup (60 ml) of honey or maple syrup for natural sweetness and slight stickiness, stir well. Watch for shiny, smooth consistency.
- Fold in 2 cups (60 g) of crispy rice cereal or your preferred crunch, gently mixing to coat evenly. It should look fluffy but hold shape.
- Pour the chocolate mixture into the prepared pan. Use a spatula to spread it evenly, pressing down lightly. The surface should be smooth and shiny.
- Optional: sprinkle sea salt flakes or add mini nuts on top for texture and flavor contrast. Press them in gently so they stick.
- Rest the bars at room temperature for 10 minutes, then transfer to the fridge. Chill for at least 2 hours or until firm and set.
- Finishing: Once firm, lift the parchment to remove from the pan. Cut into bars or squares with a sharp knife. Serve immediately or store.
Let the bars rest at room temp briefly before refrigerating for at least 2 hours. Once set, remove from pan by lifting parchment paper, then cut into squares. Serve immediately or store in an airtight container in the fridge for up to a week.
How to Know It’s Done
- Chocolate is glossy and fully melted before mixing.
- Cereal is coated evenly without clumping.
- Bars are firm and hold shape when cut, with a shiny surface.
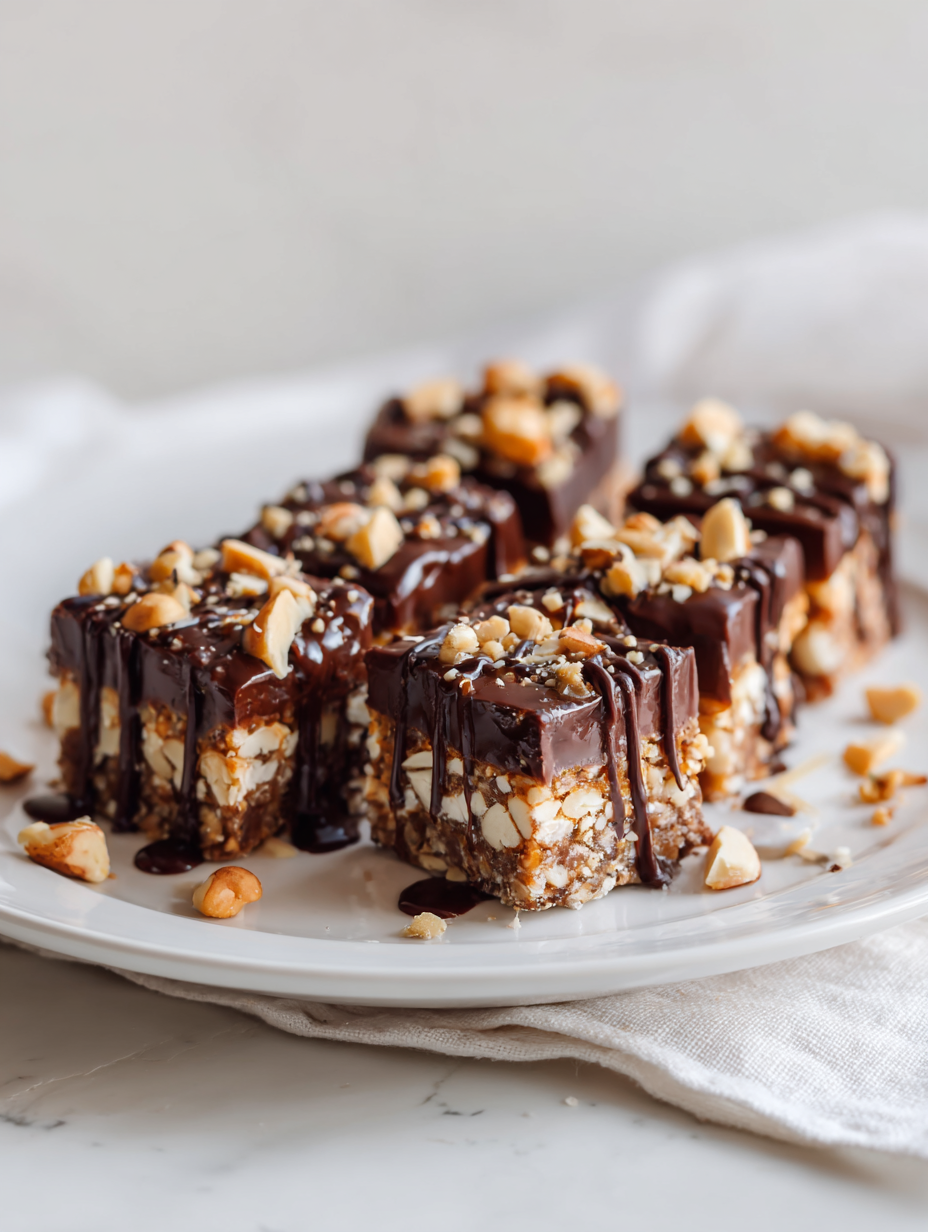
No-Bake Chocolate Nut Bars
Ingredients
Equipment
Method
- Line your 9x9 inch pan with parchment paper, leaving overhang for easy removal.
- In a microwave-safe bowl, melt the chocolate chips in 30-second bursts, stirring well after each, until smooth and glossy. This should take about 2 minutes total.
- Add the butter to the melted chocolate and stir until fully incorporated and the mixture is shiny and smooth. Feel the warmth and smell the rich cocoa aroma.
- Mix in the honey or maple syrup, stirring until the mixture is evenly combined and slightly sticky to the touch.
- Gently fold in the crispy rice cereal, ensuring each piece is coated with the chocolate mixture. The mixture should look fluffy and hold its shape when pressed.
- Pour the mixture into the prepared pan and use a spatula to spread it evenly, pressing down firmly to create a compact layer with a smooth surface.
- If desired, sprinkle sea salt flakes or chopped nuts on top and gently press them into the surface for added flavor and texture.
- Allow the bars to sit at room temperature for about 10 minutes, then transfer to the fridge and chill for at least 2 hours until firm and set.
- Once set, lift the bars out of the pan using the parchment overhang and cut into squares with a sharp knife. Wipe the knife clean between cuts for neat edges.
- Serve immediately or store in an airtight container in the fridge for up to a week. Enjoy these rich, crunchy, chocolatey treats whenever cravings hit!
Notes
Tips for perfect no-bake bars
- Use high-quality chocolate: The better the chocolate, the smoother and richer your bars will taste. Don’t skimp on the good stuff.
- Don’t rush melting: Low and slow is key. Use short bursts in the microwave and stir often to avoid scorching or graininess.
- Add ingredients gradually: When mixing in cereal or nuts, fold gently to keep the mixture light and prevent breaking the cereal too much.
- Chill thoroughly: For clean cuts, let the bars set in the fridge for at least 2 hours until firm and shiny. Patience pays off.
- Press firmly: When pouring into the pan, press the mixture down with the spatula to eliminate air pockets and ensure even texture.
- Avoid over-handling: Once poured, don’t over-manipulate the mixture. Keep it level and let it set undisturbed for the best finish.
- Use parchment paper: Lining your pan prevents sticking and makes removal and cutting a breeze, keeping your edges sharp.
Common mistakes and how to fix them
- FORGOT to temper chocolate → Melt slowly to prevent graininess.
- DUMPED in all ingredients at once → Add ingredients gradually for smooth mixing.
- OVER-TORCHED the chocolate → Remove from heat as soon as it’s glossy and smooth.
- SKIPPED parchment lining → Use parchment for easy removal and clean cuts.
Quick fixes and pantry swaps
- If chocolate seizes, splash in a teaspoon of vegetable oil to loosen the mixture.
- When bars crack when cutting, chill longer or warm the knife slightly.
- DUMPED in too much cereal? Add a little melted chocolate to bind and smooth.
- Over-torched chocolate? Patch with fresh melted chocolate for a glossy finish.
- When in doubt, swap dark for milk chocolate for a sweeter, creamier result—smells divine.
Prep, store, and reheat tips
- Preparing the chocolate mixture a day ahead allows flavors to meld; just keep it covered in the fridge to prevent odors.
- Store the finished bars in an airtight container in the fridge for up to a week, maintaining their firm, glossy texture.
- For longer storage, freeze the bars wrapped tightly in plastic wrap and stored in a sealed bag; they’ll keep for up to a month.
- Reheat slices briefly in the microwave on 30% power for 10-15 seconds until just softened; watch for melty, shiny chocolate.
Top questions about no-bake chocolate bars
1. How do I melt chocolate without it seizing or burning?
The best way is to melt the chocolate slowly in short bursts, stirring often to prevent burning and graininess.
2. Can I make these bars dairy-free?
Yes, you can use vegan chocolate or dairy-free chips for a plant-based alternative that melts just as smoothly.
3. How long do I need to chill the bars?
Chill the mixture for at least 2 hours until firm. The bars should be shiny, hold their shape, and be easy to cut.
4. Can I freeze these bars?
Yes, wrapping the bars tightly in plastic and freezing them for up to a month works well. Thaw in the fridge before serving.
5. What should I do if the chocolate doesn’t set properly?
If the chocolate isn’t glossy or feels sticky, re-melt with a splash of vegetable oil and stir until smooth.
6. How do I get clean slices without cracking?
Use a sharp knife warmed slightly with hot water for clean cuts. Wipe between cuts for neat edges.
7. What are good substitutions for cereal?
You can swap crispy rice cereal for crushed pretzels or graham crackers for different textures and flavors.
8. How can I customize the flavor of these bars?
Add a pinch of sea salt or vanilla extract to enhance flavor, or mix in nuts or dried fruit for texture.
9. My mixture is too stiff, what do I do?
If the mixture is too thick to pour, gently warm it or add a small splash of milk or cream to loosen.
10. How should I store leftovers?
Store in an airtight container in the fridge for up to a week or in the freezer for longer, wrapped well.
These no-bake chocolate bars are a simple reminder that good things don’t always need fuss or oven time. They’re perfect for when you want something sweet that’s honest and quick, with that melt-in-your-mouth richness that hits just right.
Once you get the hang of the melting and mixing, you’ll find they come together faster than you expect—making them a go-to whenever a chocolate craving strikes, no matter the season or occasion.