
This no-bake cornflake cookies recipe is my go-to when I need a quick sweet fix that doesn’t require turning on the oven. It’s oddly satisfying how a simple mix of butter, sugar, and crispy cornflakes can turn into something so nostalgic and crave-worthy in no time at all. I love that it’s a hands-off treat that can come together in under 15 minutes, perfect for busy afternoons or last-minute dessert cravings.
There’s something about the crunch of those cornflakes coated in glossy, sweet syrup that instantly takes me back to childhood kitchens. It’s a messy, honest process—no fancy tools, just a bowl, a spoon, and a bit of patience. This recipe is the unofficial MVP of my emergency dessert stash, especially when I want something comforting but don’t want to fuss over complicated steps.
This recipe is a nostalgic rescue for busy afternoons when I crave a sweet fix but have no time for baking. It’s a perfect way to turn a handful of simple ingredients into something that feels like a warm hug from childhood, without turning on the oven.
A Nostalgic Treat in Minutes
- Making these cookies always reminds me of lazy weekend afternoons with my grandma, who’d let me lick the spoon.
- I get unexpectedly proud when I scoop the mixture onto the tray — it’s simple, but feels like a small victory.
- Nothing beats that moment when the syrup finally coats the cornflakes perfectly, crispy with a glossy sheen, just the right amount of sticky sweetness.
- These cookies are chaos on the counter—sticky hands, crumbs everywhere—but they’re worth every messy second.
The story behind this recipe
- This recipe came about during a frantic weekend, when I needed something sweet but had zero patience for baking. I remember rummaging through my pantry and spotting a bag of cornflakes that I’d bought on a whim—never quite knowing what to do with them. Stirring together butter, sugar, and cocoa, I realized how oddly satisfying it was to create something crispy, sticky, and totally no-fuss. It’s become my emergency treat, a quick fix that tastes like childhood but still feels like a little victory every time.
- I love how these cookies come together with just a handful of ingredients, no oven required. Sometimes, I’ll double the batch just so I don’t run out of the crunchy, sweet bites during busy weeks. They’re a messy, honest kind of dessert—no perfect edges, just spoonfuls of gooey goodness that set in the fridge. Honestly, making these is as much about the process as the treat itself—an instant mood lift, no special tools needed.
- I keep coming back to this recipe because it’s foolproof and forgiving, perfect for when I want something nostalgic and satisfying with minimal effort.
Historical Tidbits
- These cookies originated during the Great Depression, when families needed affordable, no-bake treats using pantry staples.
- Cornflakes were initially invented in the late 19th century as a healthful breakfast option, but soon found their way into sweet recipes like this one.
- The no-bake cookie trend surged in the 1950s, with housewives embracing quick, oven-free desserts amid busy household routines.
Ingredient breakdown
- Butter: I use unsalted butter for a clean, rich base—skip if you prefer a milder flavor, but the salt balances the sweetness beautifully.
- Sugar: Granulated works perfectly, but if you want a less sweet version, reduce by a tablespoon and taste—sugar’s the glue for that gooey texture.
- Cornflakes: The star! Crispy and light, they give the cookie that crunch. Freshness matters—use a recently opened bag for maximum snap.
- Cocoa powder: Adds depth and a hint of smoky flavor—preferably unsweetened. If you like it sweeter, toss in a few mini chocolate chips.
- Vanilla extract: Just a splash brightens everything—don’t skip it, or the flavor will feel a little flat, especially when cooled.
- Optional add-ins: Peanuts or dried cranberries can amp up the texture—add before mixing, so they stick nicely without breaking down.
- Parchment paper: Essential for easy cleanup and preventing sticking. Trust me, scraping sticky cookies off a tray is no fun without it.
Spotlight on key ingredients
Cornflakes:
- I love how they’re light and crispy, but they soften quickly once coated in syrup. Use fresh for maximum crunch.
- They behave unpredictably if you handle them roughly—gently fold to avoid breaking the flakes and losing that delicate crunch.
Butter:
- It melts smoothly, giving the coating a rich, glossy sheen. Too little and the mixture won’t stick well.
- During melting, it releases a warm, comforting smell—make sure not to overheat or it’ll smell burnt and ruin the texture.
Notes for ingredient swaps
- Dairy-Free: Use coconut oil or dairy-free margarine instead of butter. It keeps the cookies rich but may alter the flavor slightly, adding a subtle coconut note.
- Sugar Alternatives: Swap granulated sugar for honey or maple syrup. Expect a slightly different sweetness profile and a chewier texture.
- Cornflakes: Try crisp rice cereal for a lighter, less sweet crunch, or oatmeal flakes for a heartier bite, though it will change the texture.
- Cocoa Powder: Use carob powder for a sweeter, milder flavor or Dutch-processed cocoa for a smoother, less acidic taste.
- Add-ins: Incorporate chopped nuts, dried fruits, or mini chocolate chips to customize texture and flavor—add before mixing for even distribution.
- Parchment Paper: If unavailable, use a silicone baking mat or lightly grease the tray; expect a slightly messier cleanup but similar results.
Equipment & Tools
- Parchment paper: Prevents sticking and makes cleanup easy.
- Medium saucepan: Melts the butter and cocoa mixture evenly.
- Sturdy spoon or spatula: Folds cornflakes into the syrup without breaking them.
- Measuring cups and spoons: Ensures accurate ingredient proportions.
- Cooling rack or tray: Supports cookies as they set and cool.
Step-by-step guide to no bake cookies
- Equipment & Tools: Line a baking sheet with parchment paper, use a medium saucepan for melting, and a sturdy spoon or spatula for mixing.
- Measure butter, sugar, and cocoa into the saucepan. Heat over medium-low (about 150°C / 300°F).
- Stir constantly until the butter melts completely, and the mixture is smooth and glossy, about 2 minutes.
- Bring to a gentle boil (crackling and bubbling), then let it boil for 1 minute—timing is key for setting.
- Remove from heat. Quickly stir in vanilla extract, then add the cornflakes, folding gently to coat evenly.
- When the mixture is uniformly coated, use a spoon to scoop dollops onto the prepared baking sheet. Don’t pack them tight.
- Flatten each dollop slightly with the back of the spoon for a more uniform shape and quicker set.
- Let the cookies rest at room temperature for about 15 minutes, or until they start to firm up, then transfer to the fridge.
- Chill for at least 30 minutes—until they’re set and slightly crisp on the outside.
- Check for doneness: the cookies should hold their shape, have a shiny coating, and feel firm but not hard.
- Serve straight from the fridge or at room temp. Enjoy the crunch and gooey sweetness!
Allow cookies to rest at room temp for 15 minutes, then chill in the fridge for 30 minutes until firm. Serve directly from fridge or at room temperature, enjoying the crunchy, sticky bites.
How to Know It’s Done
- Color: Cookies should be glossy and golden-brown on the edges.
- Texture: They should hold shape but still feel slightly soft when gently pressed.
- Appearance: Full coating of chocolate-cocoa glaze with a crispy exterior.
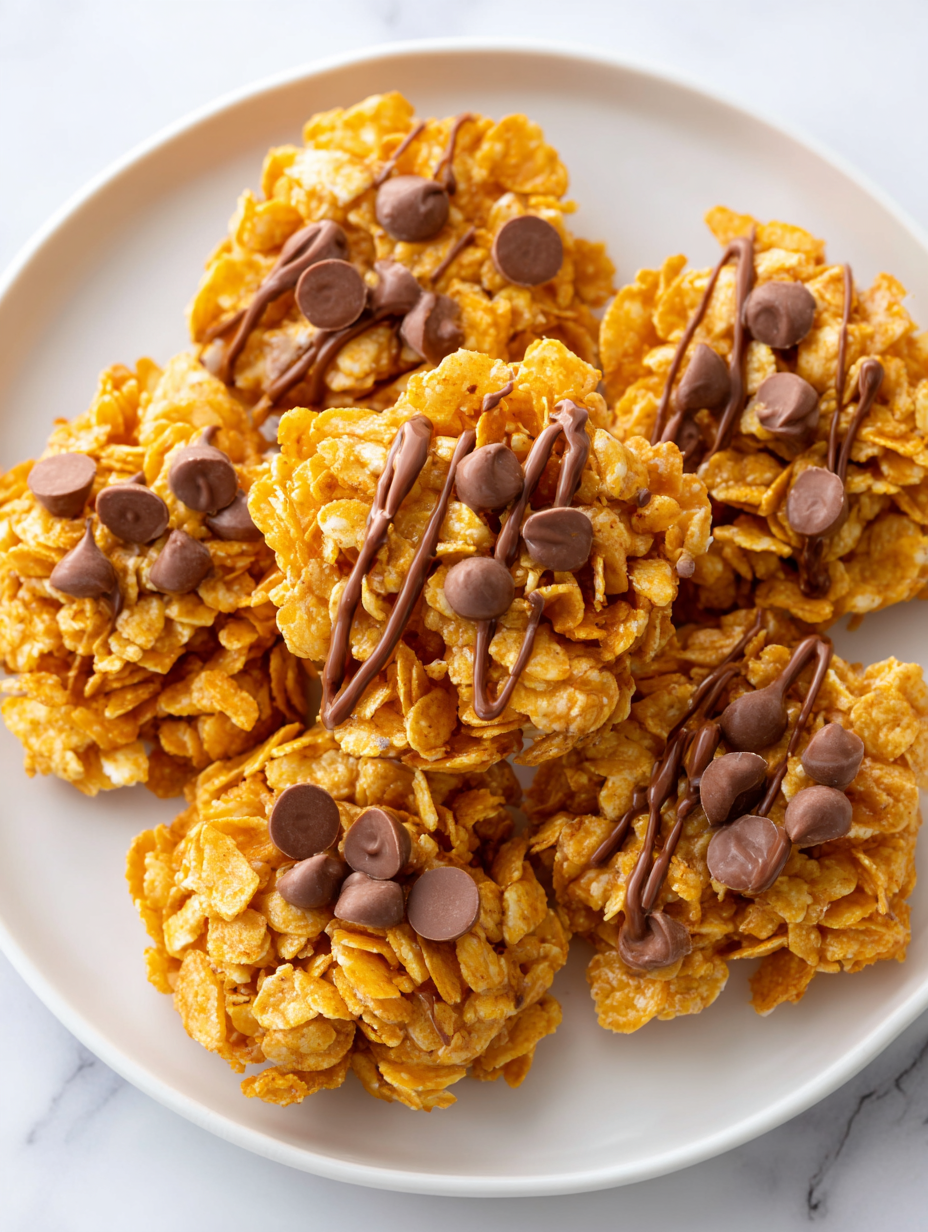
No-Bake Cornflake Cookies
Ingredients
Equipment
Method
- Line a baking sheet with parchment paper and set it aside.
- In a medium saucepan, combine the butter, sugar, and cocoa powder. Heat over medium-low, stirring constantly, until the butter melts completely and the mixture turns glossy and smooth, about 2 minutes. You’ll notice it bubbling gently and smelling rich and chocolatey.
- Increase the heat slightly and bring the mixture to a gentle boil, letting it bubble for exactly 1 minute. This helps the cookies set properly and develop that sticky, glossy texture.
- Remove the saucepan from heat and stir in the vanilla extract. Then, gently fold in the cornflakes, mixing carefully so they stay as crispy as possible and are evenly coated with the syrup. You'll see the flakes glisten and stick together slightly, but still retain their crunch.
- Using a spoon, scoop generous dollops of the mixture onto your prepared baking sheet. Gently flatten each mound with the back of the spoon to shape the cookies and help them set faster. The mixture should be sticky but manageable.
- Let the cookies sit at room temperature for about 15 minutes, allowing the coating to firm up slightly. Then, transfer the tray to the fridge and chill for at least 30 minutes until they are completely set and firm to the touch.
- Once chilled and firm, remove the cookies from the fridge. They will have a shiny, crispy exterior with a chewy interior—perfect for snacking or sharing. Serve straight from the fridge or at room temperature for a delicious nostalgic treat.
Pro tips for perfect cookies
- Bold Flavored Oils: Use a splash of coconut or sesame oil for a subtle aroma that enhances the dish’s depth.
- Quick Melting: Warm butter and cocoa gently over low heat to prevent scorching and ensure a glossy finish.
- Layered Flavors: Add a pinch of sea salt to the syrup to heighten the sweetness and bring out the chocolate notes.
- Taste Before Setting: Always check the syrup for sweetness and consistency before mixing in cornflakes—adjust if needed.
- Gentle Folding: Mix cornflakes carefully to keep as much crunch as possible—avoid stirring vigorously to prevent breakage.
- Cooling Surface: Use a wire rack instead of a flat surface to let excess moisture escape, keeping cookies crisp.
- Chill Strategically: Refrigerate cookies until set but don’t leave them too long; they can become too firm and hard to bite.
Common mistakes and how to fix them
- FORGOT to fold gently, broke flakes; fix by folding more delicately.
- DUMPED too much sugar, causing overly sweet cookies; reduce sugar next time.
- OVER-TORCHED the cocoa mixture, turned bitter; watch heat carefully as it melts.
- MISSED the chilling step, cookies were too soft; always chill until firm.
Quick Fixes for Sticky Situations
- When mixture is too sticky, splash a bit of warm water and fold again gently.
- If cookies crackle excessively, reduce heat or stir less vigorously during melting.
- Dumped too much sugar? Fix with a tiny splash of milk to loosen the syrup.
- Over-torched cocoa? Immediately add more butter and stir to recover gloss.
- Splash cold water on the tray if cookies stick—quick rescue for easy removal.
Prep, store, and reheat tips
- You can prepare the syrup mixture ahead; store it in an airtight container in the fridge for up to 24 hours. The cool syrup may thicken slightly but can be gently reheated to loosen.
- Assemble the cookies a day in advance by scooping and shaping them on a tray, then cover tightly and refrigerate. They will stay fresh for up to 3 days.
- Store the finished cookies in an airtight container at room temperature for 2-3 days, or refrigerate for up to a week. Expect slight softening over time, but they’ll still be tasty.
- Reheat refrigerated cookies briefly in the microwave—about 10 seconds—until slightly warm and the aroma of cocoa and butter is inviting. Let them sit for a minute before eating to avoid burns.
Top questions about no bake cookies
1. Can I use a different cereal?
Use fresh, crispy cornflakes for the best crunch. Old or stale flakes will turn soggy quickly.
2. Can I replace the sugar with honey?
Yes, you can substitute honey or maple syrup for sugar. Expect a chewier texture and a slightly different flavor.
3. How do I keep the cornflakes from breaking?
Stir gently when folding in the cornflakes to prevent breaking them and losing that delicate crunch.
4. How do I know when they’re set?
Chill the cookies until they feel firm and hold their shape—about 30 minutes in the fridge usually does it.
5. My mixture is too sticky, what now?
If the mixture is too sticky, add a little more cornflakes to absorb excess moisture and help shape the cookies.
6. Can I skip the parchment paper?
Use parchment paper for easy cleanup and to prevent sticking. Silicone mats are a good alternative if you have them.
7. How should I store these cookies?
Store leftovers in an airtight container at room temperature for up to 3 days or refrigerate for longer freshness.
8. The syrup is too thick, what do I do?
If the syrup cools and thickens, gently reheat it over low heat or briefly in the microwave to loosen it before mixing.
9. How can I enhance the flavor?
For an extra flavor boost, add a pinch of sea salt or a splash of vanilla to the syrup before mixing.
10. They’re too hard, how do I fix it?
If cookies crack or crumble when removing from the fridge, let them sit at room temperature for a few minutes first.
These cookies might seem simple, but they carry a lot of nostalgia and honest effort. They remind me that sometimes, the best treats are the ones made with just a handful of ingredients and a little patience.
Whenever I make them, I’m transported back to childhood kitchens and messy counters. It’s a small, imperfect joy that I keep coming back to, especially when I need a quick, comforting sweet fix.
 Hello, I’m Emily Richardson, the heart and soul behind Playing with Flavors. Cooking isn’t just a hobby for me – it’s a passion that I’ve cultivated for years, and it’s become the driving force of my life.
From the kitchen of my cozy café to the pages of this blog, every dish I create is a reflection of my love for food and the joy it brings to people.
Hello, I’m Emily Richardson, the heart and soul behind Playing with Flavors. Cooking isn’t just a hobby for me – it’s a passion that I’ve cultivated for years, and it’s become the driving force of my life.
From the kitchen of my cozy café to the pages of this blog, every dish I create is a reflection of my love for food and the joy it brings to people.


