Sometimes, after a weekend packed with errands and late nights, I just want something that feels both light and satisfying without adding to the chaos of the kitchen. This no bake Greek yogurt cheesecake is my go-to when I crave that creamy, tangy bite but don’t want to turn on the oven or fuss with complicated steps. It’s like a little slice of cool comfort that comes together in no time, especially perfect during those warm summer days or whenever I need a quick, wholesome dessert.
What I love most about this recipe is how it lets the ingredients shine — no heavy creams or sugary syrups masking the flavor. The Greek yogurt gives it a lively tang that balances the sweetness, and the crust is just enough crunch to keep things interesting. It’s honest, straightforward, and feels like a small act of kindness in my busy week. Plus, it’s so adaptable; I’ve thrown in berries or citrus zest depending on what’s in the fridge, and it always feels fresh and relevant.
It’s funny how the simplest things become favorites. This cheesecake reminds me that sometimes, the best desserts are the ones that don’t require much fuss but deliver plenty of flavor. It’s a reminder to slow down, enjoy the process, and appreciate a dessert that’s as honest as it is satisfying. In a world full of complicated recipes, this one keeps it real — easy, fresh, and always ready for that next slice.
This recipe is about reclaiming simplicity and freshness, especially after busy weekends or when you crave a light, satisfying dessert without turning on the oven. I love how the tangy Greek yogurt cuts through the richness and feels like a cool breeze on a warm day, making it perfect for summer afternoons or when you want something wholesome but quick.
The secret of keeping it simple
- This recipe feels like reclaiming a moment of calm in my busy week, a quiet pleasure I look forward to.
- I used to think no-bake desserts were less satisfying, but this one surprised me with its bright, tangy punch.
- Sharing this cheesecake at gatherings always sparks conversations about how easy and fresh it is, even among skeptics.
- There’s a nostalgic comfort in its simplicity—reminds me of summer afternoons and lazy weekends.
The story behind this recipe
- This recipe came about during a particularly hectic week when I needed something quick, light, and satisfying. I wanted a dessert that wouldn’t require turning on the oven or fussing with complicated layers. One evening, as I rummaged through the fridge, I found a tub of Greek yogurt and a leftover biscuit crust, and suddenly, a no-bake cheesecake idea clicked into place.
- It’s funny how spontaneous ideas often turn into favorites. I loved how the tangy yogurt paired with a simple, crunchy base, making every bite feel fresh and honest. Over time, I’ve tweaked the recipe, adding citrus zest or berries, but the core idea of effortless, vibrant dessert stays the same. It’s become my go-to for summer evenings, quick brunches, or whenever I need a sweet fix that feels wholesome.
- heading”: “The story behind this recipe
Historical & Cultural Insights
- This recipe echoes Mediterranean traditions where yogurt-based desserts have been a staple for centuries, offering a tangy, refreshing end to meals.
- The idea of no-bake cheesecakes gained popularity in the 20th century as a quick, no-fuss dessert solution, especially during post-war food rationing.
- Greek yogurt became a household staple in the West during the early 2000s, inspiring many to create healthier, lighter desserts like this one.
Ingredient breakdown: key components
- Greek yogurt: I love the creamy tang it adds—like a bright breeze. Swap with ricotta for a milder, richer flavor, but lose some of that zing.
- Graham cracker crust: It’s got that buttery crunch I crave. Use digestive biscuits if you’re outside the US; they’ll still give you that satisfying snap.
- Honey or maple syrup: I add just enough to balance the tang without overwhelming. Skip or reduce if your yogurt is sweetened already.
- Lemon zest: Brightens everything up—imagine a fragrant, sunny burst. Lime zest works beautifully for a more tropical vibe.
- Gelatin (optional): I sometimes add a pinch for extra firmness. If you skip it, just chill longer until it’s set, no worries.
- Fresh berries: I love the burst of juice and color. Frozen berries work fine—just thaw and drain well to avoid excess moisture.
- Vanilla extract: A splash deepens the flavor. Feel free to experiment with almond or orange extract for a different twist.
Spotlight on key ingredients
Greek yogurt:
- I love how it oozes tang and creaminess. When mixed, it becomes velvety and slightly tart, giving that signature zing.
- It behaves like a thick, luscious custard during mixing, reacting quickly to the whisk and sometimes needing a quick scrape down. Its acidity helps set the cheesecake naturally, no gelatin needed if chilled long enough.
Graham cracker crust:
- It’s got that buttery crunch that snaps under the fork. When pressed, it feels firm yet tender, with a fragrant toasty aroma.
- During chilling, it maintains its structure but softens slightly, providing a satisfying contrast to the creamy filling. It’s forgiving if pressed unevenly—just patch it up with the back of a spoon.
Notes for ingredient swaps
- Dairy-Free: Swap Greek yogurt for coconut or almond yogurt. Keep in mind, the texture may be slightly thinner and less tangy.
- Crust Alternatives: Use crushed nuts or gluten-free cookies if you need a nutty or allergen-friendly base. Expect a different crunch and flavor profile.
- Sweetener: Replace honey with agave syrup or stevia for a different sweetness note. Be aware of the change in moisture and flavor impact.
- Citrus Zest: Lime or orange zest can replace lemon for a more tropical or aromatic twist. The brightness remains, but the aroma shifts.
- Gelatin: Use agar-agar for a vegetarian option. Dissolve and set similarly, but test firmness as it may behave differently.
- Fresh Berries: Frozen berries work well if thawed and drained thoroughly. They add juice and color without excess moisture.
- Vanilla Extract: Almond or orange extract adds a different aromatic dimension—use sparingly to avoid overpowering the tang.
Equipment & Tools
- Springform pan: For shaping and easy removal of the cheesecake.
- Food processor or bag and rolling pin: To crush the crackers evenly.
- Mixing bowl: To whisk and combine the filling ingredients.
- Spatula: To smooth the filling and press the crust.
- Microwave or stovetop: To gently dissolve the gelatin if used.
Step-by-step guide to no bake cheesecake
- Gather your equipment: a 20cm (8-inch) springform pan, a mixing bowl, a spatula, and a food processor or crush-proof bag with a rolling pin.
- Crush the graham crackers: pulse in a food processor or bash in the bag until fine crumbs. Mix with melted butter and a pinch of salt until well combined.
- Press the crust: transfer to the pan, pressing evenly into the bottom and slightly up the sides. Chill in the fridge for 20 minutes to set.
- Prepare the filling: in a large bowl, whisk Greek yogurt, honey or maple syrup, lemon zest, and vanilla until smooth and slightly fluffy, about 2 minutes.
- Optional gelatin: sprinkle 1 teaspoon of gelatin over 2 tablespoons of cold water, let bloom for 5 minutes, then gently warm until dissolved (about 30 seconds in the microwave). Mix into the yogurt mixture if firmness is desired.
- Pour the filling: onto the chilled crust, smoothing the top with a spatula. Cover loosely with plastic wrap.
- Chill the cheesecake: in the fridge for at least 4 hours, preferably overnight, until firm and set.
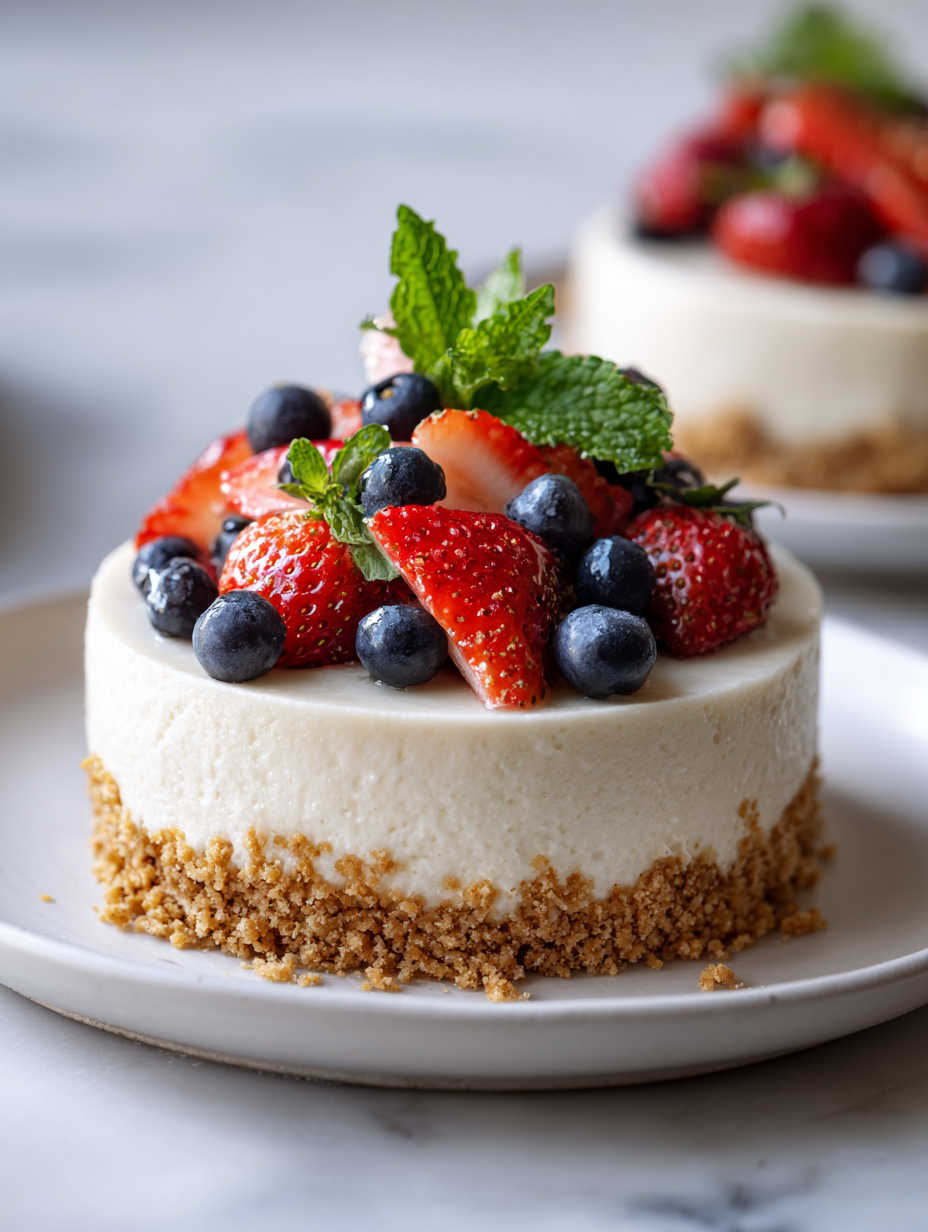
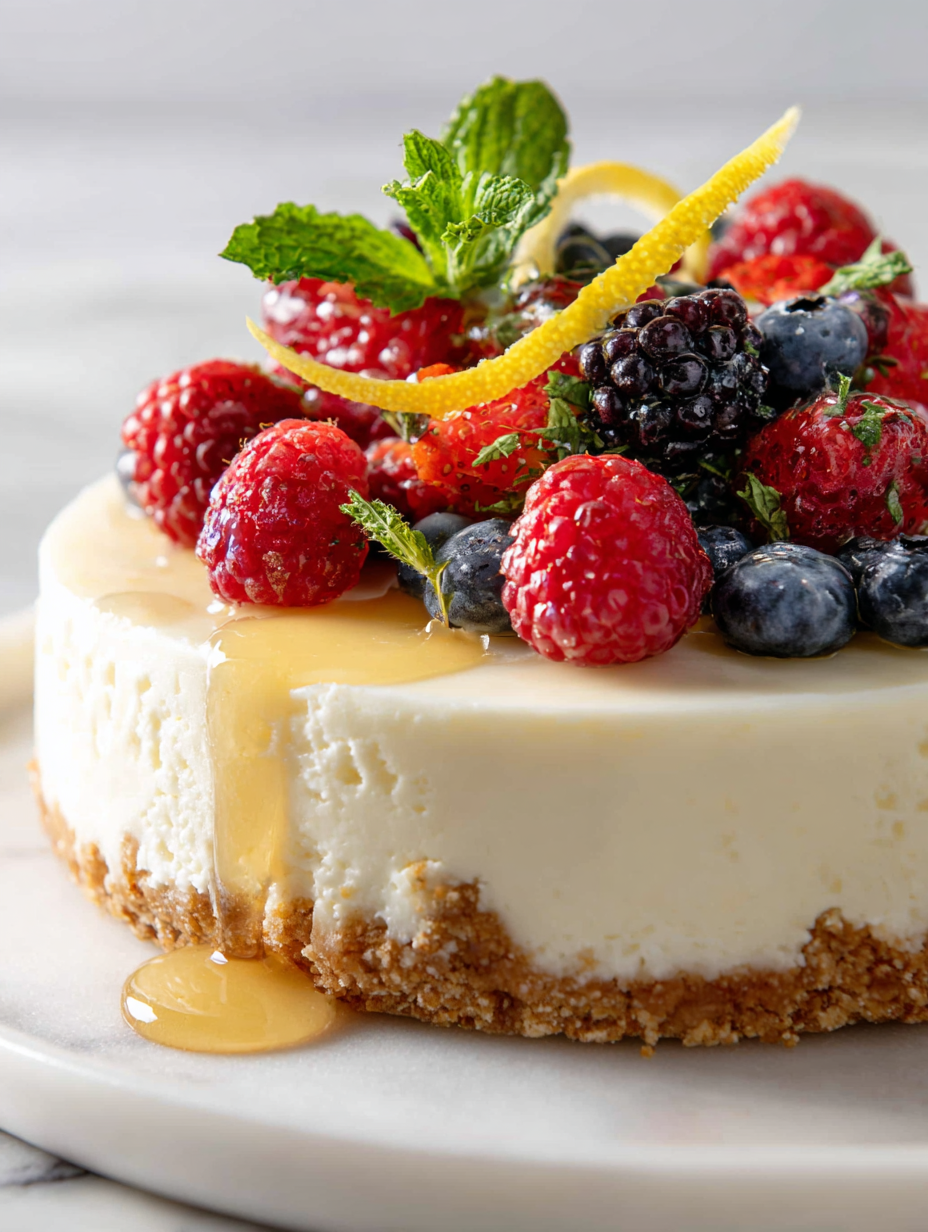
- Finish with toppings: before serving, sprinkle with fresh berries, a drizzle of honey, or a sprinkle of lemon zest for extra brightness.
Let the cheesecake chill in the fridge for at least 4 hours or overnight. Before serving, add toppings and slice with a warm knife for clean cuts. Serve straight from the fridge for best texture and freshness.
How to Know It’s Done
- Crust: Firm, golden-brown, and slightly crumbly yet cohesive.
- Filling: Should be smooth, with no liquid pooling, and jiggle slightly when gently shaken.
- Set: Fully firm, with a clean edge when sliced, and a slight bounce when pressed.
No-Bake Greek Yogurt Cheesecake
Ingredients
Equipment
Method
- Pulse the graham crackers in a food processor or crush them in a zip-top bag with a rolling pin until finely ground. Transfer the crumbs to a bowl and stir in the melted butter until evenly coated. Press this mixture firmly into the bottom of a springform pan, using the back of a spoon or your fingers to create an even crust. Chill in the fridge for 20 minutes to set.
- In a large mixing bowl, whisk together the Greek yogurt, honey, vanilla extract, and lemon zest until smooth and slightly fluffy—this should take about 2 minutes. The mixture will be velvety and fragrant, with a tangy aroma.
- If you want a firmer cheesecake, sprinkle the gelatin powder over 2 tablespoons of cold water and let it bloom for 5 minutes. Gently warm the bloomed gelatin in the microwave for about 30 seconds or until melted. Stir the dissolved gelatin into the yogurt mixture until well combined.
- Pour the creamy filling over the chilled crust, smoothing the top with a spatula. Cover loosely with plastic wrap and refrigerate for at least 4 hours or overnight until fully set and firm.
- Once set, gently remove the cheesecake from the springform pan, releasing the sides carefully. Top with fresh berries, or your favorite fruit, for a burst of color and flavor. Slice with a warm, damp knife for clean cuts, and serve immediately for the best texture.
Notes
Pro tips for perfect cheesecake
- Bolded mini-head: Chill the crust before adding filling to prevent sogginess and ensure crispness.
- Bolded mini-head: Use a warm, damp cloth to wipe your knife between slices for clean cuts and no tearing.
- Bolded mini-head: When mixing, fold in the yogurt gently to keep the filling airy and light, avoiding a dense texture.
- Bolded mini-head: Let the cheesecake sit at room temperature for 10 minutes before slicing—this softens the edges for a cleaner cut.
- Bolded mini-head: For a more pronounced tang, add a splash of lemon juice just before pouring the filling into the crust.
- Bolded mini-head: If the filling feels too runny, sprinkle a pinch of gelatin or chill longer for better firmness.
- Bolded mini-head: Toast your nuts or cookie crumbs lightly before adding for an extra layer of aroma and depth.
Common mistakes and how to fix them
- FORGOT to check the crust’s firmness before chilling. Do a gentle press test to avoid cracks.
- DUMPED the gelatin into hot water instead of cold. Dissolve separately for a smooth texture.
- OVER-TORCHED the crust in the oven. Keep an eye at 180°C (350°F) for golden edges.
- MISSED the chill time. Let the cheesecake rest at least 4 hours for proper set.
Quick fixes and pantry swaps
- When mixture is too runny, add a pinch of gelatin or chill longer to set.
- DUMPED the crust in the oven? Patch with extra crumbs and bake briefly at 180°C (350°F).
- Splash cold water on a warm knife for cleaner slices without tearing.
- When the yogurt is too tangy, add a touch more honey or switch to a milder Greek-style yogurt.
- If the crust cracks when pressing, shield with a damp cloth and gently press again for a smooth base.
Prep, store, and reheat tips
- Prepare the crust and press into pan the night before; it firms up overnight, making assembly easier and ensuring a crisp base.
- The cheesecake can be made 1-2 days in advance; keep covered in the fridge to prevent absorbing fridge odors. It stays fresh and tangy for up to 3 days.
- For best texture, let it sit at room temperature for 10-15 minutes before serving—this softens the edges and enhances flavor.
- Refrigerate leftovers tightly wrapped; the creamy filling may develop a slightly sharper tang if stored beyond 3 days. Avoid freezing, as texture may change.
Top questions about Greek yogurt cheesecake
1. Can I substitute cream cheese for Greek yogurt?
You can use regular cream cheese if you prefer a richer, denser texture. Greek yogurt keeps it light and tangy.
2. Can I freeze the cheesecake?
Yes, freezing it for up to a month works. Just thaw in the fridge overnight before serving.
3. Is there a dairy-free option?
For a dairy-free version, coconut yogurt can be used, but it may be a bit less tangy and slightly creamier.
4. Should I use full-fat Greek yogurt?
Using full-fat Greek yogurt will give you a creamier, more satisfying texture. Skim yogurt makes it lighter but less rich.
5. How long should I chill it?
Chill the cheesecake for at least 4 hours, ideally overnight, to let it set properly and develop flavor.
6. Can I add toppings?
Yes, adding fresh fruit or a fruit compote on top adds a vibrant, juicy contrast that enhances the tang.
7. How do I get clean slices?
Use a warm, damp cloth to wipe your knife between slices for smooth, clean cuts.
8. My filling is too soft, what now?
If the filling is too runny, blend in a teaspoon of gelatin dissolved in a little warm water, then chill again.
9. Can I add citrus zest?
You can add lemon or lime zest to brighten the flavor and add extra zing to the cheesecake.
10. Why is this recipe good for summer?
This no bake cheesecake is perfect for hot days when you want a cool, fresh dessert without turning on the oven.
This no bake Greek yogurt cheesecake feels like a small act of kindness—bright, tangy, and surprisingly simple to make. It’s perfect for those moments when you want something fresh without the fuss, especially in warm weather or busy weekends. Sharing it always makes me realize how easy and satisfying good ingredients can be.
In the end, it’s about enjoying the honest flavors and that cool, creamy texture. No matter the occasion, this cheesecake offers a little pause—a moment to appreciate simple pleasures and fresh ingredients. Sometimes, the best desserts are the ones that come together effortlessly but leave a lasting impression.