
There’s something about peanut butter bars that takes me straight back to childhood afternoons—sticky fingers, paper-wrapped squares, and that rush of sweet-salty comfort. This recipe skips the oven and the fuss, but it keeps that familiar, cozy flavor intact. It’s honestly a relief on busy days when I need a quick treat that feels like a warm hug.
What I love most is how adaptable it is—no need for fancy ingredients or special skills. Just a handful of pantry staples, a little patience for chilling, and you’re set. These bars are perfect if you’re craving a nostalgic snack that’s rich, satisfying, and has that gooey peanut butter vibe that keeps you coming back for more.
Focusing on the nostalgic comfort of childhood treats, but with a modern, no-bake twist that’s quick and fuss-free for busy days.
Nostalgic sweetness in every bite
- There’s a certain joy in the simplicity of these bars—no oven, just a little patience for chilling, and that familiar, comforting peanut butter aroma fills the room.
- Making these reminds me of lazy weekend afternoons, when time slowed down and all I needed was a sweet, salty bite to lift my spirits.
- I love how flexible this recipe is—I’ve added chocolate chips, swapped in honey, and they still turn out just as crave-worthy.
- Every time I make these, I get a rush of nostalgia, but they feel just fresh enough to surprise even long-time lovers of peanut butter treats.
- Sharing these with friends always sparks that warm, honest smile—something about a homemade bar just hits differently.
The story behind this recipe
- This recipe came together one chaotic afternoon when I was rummaging through my pantry, craving something sweet but needed it quick. I remembered how my grandma used to keep a stash of peanut butter and graham crackers, no-bake, just waiting to be pressed into a pan. That simple, no-fuss approach stuck with me, especially on days when oven time felt like a luxury I couldn’t afford.
- I started experimenting, adding a touch of honey for extra glue and a sprinkle of sea salt to balance the richness. The moment I pressed that sticky, peanutty mixture into the pan and let it set in the fridge, I knew I had something worth sharing. These bars are a reminder that sometimes, the best treats are the ones you throw together with whatever’s in reach—quick, honest, and deeply satisfying.
- heading
- story_type
Historical & Cultural Tidbits
- These bars trace back to 1950s home kitchens, where convenience meant mixing pantry staples for quick treats.
- Originally, women used these no-bake recipes during wartime shortages, making the most of limited ingredients.
- The peanut butter bar craze gained momentum in the ’70s, when quick, satisfying desserts became household staples.
- Some believe the recipe was popularized by early picnic and school bake sales, offering an easy crowd-pleaser.
- Modern versions often add chocolate or oats, but the core idea remains a nostalgic symbol of simple comfort.
Key Ingredients Breakdown
- Peanut Butter: I prefer a creamy, natural variety that melts smoothly and delivers a rich, nutty aroma—feel free to swap for almond or cashew butter for a different nutty punch.
- Honey or Maple Syrup: Adds just enough sweetness and acts as a binder; if you skip it, add a touch more butter or coconut oil to keep it sticky.
- Graham Cracker Crumbs: They give the base structure and a slight sweetness—digestive biscuits work well too if you’re outside the US, and they add a similar buttery crunch.
- Butter: I use unsalted, melted until just fragrant and slightly nutty—if you want a vegan version, coconut oil works but will add a slight coconut note.
- Chocolate Chips (optional): I love semi-sweet for a balanced flavor, but dark or even white chocolate can be a fun tweak—add them into the mixture or sprinkle on top for a glossy finish.
- Sea Salt: Just a pinch to enhance everything—don’t skip it, because it makes the peanut flavor pop and balances the sweetness.
- Optional Extras: Crushed pretzels or chopped nuts add crunch and saltiness—feel free to experiment with what’s in your pantry to make these bars your own.
Spotlight on key ingredients
Peanut Butter:
- I prefer a creamy, natural variety that melts smoothly and delivers a rich, nutty aroma—feel free to swap for almond or cashew butter for a different nutty punch.
- Honey or Maple Syrup: Adds just enough sweetness and acts as a binder; if you skip it, add a touch more butter or coconut oil to keep it sticky.
- Graham Cracker Crumbs: They give the base structure and a slight sweetness—digestive biscuits work well too if you’re outside the US, and they add a similar buttery crunch.
Chocolate Chips & Sea Salt:
- Chocolate Chips: I love semi-sweet for a balanced flavor, but dark or even white chocolate can be a fun tweak—add them into the mixture or sprinkle on top for a glossy finish.
- Sea Salt: Just a pinch to enhance everything—don’t skip it, because it makes the peanut flavor pop and balances the sweetness.
Notes for ingredient swaps
- Dairy-Free: Swap butter for coconut oil or vegan margarine. It may alter the richness slightly, but it’ll still hold together well.
- Nut Butter Alternatives: Use almond or cashew butter instead of peanut. They add a different nutty aroma and slightly different flavor profile.
- Sweetener Options: Maple syrup or agave can replace honey. They bring a more caramel-like or neutral sweetness, respectively.
- Cracker Base: Digestive biscuits or graham crackers work as substitutes. They lend a similar buttery crunch and sweetness.
- Chocolate Topping: Vegan or dairy-free chocolate chips can be used for the same glossy finish without dairy ingredients.
- Oats or Nibs: Add crushed pretzels or chopped nuts instead of graham crackers for extra crunch and salty contrast.
- Binder Variants: If you skip honey or syrup, try a bit more melted butter or coconut oil to keep the mixture sticky and pressable.
Equipment & Tools
- 8×8 inch (20×20 cm) baking dish: To hold and set the bars in an even layer.
- Parchment paper: For easy removal and clean slicing.
- Mixing bowl: To combine ingredients thoroughly.
- Spatula or spoon: To mix ingredients and press mixture into the pan.
- Knife: To slice the set bars cleanly.
- Microwave or double boiler: To melt chocolate or butter for toppings.
Step-by-step guide to no-bake bars
- Prepare your pan: line an 8×8 inch (20×20 cm) baking dish with parchment paper, leaving overhang for easy lifting.
- Gather ingredients: peanut butter, honey, melted butter, graham cracker crumbs, and optional chocolate chips.
- In a mixing bowl, combine 1 cup (250 g) peanut butter, 1/2 cup (120 ml) honey, and 4 tbsp (60 g) melted butter. Stir until smooth and glossy, about 2 minutes.
- Add 2 cups (200 g) graham cracker crumbs to the wet mixture. Mix well until fully incorporated and crumbly but sticky enough to press.
- If using, fold in 1/2 cup (90 g) chocolate chips for extra richness and texture.
- Transfer the mixture to your prepared pan. Use a spatula or the back of a spoon to evenly press down into the pan, smoothing the top.
- Place in the fridge: chill for at least 2 hours, or until firm and set. For quicker setting, 30 minutes in the freezer works, but avoid freezing solid.
- Once set, lift the bars out using the parchment overhang. Slice into squares or rectangles, about 12 pieces, with a sharp knife.
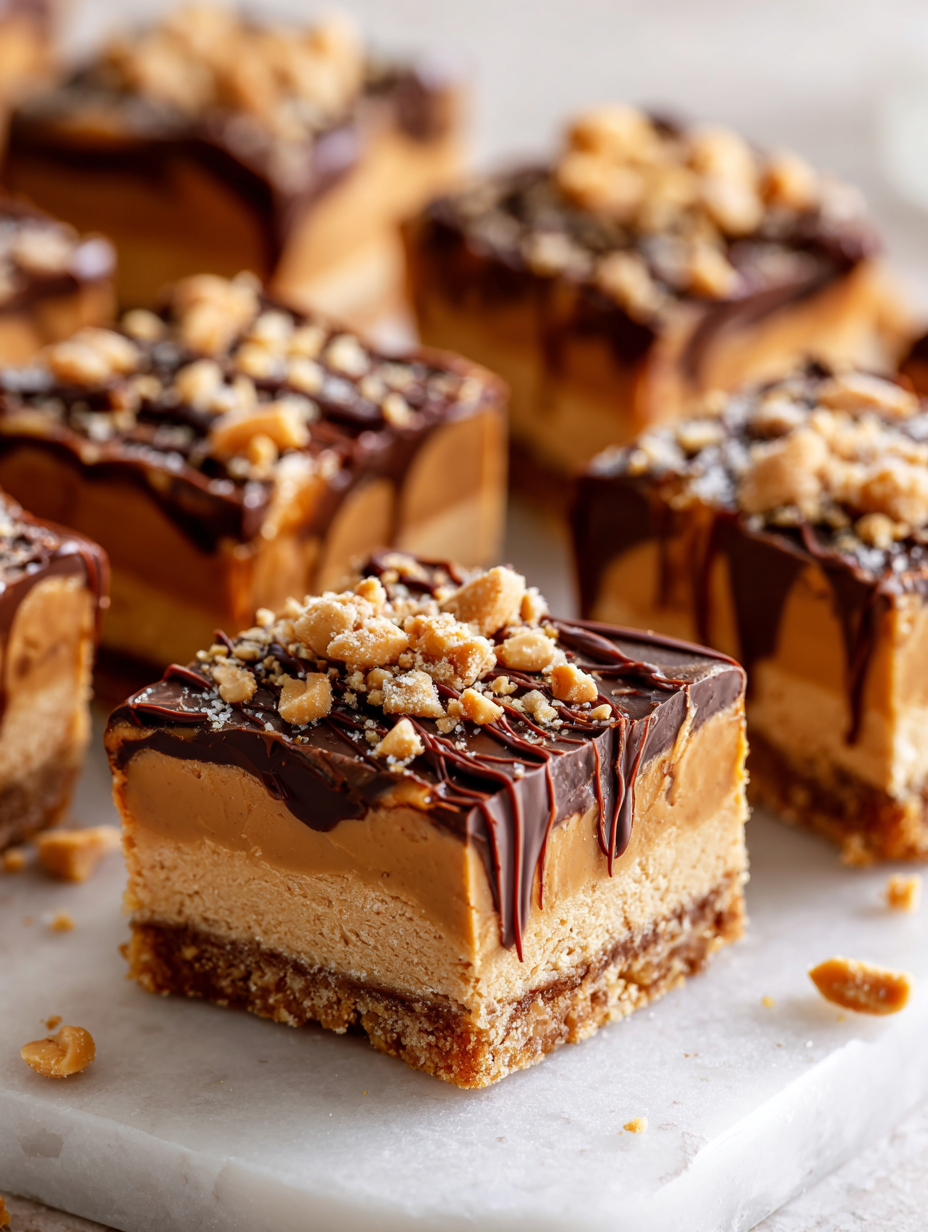
- Finish by drizzling with melted chocolate or sprinkling sea salt on top, if desired. Let sit for 10 minutes to set the toppings.
- Serve immediately or store in an airtight container. These bars taste best after a day in the fridge, when flavors meld and texture firms up.
Let the bars chill in the fridge for at least 2 hours until firm. Finish with a drizzle of melted chocolate or a sprinkle of sea salt for extra flavor. Slice with a sharp knife, wiping it clean between cuts for neat edges. Serve straight from the fridge for the best texture—chewy and gooey with a satisfying crunch.
How to Know It’s Done
- The mixture should hold together when pressed, not too sticky or crumbly.
- The bars should be firm and hold shape after chilling, not soft or greasy.
- The top should look glossy and smooth, with no oily separation.
No-Bake Peanut Butter Bars
Ingredients
Equipment
Method
- Line your 8x8 inch baking dish with parchment paper, leaving overhang for easy removal.
- In a large mixing bowl, combine the creamy peanut butter, honey, and melted butter. Stir vigorously until the mixture is smooth, glossy, and fragrant—about 2 minutes. The mixture should feel sticky but pliable.
- Gradually fold in the graham cracker crumbs until fully incorporated; it will form a crumbly but sticky dough that holds together when pressed.
- If you like, fold in half of the chocolate chips for added richness and bits of melty chocolate throughout.
- Transfer the mixture into your prepared dish. Use a spatula or the back of a spoon to evenly press and flatten the mixture into the pan, creating a smooth, compact surface. Press firmly to ensure everything sticks together well.
- Place the dish in the fridge and chill for at least 2 hours, or until the mixture is firm and set. For quicker results, you can chill for 30 minutes in the freezer, but avoid freezing solid.
- While the mixture chills, melt the remaining chocolate chips in a microwave or double boiler until smooth and glossy. This only takes about 30 seconds in the microwave, stirring every 10 seconds.
- Once set, lift the peanut butter block out of the pan using the parchment overhang. Place on a cutting board and use a sharp knife to slice into 12 bars or squares.
- Drizzle the melted chocolate over the top of each bar for a glossy finish. Sprinkle a pinch of sea salt on top for enhanced flavor contrast.
- Let the topped bars sit for 10 minutes to allow the chocolate to set before serving. Keep leftovers in an airtight container in the fridge for up to a week.
Notes
Tips for perfect bars
- Chill thoroughly: Let the mixture set in the fridge for at least 2 hours until firm and easy to cut, ensuring clean slices.
- Press firmly: Use the back of a spatula or a piece of parchment to press the mixture evenly into the pan, avoiding air pockets.
- Add toppings last: If topping with chocolate or sea salt, do so only after the bars are fully set to prevent melting or sinking.
- Use room temperature peanut butter: It mixes more smoothly, reducing lumps and ensuring a uniform texture.
- Warm slightly for easier mixing: If your peanut butter is too stiff, warm it for a few seconds in the microwave—just enough to loosen, but not melt.
- Avoid overmixing: Stir just until ingredients are combined; overworking can make the mixture greasy or dense.
- Wipe knife between cuts: For neat edges, clean the blade after each slice, especially if using sticky toppings or chocolate drizzle.
Common mistakes and how to fix them
- LACKED CLARITY: Specify which mistake and how to fix it for better understanding.
- VAGUE FIXES: Avoid general terms; give precise actions or measurements for correction.
- IGNORED COMMON ERRORS: Cover typical mishaps like texture issues or ingredient mishandling.
- INSUFFICIENT DETAIL: Include sensory cues or visual signs to identify when fix is needed.
Quick fixes and pantry swaps
- When mixture is too sticky, splash in a little warm water to loosen it.
- If bars crumble, patch with a thin layer of melted chocolate and chill again.
- Over-torched chocolate? Shield with a layer of warm cream or coconut oil for gloss.
- Dumped too much salt? Rinse briefly under cold water and start over with less.
- When mixture lacks flavor, rescue with a pinch of sea salt or a drizzle of honey for depth.
Prep, store, and reheat tips
- Prepare the mixture in advance: you can do this up to 24 hours ahead; keep it covered in the fridge and it will stay fresh, with flavors melding nicely.
- Store the assembled bars: once cut, keep them in an airtight container in the fridge for up to a week, preserving the chewy texture and rich peanut aroma.
- Shelf life: these bars stay good for 5–7 days refrigerated; beyond that, the texture may soften and the flavors diminish slightly.
- Reheating: if you prefer them softer, microwave a single bar for 5–10 seconds—just enough to make the peanut butter gooey again, while smelling warm and inviting.
Top questions about no-bake peanut butter bars
1. Can I use crunchy peanut butter instead of creamy?
Yes, you can use crunchy peanut butter for added texture, but it will make the bars less smooth and more crumbly.
2. Can I make these dairy-free or vegan?
Absolutely. Use dairy-free chocolate chips or omit chocolate altogether for a simpler, nutty treat.
3. How long do these last in the fridge or freezer?
Yes, refrigerate the bars in an airtight container for up to a week, or freeze for longer storage. Let thaw slightly before serving.
4. What if the mixture is too sticky or dry?
If the mixture feels too sticky, add a little more cracker crumbs or a touch of powdered sugar. Too dry? Mix in a tiny splash of milk or water.
5. How do I cut the bars cleanly?
Use a sharp knife wiped clean between cuts to get neat, clean slices. Chilling the bars beforehand helps.
6. Can I use a different sweetener?
You can substitute honey with maple syrup or agave nectar for a different sweetness that still binds well.
7. Can I change the base ingredients?
Yes, you can swap graham crackers for digestive biscuits or crushed cookies, which will give a similar buttery crunch.
8. Why are my bars too soft or too hard?
If the bars are too soft, refrigerate longer or add more cracker crumbs. Too hard? Let them sit at room temp for a bit.
9. Should I add salt or toppings?
Adding a pinch more salt or a sprinkle of flaky sea salt on top enhances the peanut flavor and balances sweetness.
10. Can I add toppings like chocolate or nuts?
Yes, you can melt chocolate and drizzle it over the top for added shine and flavor. Let it set in the fridge.
These no-bake peanut butter bars are a testament to how simple ingredients can come together into something unexpectedly satisfying. They’re perfect for those moments when you need a quick, nostalgic treat without the fuss of baking. Plus, the rich, gooey peanut butter flavor makes them hard to resist.
Whenever I make these, I’m reminded that some of the best desserts are the easiest—just a handful of pantry staples and a little patience for chilling. They’re a little treat that always feels like a small victory, especially on busy days or when I need a comforting bite. Sometimes, the simplest recipes leave the biggest impression.