
This no bake peanut butter cheesecake is my go-to when I need something sweet and satisfying without firing up the oven. It’s the kind of dessert I turn to after a long day, when the craving for something creamy and salty hits hard. The best part? It’s honest pantry magic—crushed cookies, peanut butter, cream cheese—stuff I usually have lying around.
What I love most about this recipe is how forgiving it is. No need for fancy ingredients or special equipment. Just a quick mix, a bit of patience in the fridge, and you’ve got a luscious, velvety cheesecake that tastes like a peanut butter hug. It’s a reminder that sometimes, the simplest things really are the most satisfying.
This recipe is inspired by those moments when you need a quick, satisfying dessert that feels indulgent but requires almost no effort—perfect for when unexpected guests arrive or that craving hits late at night. It’s about turning simple pantry staples into a creamy, dreamy treat without turning on the oven, saving time and energy. Plus, it’s a nostalgic nod to childhood comfort foods, upgraded with that rich, salty punch of peanut butter.
A No-Bake Peanut Butter Hug
- This recipe reminds me of lazy Sunday afternoons, where a quick dessert could turn a regular day into a small celebration.
- I get a little thrill every time I see how easily pantry staples transform into something so rich and satisfying.
- There’s a nostalgic warmth in the salty, sweet combo that takes me straight back to childhood cookie jars.
- I love the relief of knowing I can whip this up in no time, especially when unexpected guests pop in.
- Every spoonful feels like a cozy secret, a quiet indulgence that I can make without fuss.
The story behind this recipe
- This recipe was born out of a lazy summer afternoon, when I realized I had no energy for baking but still craved something indulgent. I had a jar of peanut butter and a few cream cheese blocks, so I started experimenting. The result was a silky, rich cheesecake that needed no oven, just some patience in the fridge. It’s become my secret weapon for last-minute gatherings or when I just need a quick fix of comfort.
- I remember one particularly chaotic weekend—kids running around, a sudden craving for something sweet, and no time to bake. Whipping up this no-bake cheesecake was a relief and a small victory. It’s funny how simple ingredients and a little bit of chill time can turn into a moment of calm and satisfaction. Now, it’s a staple in my recipe box, always ready for when the craving strikes.
- Every time I make it, I think about how pantry staples can become something special with just a little love and patience. It’s not fancy, but it’s honest, creamy, and full of that salty-sweet punch I love. Plus, it’s a reminder that sometimes, the best desserts are the easiest ones—no fuss, just flavor.
Historical & Cultural Tidbits
- This cheesecake has roots in the no-bake dessert trends that gained popularity during the mid-20th century, especially in busy households needing quick treats.
- Peanut butter, originally a 19th-century invention, became a pantry staple in America, inspiring countless recipes like this one that elevate simple ingredients.
- The idea of skipping oven baking for creamy desserts surged during the 1970s and ’80s, as more households looked for convenient, fuss-free options.
- This recipe echoes the nostalgic era of 1950s and 60s freezer desserts, where cold, creamy treats became a summer staple.
Ingredient breakdown
- Cream cheese: I love how it becomes silky smooth with a gentle beat—makes the filling luxuriously creamy. Skip the softened part, and it’ll clump; give it time at room temp.
- Peanut butter: The salty, oozing richness is the star here. Natural peanut butter adds depth, but if you want extra sweetness, a quick drizzle of honey works wonders.
- Graham cracker crumbs: The base needs to hold everything together. Toast them lightly if you want a nuttier, more aromatic crust—just watch for smoke and smell that caramel note.
- Sweetener: I usually use powdered sugar—fine and quick to dissolve. If you prefer a touch less sweetness, start with half and taste the mixture before adding more.
- Heavy cream: Whipped till soft peaks, it gives the cheesecake a light, airy texture. If you over-whip, it turns grainy—stop as soon as you see gentle peaks forming.
- Lemon juice: Just a splash brightens the whole thing, balancing the richness. Skip it if you prefer a more neutral flavor, but I find it lifts the entire dessert.
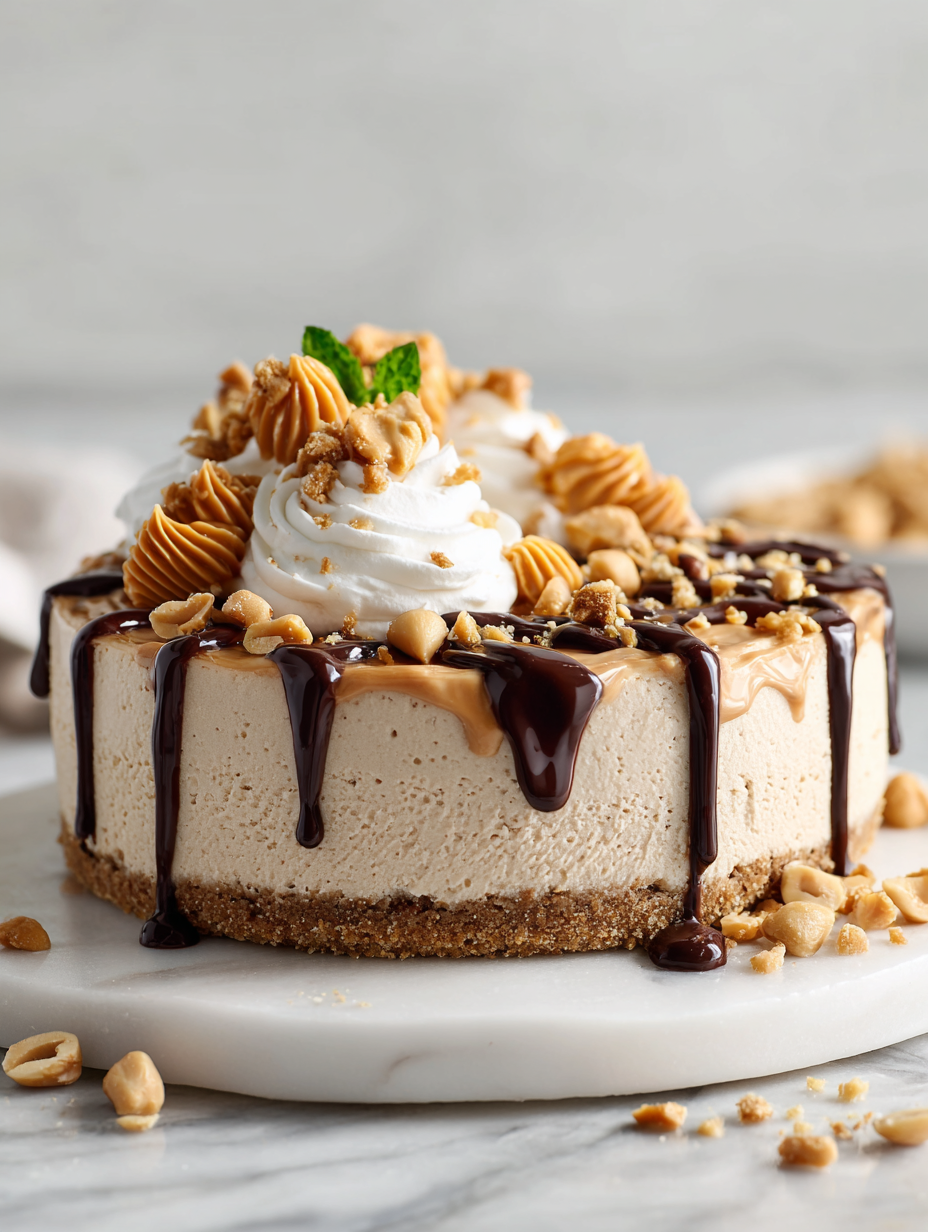
- Optional toppings: Chopped peanuts, chocolate shavings, or a drizzle of caramel—these add crunch, richness, and visual appeal. Use what you love, just keep it simple.
Spotlight on key ingredients
Cream cheese:
- I love how it becomes silky smooth with a gentle beat—makes the filling luxuriously creamy. Skip the softened part, and it’ll clump; give it time at room temp.
- Peanut butter: The salty, oozing richness is the star here. Natural peanut butter adds depth, but if you want extra sweetness, a quick drizzle of honey works wonders.
Heavy cream:
- Graham cracker crumbs: The base needs to hold everything together. Toast them lightly if you want a nuttier, more aromatic crust—just watch for smoke and smell that caramel note.
- Whipped till soft peaks, it gives the cheesecake a light, airy texture. If you over-whip, it turns grainy—stop as soon as you see gentle peaks forming.
Notes for ingredient swaps
- Dairy-Free: Use coconut cream and dairy-free cream cheese. The texture stays rich, but it might be slightly less tangy.
- Gluten-Free: Swap graham cracker crumbs for gluten-free cookie crumbs or crushed toasted almonds for a nuttier, more aromatic crust.
- Sweetener: Replace powdered sugar with maple sugar or coconut sugar. Expect a slightly more caramel-like flavor and darker color.
- Peanut Butter: Almond butter or sunflower seed butter works, but they’ll add different nutty notes and may be less salty.
- Heavy Cream: Coconut whipped cream can be a good dairy-free alternative—adds a subtle coconut aroma and lighter texture.
- Crust: Oat-based or gluten-free cookie crust if you need a different texture or have allergies, just keep an eye on moisture content.
- Flavor Boost: Add a splash of vanilla extract or a pinch of sea salt to enhance the peanut butter flavor without changing the base.
Equipment & Tools
- Springform pan: To hold the crust and filling, easy to remove the cheesecake.
- Mixing bowls: For mixing crust, filling, and whipped cream separately.
- Spatula: To spread and smooth the filling evenly.
- Whisk: To beat cream cheese and whip the cream.
- Rolling pin or heavy bottle: To crush the cookies.
Step-by-step guide to no bake peanut butter cheesecake
- Gather your equipment: a 20cm (8-inch) springform pan, mixing bowls, a spatula, and a whisk. Line the pan with parchment for easy removal.
- Crush the cookies: place graham crackers in a zip-top bag, smash with a rolling pin until fine, about 2 minutes. Mix with melted butter until crumbly.
- Press the crust: transfer to the prepared pan, press evenly with the back of a spoon or fingers, then chill in the fridge for 15 minutes to set.
- Beat the cream cheese: in a large bowl, soften at room temp for 30 minutes. Whisk until smooth and creamy, about 2 minutes. Scrape sides often.
- Add peanut butter: fold in creamy peanut butter and powdered sugar. Mix until well combined, about 1 minute. Smell for a rich, salty aroma.
- In a separate bowl, whip the heavy cream: until soft peaks form, about 3-4 minutes. Be careful not to overwhip or it’ll turn grainy.
- Fold whipped cream into the cream cheese mixture: gently combine until smooth and fluffy, about 1 minute. The texture should be creamy but airy.
- Pour filling over the chilled crust: smooth the top with a spatula. Cover loosely with plastic wrap and refrigerate for at least 4 hours, preferably overnight.
- Check for doneness: the top should be set but still slightly jiggle in the center. Edges should look firm and slightly matte. No cracks or wet spots.
- Finish and serve: remove from fridge, run a knife around the edge to loosen, then release the springform. Slice with a warm knife, serve chilled.
Chill the cheesecake in the fridge for at least 4 hours or overnight. Before serving, run a knife around the edge, then release the springform. Slice with a warm knife for clean cuts. Garnish with chopped peanuts or chocolate if desired.
How to Know It’s Done
- The filling is set with no wobble when gently shaken.
- Edges are firm and slightly matte, not shiny or wet.
- Crust feels crisp and holds together when pressed lightly.
No-Bake Peanut Butter Cheesecake
Ingredients
Equipment
Method
- Place the graham crackers in a zip-top bag and crush them into fine crumbs using a rolling pin or heavy bottle. Transfer the crumbs to a bowl and stir in the melted butter until evenly coated.
- Press the crumb mixture evenly into the bottom of a lined springform pan, creating a firm crust. Chill in the refrigerator for about 15 minutes to set.
- In a large mixing bowl, beat the softened cream cheese with a whisk until silky smooth and free of lumps, about 2 minutes.
- Fold in the peanut butter and sifted powdered sugar, mixing until fully combined and fragrant—this gives the filling its rich, salty flavor.
- In a separate chilled bowl, whip the heavy cream with a whisk until soft peaks form, about 3-4 minutes. The cream should hold gentle peaks and be slightly fluffy.
- Gently fold the whipped cream into the peanut butter mixture, using a spatula to keep the batter light and airy. Be careful not to deflate the mixture.
- Pour the creamy filling over the chilled crust, smoothing the top with a spatula. Cover loosely with plastic wrap and refrigerate for at least 4 hours or overnight to set.
- Once set, run a warm knife around the edges of the cheesecake and carefully release the springform. Slice with a warm knife for clean cuts.
- Garnish with chopped peanuts or chocolate shavings if desired, then serve chilled and enjoy the luscious, peanutty goodness!
Pro tips for perfect cheesecake
- Bolded mini-head: Chill the crust thoroughly before filling to prevent sogginess and ensure crisp edges.
- Bolded mini-head: Use room temperature cream cheese for a smoother, lump-free filling—it mixes faster and more evenly.
- Bolded mini-head: Fold whipped cream gently into the peanut butter mixture to keep the cheesecake light and airy.
- Bolded mini-head: Slightly under-whip the heavy cream; it will firm up further in the fridge, avoiding a grainy texture.
- Bolded mini-head: For a richer flavor, lightly toast the graham cracker crumbs before pressing them into the pan.
- Bolded mini-head: If the filling feels too thick, add a splash of milk or cream to loosen it up before pouring.
- Bolded mini-head: Chill the assembled cheesecake at least 4 hours, preferably overnight, for the best set and flavor development.
Common mistakes and how to fix them
- FORGOT to chill the crust? Re-press and refrigerate for 15 minutes before filling.
- DUMPED the whipped cream too quickly? Fold gently to keep the mixture airy.
- OVER-TORCHED the crust? Lower oven temperature or toast for less time to avoid burning.
- MISSED the set test? Chill longer or check if the filling is firm and jiggles slightly.
Quick fixes and pantry swaps
- When the filling is too runny, splash in a bit more cream cheese and chill to firm up.
- If the crust crumbles, patch with a little melted butter and press firmly again.
- Splash a few drops of lemon juice if the filling tastes flat or overly salty.
- Patch cracked edges by smoothing with a warm knife or adding a thin layer of whipped cream.
- Shield the cheesecake with foil if the edges brown too quickly during chilling.
Prep, store, and reheat tips
- Prepare the crust and press it into the pan a day ahead; it firms up better and makes assembly easier.
- The cheesecake can be stored covered in the fridge for up to 3 days; the flavors deepen and the texture becomes more cohesive.
- For best freshness, serve within 48 hours of making; beyond that, the crust may soften and the filling may lose some creaminess.
- Reheat slices slightly in the microwave for 10-15 seconds if you prefer a warmer, softer texture—watch for melty peanut butter and creamy warmth.
- For leftovers, keep refrigerated, covered tightly; the cheesecake may develop a slightly denser texture but will still taste rich and peanutty.
Top questions about peanut butter cheesecake
1. Can I use crunchy peanut butter?
Yes, you can use natural peanut butter, but it might make the filling slightly less creamy and more oily. Stir it well before mixing.
2. How long does it need to chill?
Absolutely. It adds a nice texture and crunch to the smooth cheesecake. Just fold in gently so it doesn’t break the creamy surface.
3. Can I freeze it?
At least 4 hours, but overnight is best. It allows the flavors to meld and the filling to set fully.
4. What if the filling is too runny?
Yes, wrap it well and freeze for up to 2 months. Thaw in the fridge for a few hours before serving.
5. Can I make this gluten-free?
Mix in a little extra softened cream cheese and refrigerate for an hour or so. It helps tighten up the texture.
6. Is it possible to make it vegan?
Yes, substitute gluten-free cookie crumbs for the crust. The filling remains the same, just watch for crust softness.
7. How do I prevent cracks on top?
Use vegan cream cheese and plant-based butter or coconut oil in the crust. The texture will be slightly different but still delicious.
8. Can I add toppings?
Ensure the filling is evenly mixed and chill it slowly. Avoid over-whipping the cream, which can cause cracking.
9. How do I know it’s done?
Yes, chopped peanuts, chocolate shavings, or caramel drizzle work well. Add just before serving for the best appearance.
This no bake peanut butter cheesecake is a reminder that sometimes, simplicity really does shine. It’s quick, satisfying, and full of those salty-sweet hits that keep you coming back for more. Perfect for when you want a dessert that feels indulgent without the fuss.
Sharing it with friends or keeping it for yourself—either way, it’s a little moment of comfort. No matter the season, it’s a treat that hits just right, every time.


 Hello, I’m Emily Richardson, the heart and soul behind Playing with Flavors. Cooking isn’t just a hobby for me – it’s a passion that I’ve cultivated for years, and it’s become the driving force of my life.
From the kitchen of my cozy café to the pages of this blog, every dish I create is a reflection of my love for food and the joy it brings to people.
Hello, I’m Emily Richardson, the heart and soul behind Playing with Flavors. Cooking isn’t just a hobby for me – it’s a passion that I’ve cultivated for years, and it’s become the driving force of my life.
From the kitchen of my cozy café to the pages of this blog, every dish I create is a reflection of my love for food and the joy it brings to people.


