
Sometimes, the best snacks come from just throwing things together without heating up the kitchen. These no-bake seed bars are a perfect example—raw, honest, and a little bit messy, just like those mornings when you need something quick but wholesome. No fuss, no waiting, just a handful of ingredients and a trusty spoon.
I love making these because they remind me that nourishing food doesn’t always have to be polished or perfect. It’s about feeling free in the kitchen—embracing the chaos, tasting the seeds, hearing that satisfying crack when you press the mixture into the pan. It’s honest food, made with heart and just enough patience to get it right.
Plus, these bars are a lifesaver when you’re rushing out the door or need a snack that doesn’t fall apart in your bag. They’re a little bit rustic, a little bit nourishing, and totally customizable. Sometimes, the simplest recipes turn into the ones you come back to again and again, especially when they’re this easy.
This recipe is about reclaiming that raw, unpolished kitchen moment—embracing the messy, imperfect process of creating something nourishing without fuss or heat, perfect for busy mornings or lazy afternoons.
The story behind this recipe
- This recipe sprouted from a busy weekend when I needed something quick, nutritious, and satisfying. I realized I had all these seeds and a jar of honey just sitting there, waiting to be put to good use. Making these bars became a sort of small rebellion against the packaged snacks I was reaching for too often.
- The first batch was a chaotic mess—mostly because I was rushing and didn’t measure carefully. But somehow, that imperfect mix still held together, and the flavor was unexpectedly bright and nutty. It became a little ritual—testing, tweaking, and finally settling into a recipe that’s raw, honest, and forgiving enough for anyone’s kitchen.
- heading: ‘The story behind this recipe’
Key ingredients overview
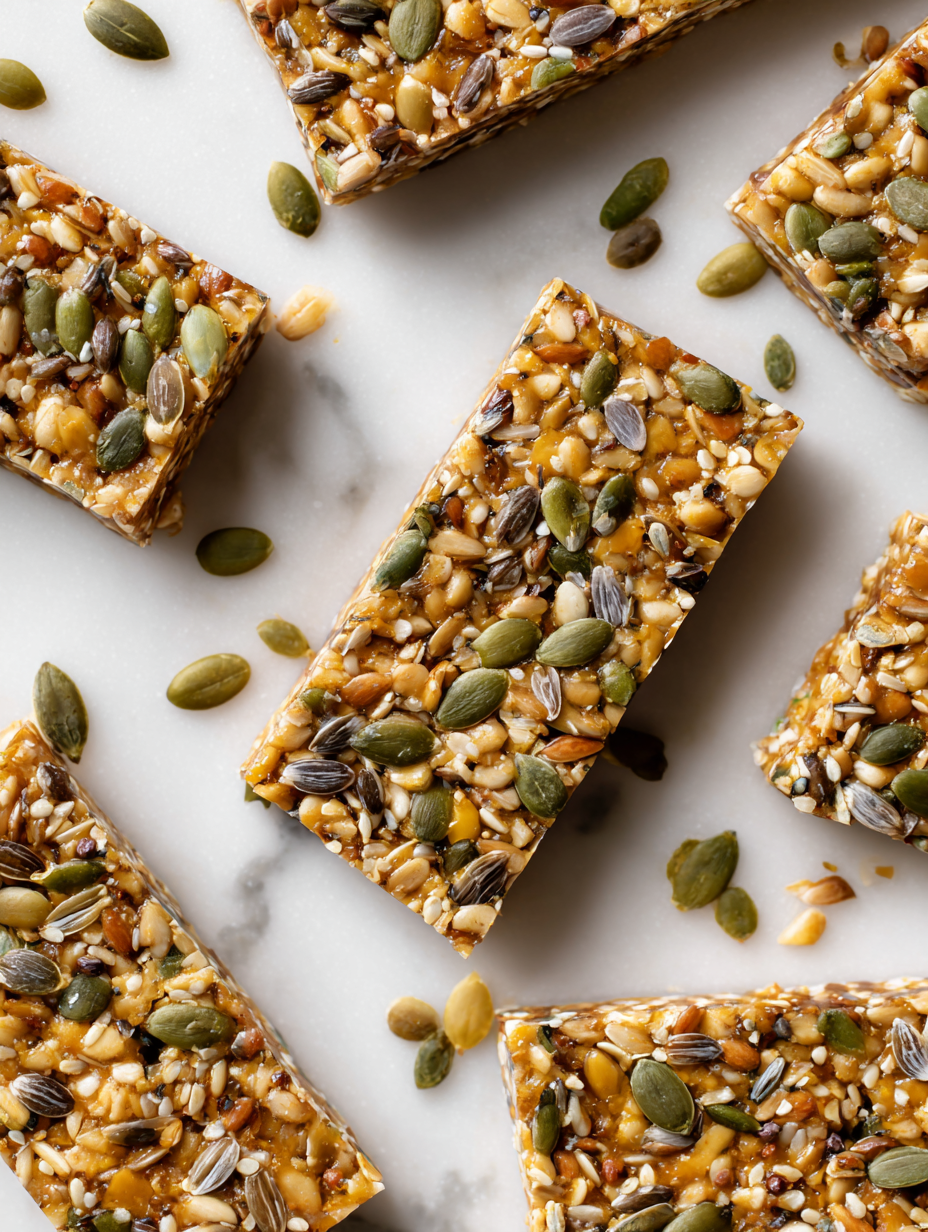
- Sunflower seeds: I love their nutty, slightly sweet flavor—make sure to toast them lightly for extra aroma, or skip to keep it raw and bright.
- Chia seeds: They swell and become gel-like, giving the bars a subtle crunch—if you’re not a fan, substitute with hemp seeds for a milder texture.
- Honey: It adds that sticky, sweet glue that holds everything together—use maple syrup or agave for a vegan twist, but expect a slightly different sweetness.
- Oats: I prefer rolled oats for their hearty chew, but if you want a finer crumb, blitz them briefly in the food processor—less rustic, more refined.
- Dried cranberries: I love their burst of tartness and chewy texture—swap with apricots or goji berries for a different fruity zing.
- Coconut oil: I use it to slightly firm up the bars and add a subtle rich aroma—if you want a milder scent, try neutral-tasting vegetable oil.
- Vanilla extract: Just a splash enhances everything with warmth and depth—skip if you want a more straightforward seed flavor, or add cinnamon instead.
Spotlight on key ingredients
Sunflower seeds:
- I love their nutty, slightly sweet flavor—make sure to toast them lightly for extra aroma, or skip to keep it raw and bright.
- Chia seeds: They swell and become gel-like, giving the bars a subtle crunch—if you’re not a fan, substitute with hemp seeds for a milder texture.
Chia seeds:
- They absorb moisture quickly, turning gooey and adding a gentle crunch—watch for clumping if you skip toasting.
- Honey: It’s the sticky glue that binds everything—when heated, it releases a sweet, floral aroma that’s irresistible.
Notes for ingredient swaps
- Nuts and Seeds: I love mixing sunflower, pumpkin, and sesame seeds for varied crunch and flavor—swap out depending on what’s in your pantry, but keep the toasted aroma for depth.
- Sweeteners: Honey adds a sticky, floral sweetness—try maple syrup or agave nectar for a vegan version, but expect a slightly different flavor profile and consistency.
- Oats: Rolled oats give a hearty chew—if you prefer finer texture, pulse them briefly in a food processor, though it’ll lose some rustic charm.
- Fruits: Dried cranberries are tangy and chewy—swap with chopped apricots, cherries, or goji berries for a different fruity burst and texture.
- Fats: Coconut oil lends a mild richness—substitute with neutral vegetable oil for a subtler finish, or use nut butters for extra creaminess and flavor.
- Binders: Honey acts as the glue—if going vegan, try brown rice syrup or molasses, but note they may alter the stickiness and flavor profile.
- Add-ins: Shredded coconut or cacao nibs add texture and flavor—feel free to omit or swap with chopped nuts, chia, or flaxseed for more variety.
Equipment & Tools
- Parchment paper: Line the baking dish for easy removal and clean edges.
- Mixing bowl: Combine and toss ingredients evenly.
- Small saucepan: Gently melt honey and coconut oil without scorching.
- Sharp knife: Slice chilled mixture into bars cleanly.
Step-by-step guide to seed bars
- Equipment & Tools: Line a 20×20 cm (8×8 inch) baking dish with parchment paper, a mixing bowl, a sturdy spoon, and a small saucepan for melting honey and coconut oil.
- Measure out 1 cup sunflower seeds, 1/2 cup chia seeds, 1 1/2 cups rolled oats, 1/2 cup dried cranberries, and 1/4 cup shredded coconut. Set aside.
- In the saucepan, gently warm 1/4 cup honey and 2 tablespoons coconut oil over low heat (~30°C/86°F). Stir until combined and just melted. Watch for a faint shimmer and a sweet aroma.
- Pour the warm mixture over the seeds and oats in the mixing bowl. Add a teaspoon of vanilla extract. Mix thoroughly until everything is evenly coated and sticky.
- Transfer the mixture to the prepared baking dish. Use the back of a spoon or a small spatula to press down firmly into an even layer. Ensure the mixture is compacted with minimal air pockets.
- Chill in the fridge for at least 2 hours. During this time, the mixture will firm up and flavors meld. The edges should look set and slightly darker, with a crackling sound when pressed gently.
- Once firm, lift the mixture out of the dish using the parchment paper. Slice into bars or squares with a sharp knife. If the mixture cracks, press it back together gently.
- Store in an airtight container at room temperature for up to 3 days or in the fridge for up to a week. For longer storage, freeze for up to 1 month. Reheat briefly if desired, noticing a faint aroma of toasted seeds.
- Resting & Finishing: Wrap bars individually if needed, and serve with a cup of tea or coffee. They should be chewy, sticky, with a satisfying crunch from the seeds and dried fruit.
- Checkpoints & How to Know It’s Done: The bars are firm but bend slightly when pressed, with a glossy, slightly matte surface; edges are crisp, and the mixture is set without sticky residue.
Let the bars chill for at least 2 hours in the fridge. Once firm, slice and serve immediately or store in an airtight container. They taste best fresh but keep well for several days refrigerated.
How to Know It’s Done
- Mixture is evenly coated and sticky before pressing.
- Bars are firm and set after chilling, with no excess moisture.
- Edges are crisp and slightly darker, indicating proper set and flavor development.
No-Bake Seed Bars
Ingredients
Equipment
Method
- Line a 20x20 cm (8x8 inch) baking dish with parchment paper, ensuring overhang for easy removal.
- In a small saucepan over low heat, gently warm honey and coconut oil until just melted and fragrant, about 30 seconds to 1 minute. Stir gently to combine.
- In a large mixing bowl, combine sunflower seeds, chia seeds, rolled oats, dried cranberries, and shredded coconut, mixing them well with a sturdy spoon.
- Pour the warm honey and coconut oil mixture over the dry ingredients, then add vanilla extract. Mix thoroughly until all ingredients are evenly coated and sticky, pressing gently to distribute evenly.
- Transfer the mixture into the prepared baking dish. Use the back of a spoon or a spatula to press down firmly and evenly, creating a compact layer.
- Place the dish in the fridge and chill for at least 2 hours until the mixture is firm and set.
- Once chilled, lift the mixture out of the pan using the parchment overhang. Place on a cutting board and cut into bars or squares with a sharp knife.
- Serve immediately or store in an airtight container at room temperature for up to 3 days, or refrigerated for up to a week. For longer storage, freeze the bars.
Notes
Pro Tips for Perfect Seed Bars
- Bolded mini-head: Toast seeds lightly to enhance their nutty aroma and add depth to the bars.
- Bolded mini-head: Use a silicone spatula for mixing to gently fold ingredients without breaking delicate seeds.
- Bolded mini-head: When pressing the mixture into the pan, use the bottom of a glass to get an even, firm layer.
- Bolded mini-head: Chill the bars for at least 2 hours; the longer, the better the texture holds together.
- Bolded mini-head: If the mixture is too sticky, sprinkle a little extra oats or seeds to help with handling.
- Bolded mini-head: For a more caramelized flavor, briefly warm the honey and coconut oil until just fragrant and runny.
- Bolded mini-head: When slicing, clean your knife with warm water between cuts for neat, clean edges.
Common mistakes and how to fix them
- FORGOT to measure ingredients accurately → Use a scale for consistent texture and flavor.
- DUMPED ingredients into the pan without mixing → Mix thoroughly to prevent separation and ensure even binding.
- OVER-TORCHED the mixture → Remove from heat once it just starts to smell toasted and looks glossy.
- MISSED chilling time → Chill for at least 2 hours until bars are firm and hold shape.
Quick Fixes and Pantry Swaps
- When mixture is too sticky, splash with a few drops of warm water and stir well.
- If seeds aren’t sticking, patch with a drizzle of honey or maple syrup and mix again.
- Splash a little extra oil if bars crumble during slicing to help them hold together.
- When bars crack on cutting, shield edges with a damp cloth for cleaner slices.
- Dumped ingredients in wrong order? Rest the mixture briefly in the fridge before pressing.
Prep, store, and reheat tips
- Pre-measure and toast seeds and oats a day ahead to intensify their flavor and save time during assembly.
- Store the prepared dry ingredients in an airtight container at room temperature for up to 3 days for freshness.
- Keep the honey mixture in a covered jar in the fridge if making ahead; it can be warmed slightly to make mixing easier.
- Bars can be stored at room temperature in an airtight container for up to 3 days or refrigerated for up to a week, maintaining chewiness.
- Reheat briefly in the microwave (5-10 seconds) to soften and revive the aroma, especially if the bars feel firm or dry.
Top questions about seed bars
1. How do I cut the seed bars neatly?
Use a sharp knife and press down firmly to get clean cuts, especially if the mixture is well chilled.
2. Can I make these vegan or with different sweeteners?
Yes, you can swap honey for maple syrup or agave. Expect a slightly different texture and sweetness intensity.
3. How long do the seed bars last?
Store bars in an airtight container at room temperature for up to 3 days, or in the fridge for a week.
4. How do I know when the bars are ready to cut?
Chill the mixture for at least 2 hours in the fridge until firm. The edges should be crisp, and the bars hold their shape.
5. Should I toast the seeds or keep them raw?
Toast seeds lightly for a nutty aroma, or skip to keep the flavor raw and bright—both work perfectly.
6. Can I replace chia seeds with something else?
You can substitute chia seeds with hemp seeds or flaxseed, but expect a different crunch and flavor profile.
7. How do I get the mixture compact enough?
Press the mixture firmly into the pan with the back of a spoon or a glass to ensure it sticks together well.
8. Can I freeze these seed bars?
Freeze the bars for up to a month for longer storage, and thaw slightly before eating if frozen.
9. What if the mixture is too sticky to handle?
If the mixture is too sticky, sprinkle in a little extra oats or seeds and knead gently to balance moisture.
10. How should I store the seed mixture before pressing?
Chill the mixture tightly wrapped in plastic wrap or in an airtight container to keep it fresh and prevent drying out.
These no-bake seed bars are a quiet reminder that nourishing food can be simple and unpolished, just like those mornings when you grab what’s at hand. There’s a certain satisfaction in pressing a mixture that smells nutty and toasted into a pan, then slicing it into imperfect squares. It’s honest food, made with just a handful of ingredients and a little patience.
They’re perfect for busy days or when you need a quick, satisfying snack that won’t fall apart in your bag. Plus, knowing you can customize them with what’s in your pantry makes it feel like your own little kitchen rebellion. Sometimes, the best recipes are the ones that are raw, real, and just a bit messy.