
What draws me to this sticky pork ribs recipe isn’t just the tender meat or the sweet glaze, but those little burnt edges that crisp up at the edges during slow oven braising. It’s like discovering a hidden treasure in every bite—those caramelized bits that crackle and stick to your fingers, inviting you to lick them clean. I’ve always been fascinated by how imperfect bits become the most flavorful parts, and here, they’re front and center.
This recipe is a reminder that sometimes, the overlooked parts—those slightly charred, sticky edges—are what make a dish memorable. It’s about celebrating the slow transformation of pork into something almost candied, with flavors that deepen and intensify as it cooks. I love how this turns an ordinary cut into a messy, joyful feast that makes everyone reach a little further for that last, sticky finger.
Cooking these ribs feels like a small act of rebellion against the perfectly polished, overly tidy plates. It’s honest, it’s tactile, and it rewards patience. When you finally pull them out of the oven, smelling that rich, smoky sweetness, you know all the little moments of chaos—splashes, spills, smoky edges—are what made it worth it.
Focusing on the overlooked magic of caramelized, sticky edges that develop during slow oven braising, transforming ordinary pork ribs into a deeply flavorful, almost candied treat. It’s about celebrating the imperfect, slightly charred bits that everyone tends to pick off, but I’ve learned to love.
Caramelized edges, slow magic
- There’s a thrill in that first crackle of sticky edges, like catching a secret in the kitchen.
- I used to think perfect ribs needed fancy marinades, but honestly, this caramelized chaos is what I crave.
- The smell of slow-cooked pork, mingling with smoky sugars, always takes me back to family weekends.
- Nothing beats the messy joy of sticky fingers and a plate full of imperfectly perfect ribs.
- I love how those slightly charred bits make me feel like I’ve cracked some secret sauce—simple, honest, addictive.
The story behind this recipe
This recipe for sticky pork ribs came about during a chaotic family BBQ when I accidentally left the ribs in the oven a little longer than planned. The edges caramelized into these irresistible, slightly charred bites that everyone kept reaching for. It made me realize that those imperfect, sticky bits are where the real magic happens—turning a simple cut of pork into a deep, sweet, smoky treasure. Since then, I’ve been chasing that perfect balance of slow-braised tenderness and crispy, caramelized edges, making this dish my go-to when I want something unpolished but bursting with flavor.
Trivia and Cultural Roots
- Sticky pork ribs have roots in Asian barbecue traditions, where slow-cooked, caramelized meat is prized for its deep flavor.
- The caramelized edges are reminiscent of Chinese char siu, a sweet and savory roasted pork, but adapted for slow oven braising.
- Historically, the sticky, crispy exterior developed as a way to preserve meat before refrigeration, using sugars and smoke.
- In many cultures, the imperfect, slightly burnt edges are cherished, symbolizing flavor depth over visual perfection.
- Modern recipes emphasize slow cooking and caramelization, a throwback to traditional methods where patience turns ordinary into extraordinary.
Ingredient breakdown: key components
- Pork ribs: I love using bone-in ribs for that rich, meaty flavor and juicy texture; if you want less fat, try boneless but expect slightly less flavor.
- Brown sugar: It’s the backbone of that sticky glaze—caramelizes beautifully, giving a deep sweetness; substitute honey if you prefer a more floral note, but reduce the amount.
- Soy sauce: Adds umami and saltiness that balances the sweetness; tamari works well if you need gluten-free, just watch for salt levels.
- Garlic: I mash mine into a paste for maximum punch; if fresh isn’t available, use good-quality garlic powder, but add it early to mellow its sharpness.
- Apple cider vinegar: Brightens the glaze with a tangy kick—use lemon juice or rice vinegar as a quick swap, but don’t skip the acidity for balance.
- Smoked paprika: It’s the smoky whisper that ties everything together; if you don’t have it, a pinch of chipotle powder adds a similar smoky depth.
- Honey or maple syrup: I brush this on at the end for that glossy, sticky finish—if you’re out, agave syrup or even a touch of corn syrup works, but it won’t caramelize quite the same.
Spotlight on key ingredients
Brown Sugar:
- I love how it caramelizes into a shiny, sticky glaze that crackles with smoky sweetness; skip it for a less rich, less caramelized finish.
- Soy Sauce: It adds that savory umami depth and saltiness that balances the sweetness; tamari is a good gluten-free alternative, but watch for salt levels.
Garlic:
- I mash mine into a paste for maximum punch and aroma; if fresh isn’t available, use garlic powder, but add early to mellow its bite.
- Apple Cider Vinegar: Brightens the glaze with a tangy kick; lemon juice or rice vinegar can be quick swaps, but don’t skip the acidity for balance.
Notes for ingredient swaps
- Dairy-Free: Use coconut aminos instead of soy sauce for a slightly sweeter, less salty flavor—adds a tropical aroma.
- Sugar Alternatives: Swap brown sugar for coconut sugar or agave syrup—expect a more caramel-like or floral sweetness.
- Vinegar Swap: Apple cider vinegar can be replaced with lemon juice or rice vinegar—brightens the glaze without overpowering.
- Sweetener Swap: Honey or maple syrup can be replaced with agave syrup or corn syrup—keep the sticky, glossy finish.
- Smoked Flavor: If smoked paprika isn’t available, use chipotle powder or a dash of liquid smoke—aim for that smoky depth.
- Sweet Glaze: Instead of honey, try a touch of molasses for a richer, more intense caramel note—expect a darker finish.
- Meat Cuts: For less fatty ribs, try pork loin back ribs—less sticky and slightly leaner, but still flavorful.
Equipment & Tools
- Baking dish: To hold the ribs during slow oven braising.
- Small brush: For applying the glaze evenly over the ribs.
- Aluminum foil: To cover the ribs during initial baking, trapping moisture.
- Oven thermometer: To ensure precise temperature control.
- Tongs: To handle hot ribs and turn them if needed.
Step-by-step guide to sticky pork ribs
- Preheat your oven to 150°C (300°F). Gather your baking dish, a small brush, and aluminum foil. Pat the ribs dry with paper towels to ensure good caramelization. Mix your spice rub—paprika, salt, pepper, garlic powder—and rub it all over the ribs. Let sit for 15 minutes to absorb flavors.
- Place ribs bone-side down in your baking dish. Cover tightly with foil to trap steam and moisture. Bake for 2.5 hours, checking occasionally. The meat should be tender and easily jiggle when moved. The smell will be rich with smoky and caramel notes.
- Remove ribs from oven, carefully uncover. Brush a generous layer of honey or maple syrup all over the top. Increase oven temperature to 200°C (390°F). Return uncovered for an additional 20-25 minutes to develop a sticky, caramelized crust. Watch for a deep amber color and slight crackle.
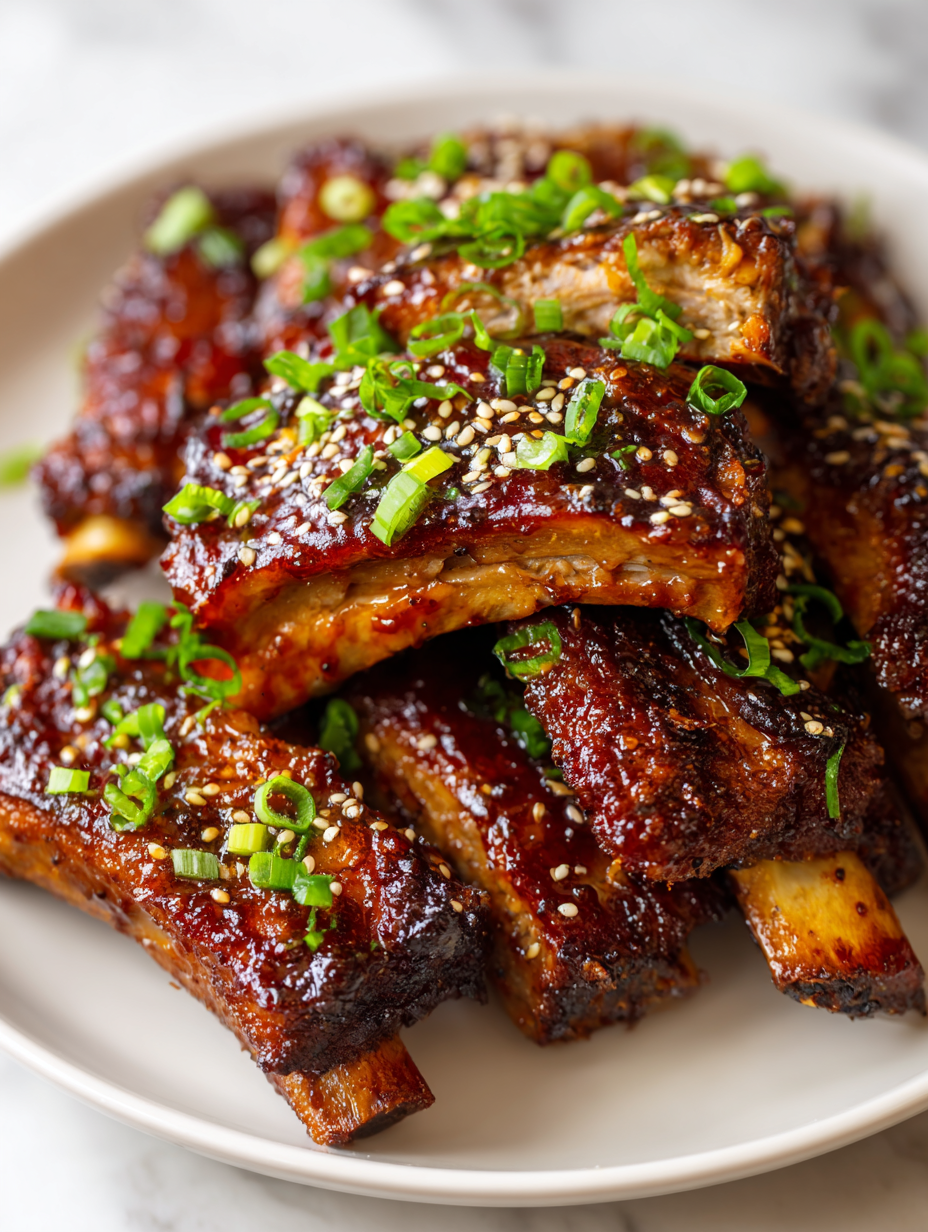
- Once done, take out the ribs and let rest for 5 minutes. This helps juices redistribute and makes slicing easier. Plate the ribs, spoon over any remaining glaze, and serve with your favorite sides. The edges should be crispy, sticky, and deeply flavorful.
- For the final check, the ribs should have a crackling glaze, a deep caramel color, and meat that pulls away easily from the bone. The aroma should be smoky with sweet undertones. The glaze will be tacky and shiny, inviting that first bite.
Let the ribs rest for 5 minutes to settle juices. Slice between the bones and serve with extra glaze if desired. The sticky edges should be crispy and caramelized, inviting bites that crackle with smoky sweetness.
How to Know It’s Done
- Deep amber, crackling exterior with a sticky glaze.
- Meat easily pulls from the bone with a jiggle at 65°C (150°F).
- Aromatic, smoky-sweet smell with caramel hints during baking.
Sticky Caramelized Pork Ribs
Ingredients
Equipment
Method
- Preheat your oven to 150°C (300°F). Pat the pork ribs dry with paper towels to ensure good caramelization. In a small bowl, mix paprika, salt, black pepper, garlic powder, and brown sugar to create a flavorful dry rub. Rub this mixture all over the ribs generously, pressing it into the meat. Let sit for 15 minutes to absorb the flavors.
- Place the ribs bone-side down in your baking dish, arranging them in a single layer. Cover tightly with aluminum foil to trap moisture and slow cook the meat. Bake for about 2.5 hours, until the ribs are tender and the meat easily jiggles when moved. The house will fill with a rich, smoky aroma.
- Carefully remove the foil and transfer the ribs to a plate or a rack. Mix soy sauce, minced garlic, apple cider vinegar, smoked paprika, and honey to make your glaze. Use a small brush to generously coat the top of the ribs with the glaze, creating a sticky layer.
- Increase the oven temperature to 200°C (390°F). Return the ribs uncovered to the oven and bake for an additional 20-25 minutes. During this time, the glaze will bubble and crackle as it caramelizes into a crispy, sticky coating, with edges starting to blacken slightly for that desirable burnt effect.
- Once the glaze is glossy and crackling, remove the ribs from the oven. Brush them with a little more honey for extra shine and stickiness. Let the ribs rest for 5 minutes—this helps the juices settle and makes slicing easier. The aroma should be smoky, sweet, and inviting.
- Slice between the bones to serve, revealing tender meat with crispy, caramelized edges. The surface should crackle with smoky sweetness, and the sticky, charred bits will invite you to lick your fingers. Enjoy this messy, flavorful feast with your favorite sides.
Notes
Pro tips for sticky ribs
- Bolded Mini-Head: Use a hot pan → Ensures a quick sear, trapping juices inside for tender ribs.
- Bolded Mini-Head: Pat ribs dry → Helps the glaze stick better and promotes even caramelization.
- Bolded Mini-Head: Apply glaze in layers → Adds depth and sticky texture, building flavor with each coat.
- Bolded Mini-Head: Watch for crackle → When glaze shimmers and crackles, it’s ready for the oven finish.
- Bolded Mini-Head: Rest before slicing → Keeps juices in, avoiding dry meat and messy plates.
- Bolded Mini-Head: Use a foil tent → Prevents over-browning or burning during high-heat finish.
- Bolded Mini-Head: Finish with a broil → For extra crispy, caramelized edges, keep a close eye!
Common mistakes and how to fix them
- FORGOT to adjust oven temperature → Rely on visual cues, not just time.
- DUMPED too much sauce → Use a light hand, then build layers gradually.
- OVER-TORCHED edges → Cover with foil early to prevent burning.
- FAILED to rest ribs → Let them rest 5 minutes before slicing for juiciness.
Quick fixes and pantry swaps
- When sauce is too thick, splash in a bit of warm water to loosen the glaze.
- If ribs are undercooked, cover and bake longer until meat is tender and bones loosen.
- Dumped too much glaze? Patch with a light brushing of fresh sauce and bake briefly.
- Over-torched edges? Shield with foil early to prevent burning and maintain caramelization.
- Splash with extra vinegar or lemon juice if glaze is dull—brightens and sharpens flavors.
Prep, store, and reheat tips
- You can prep the spice rub and apply it to the ribs a day in advance; keep them covered in the fridge. The flavors deepen overnight, and the meat absorbs more of the smoky, savory notes.
- Cooked ribs can be stored in an airtight container in the fridge for up to 3 days. Reheat gently in a low oven (about 150°C/300°F) covered with foil until warmed through, about 20-25 minutes. The glaze may thicken, but a quick brush of warm sauce will revive the stickiness.
- For longer storage, wrap the ribs tightly in foil and freeze for up to 2 months. Thaw overnight in the fridge before reheating. Expect the texture to be slightly less crisp, so re-crisp under a broiler for a few minutes if needed.
- The flavors tend to intensify after a day or two, making leftovers even more flavorful. The caramelized crust may soften slightly, but a quick broil will bring back that sticky crackle. Watch carefully to avoid burning the edges.
Top questions about sticky pork ribs
1. How do I choose the best ribs?
Look for ribs with good marbling and a nice layer of fat, which keeps the meat juicy and adds flavor. Bone-in ribs tend to be more flavorful than boneless ones, and opt for fresh rather than frozen for the best texture.
2. What’s the ideal oven temperature for tender ribs?
Cooking at a low temperature (around 150°C or 300°F) for several hours helps break down the connective tissues, making the ribs tender and easy to pull apart. Covering with foil traps moisture and enhances caramelization.
3. How do I get that perfect sticky glaze?
Applying the glaze in layers during the last phase builds that sticky, crackling exterior. Brushing on honey or syrup at the end creates a glossy, caramelized finish. Keep an eye to prevent burning.
4. Should I rest the ribs before slicing?
Yes, resting the ribs for about 5 minutes after cooking allows the juices to redistribute, resulting in moist, flavorful meat that slices more neatly. Wrap loosely in foil during resting if you want to keep warm.
5. How do I prevent burning or over-torched edges?
If the edges start to burn, cover them with foil or a baking sheet to prevent further charring. If the glaze is too thick, a splash of warm water or vinegar can loosen it for better application.
6. How do I know when the ribs are done?
Use a meat thermometer to check for an internal temperature of about 65°C (150°F). The meat should be tender and pulling away from the bones. The glaze should be glossy and crackling, and the aroma smoky and sweet.
7. Can I add smoky flavor if I don’t have smoked paprika?
For a more intense smoky flavor, add a dash of liquid smoke or use smoked paprika in your spice rub. To keep the glaze sticky, brush on a little extra honey or syrup during the last 10 minutes of baking.
8. How should I store and reheat leftovers?
Leftovers can be refrigerated in an airtight container for up to 3 days. Reheat in a low oven (around 150°C) covered with foil until warmed through, about 20 minutes, then broil briefly for crispy edges.
9. What tools do I need for cooking ribs?
Use tongs to handle hot ribs, and a sturdy baking dish to hold the meat during baking. A brush helps evenly coat the glaze, and foil is essential for trapping moisture and preventing burning.
10. What quick fixes can I try if things go wrong?
If the sauce is too thick, stir in a little warm water or vinegar. If the ribs are undercooked, return them to the oven covered with foil for another 30 minutes. For overly charred edges, shield with foil early in baking.
There’s something about those sticky, caramelized edges that keeps pulling me back to this recipe. It’s a messy, imperfect dish that celebrates the joy of slow cooking and a little bit of chaos in the kitchen. When I pull the ribs out and see that deep, crackling glaze, I know all the patience was worth it.
This dish isn’t just about flavor; it’s about the small moments—those smoky, sweet bites that make everyone reach for more. It’s a reminder that sometimes, the best things happen when you let go of perfection and embrace the sticky, crispy magic happening in the oven.