
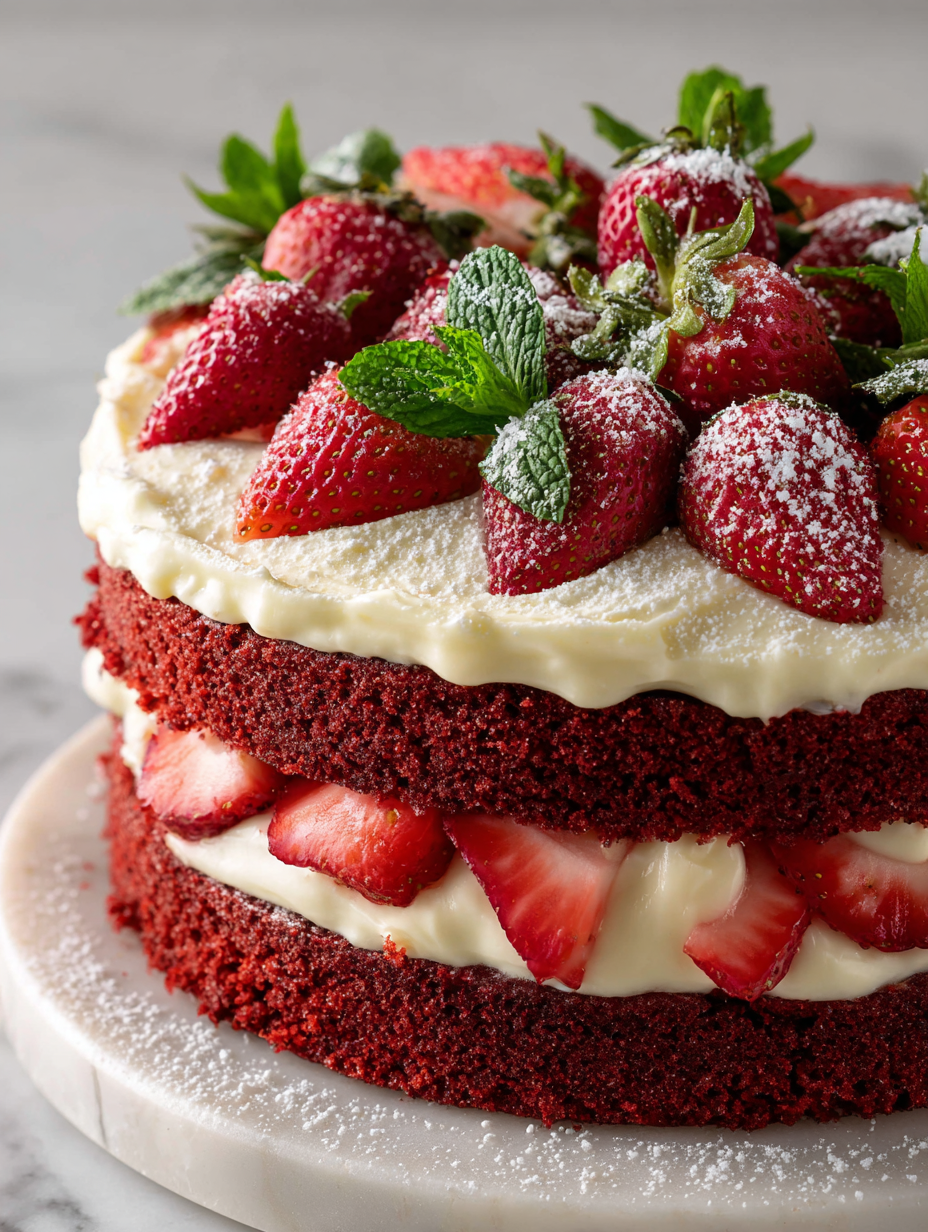
Red velvet cake always feels like a special occasion, but I love the twist of adding fresh strawberries for a burst of juicy brightness. The deep crimson layers with the vibrant red fruit create a visual feast that makes everyone pause before slicing. It’s a cake that balances richness with a pop of freshness, perfect for spring or summer gatherings.
What draws me most is how the strawberries cut through the richness of the cream cheese frosting, giving each bite a lively sweetness that feels almost nostalgic. I’ve made this cake countless times, tweaking the layers and the berry placement, but the joy of seeing that perfect color contrast and tasting the harmonious blend never gets old.
This recipe is about more than just flavor—it’s about the visual story the cake tells. The bright red layers peek through the fluffy cream, making it almost too pretty to cut into. It’s a reminder that sometimes, the simplest ingredients—strawberries and a touch of cocoa—can come together to create something that feels both familiar and refreshingly new.
Focusing on how the vibrant red velvet cake layers balance perfectly with the sweet, juicy strawberries, creating a visual and flavor harmony that feels nostalgic yet fresh.
The inspiration behind this cake
This cake came together on a whim during a late spring weekend. I had a bunch of fresh strawberries and was craving the rich, velvety texture of a classic red velvet, but with a twist. The idea of pairing the deep cocoa notes with bright, juicy strawberries felt like a natural evolution—something that could be both simple and visually striking. It’s a cake I make when I want to surprise myself, blending nostalgia with a little unexpected freshness, and every time I do, I find a new reason to love it just a little more.
Key Ingredient Insights
- Cream Cheese: I love how it adds that tangy richness, but make sure it’s softened well—nothing worse than lumps. You want it silky and smooth, almost like velvet, for that perfect frosting texture.
- Strawberries: Fresh, juicy strawberries are key. I prefer slicing them thin so they nestle into the layers without overpowering. Look for berries that smell bright and sweet, almost like a hint of garden in your hand.
- Red Food Coloring: I use gel rather than liquid—more vibrant, less mess. A little goes a long way, but don’t skimp; that deep crimson really makes the cake pop visually and flavor-wise.
- Cocoa Powder: Unsweetened, Dutch-processed—gives that deep, smoky undertone. I sift it with the flour to avoid lumps and to keep the batter smooth. It’s the backbone of that classic velvet flavor.
- Buttermilk: It keeps the cake moist and tender. If you don’t have buttermilk, a splash of vinegar or lemon juice in regular milk works fine, but the tang really balances the sweetness and richness.
- Cake Flour: Soft, fine, almost like powder—makes for a tender crumb. I prefer weighing it to avoid over-measuring, which can make the cake dense instead of fluffy. It’s a small step for good texture.
- Granulated Sugar: I keep my sugar slightly less than usual—just enough to balance the cocoa and strawberries without making the cake too sweet. It’s about that subtle, well-rounded sweetness, not cloying.
Spotlight on key ingredients
Cream Cheese and Strawberries:
- Cream Cheese: I love its velvety tang, but make sure it’s softened well—lumps are a no-go. It should be silky, almost like velvet, for that perfect frosting texture.
- Strawberries: Fresh, juicy berries are my go-to. Slice them thin so they nestle into the layers without overpowering. They smell bright and sweet, like a garden in your hand.
Notes for ingredient swaps
- Dairy-Free: Swap cream cheese with coconut cream or a dairy-free cream cheese. It won’t have that tangy punch but keeps the creamy texture.
- Vegan: Use flaxseed eggs instead of chicken eggs, and almond or soy milk instead of buttermilk. Expect a slightly different crumb—less tender but still tasty.
- Gluten-Free: Substitute cake flour with a gluten-free baking blend designed for cakes. Keep an eye on texture; it might be a tad denser.
- Sugar Alternatives: Replace granulated sugar with coconut sugar or a 1:1 natural sweetener. The flavor profile will shift slightly, more caramel-like.
- Strawberries: Frozen berries work in a pinch—just thaw and drain well. They’ll release more juice, so adjust the frosting consistency if needed.
- Food Coloring: Use natural alternatives like beet juice or pomegranate juice for a gentler hue. Expect a more muted but still lovely color.
- Oil: Swap vegetable oil for melted coconut oil or applesauce for a healthier fat. The cake might be a touch denser but still moist.
Equipment & Tools
- Oven: Bake the cakes evenly at 175°C (350°F).
- Mixing bowls: Combine dry and wet ingredients separately.
- Sifter: Aerate dry ingredients to avoid lumps.
- Spatula: Fold ingredients and smooth frosting.
- Cake pans: Shape the cake layers.
- Wire rack: Cool cakes evenly without sogginess.
- Knife or cake leveler: Slice layers evenly if needed.
Step-by-step guide to Red Velvet Strawberry Cake
- Preheat your oven to 175°C (350°F). Grease two 20cm (8-inch) round cake pans and line the bottoms with parchment. Set aside.
- In a large bowl, sift together 2 1/2 cups (310g) cake flour, 1 1/2 cups (300g) sugar, 1 teaspoon baking soda, and 1/2 teaspoon salt. Whisk to combine.
- In a separate bowl, whisk 1 cup (240ml) buttermilk, 1/2 cup (120ml) vegetable oil, 2 large eggs, 1 teaspoon vanilla extract, and 2 teaspoons red gel food coloring. Mix until smooth.
- Gradually add the wet ingredients into the dry, folding gently until just combined. Don’t overmix—lumps are okay, but no streaks of flour.
- Divide the batter evenly between the prepared pans. Smooth the tops with a spatula. Tap pans lightly to settle batter and remove air bubbles.
- Bake for 25–30 minutes. The cakes are done when the edges pull away slightly from the pan, and a toothpick inserted in the center comes out clean. The tops should be deep crimson, slightly cracked, and fragrant.
- Remove from oven and let cool in pans for 10 minutes. Then, transfer to a wire rack to cool completely, about 1 hour. Wrap loosely in plastic if not frosting immediately.
- Before assembling, prepare the frosting: beat softened cream cheese, butter, and a splash of vanilla until fluffy. Chill slightly if too soft.
- Slice each cake layer horizontally if a thinner, layered look is desired. Spread a layer of frosting on the first, then add a handful of sliced strawberries. Repeat with second layer.
- Stack the layers, then frost the outside with a generous smear of frosting, smoothing with a spatula. Decorate with remaining strawberries if desired.
- Allow the cake to rest for at least 30 minutes in the fridge before slicing to set the frosting and flavors. Bring to room temperature before serving for best texture.
Allow the assembled cake to rest in the fridge for at least 30 minutes. Serve at room temperature, slicing with a sharp serrated knife for clean cuts. Garnish with extra strawberries or a dusting of cocoa powder if desired.
How to Know It’s Done
- Cake edges are deep crimson and slightly cracked, with a fragrant cocoa smell.
- Toothpick inserted in the center comes out clean and moist, not sticky or wet.
- Frosting is smooth, creamy, and holds shape without sagging.
Red Velvet Strawberry Cake
Ingredients
Equipment
Method
- Preheat your oven to 175°C (350°F). Grease two 20cm (8-inch) round cake pans and line the bottoms with parchment paper.
- Sift together the cake flour, sugar, baking soda, and salt in a large mixing bowl until well combined. This aerates the dry ingredients and removes lumps.
- In a separate bowl, whisk together the buttermilk, vegetable oil, eggs, red gel food coloring, and vanilla extract until the mixture is smooth and vibrant red in color.
- Gradually pour the wet mixture into the dry ingredients, gently folding with a spatula until just combined. Be careful not to overmix; the batter should be slightly lumpy but smooth.
- Divide the batter evenly between the prepared pans, smoothing the tops with a spatula. Tap the pans lightly on the counter to release any air bubbles.
- Bake in the preheated oven for 25-30 minutes, or until the edges are set and a toothpick inserted into the center comes out clean. The cakes will be deep crimson and slightly cracked on top.
- Remove the cakes from the oven and let them cool in pans for about 10 minutes. Then, transfer to a wire rack and cool completely, about 1 hour. Wrap in plastic if not frosting immediately.
- While the cakes cool, prepare the frosting by beating the softened cream cheese and butter together until silky and smooth. Gradually add powdered sugar, one cup at a time, until fluffy and spreadable.
- Slice each cake layer horizontally if you prefer thinner layers. Spread a layer of frosting on the first layer, then arrange a handful of thinly sliced strawberries on top for burst of freshness.
- Stack the second layer on top and apply a generous coat of frosting over the entire cake. Smooth the sides and top with a spatula, then decorate with additional strawberries if desired.
- Refrigerate the cake for at least 30 minutes to set the frosting. Slice with a serrated knife and serve at room temperature to enjoy the fluffy layers and bright berry flavors.
Pro tips for perfect cake
- Bolded mini-head: Use gel food coloring for vibrant, consistent color—less mess, more control.
- Bolded mini-head: Fold in dry ingredients gently to keep the batter light and airy, avoiding overmixing.
- Bolded mini-head: Check the cake’s color and smell—deep crimson and cocoa aroma signal readiness.
- Bolded mini-head: Chill the frosted cake for at least 30 minutes to set the layers and frosting properly.
- Bolded mini-head: When slicing, use a serrated knife and saw gently to prevent squishing the layers.
- Bolded mini-head: For strawberries, slice thin and layer evenly for a balanced burst of flavor in each bite.
- Bolded mini-head: If the cake cracks on top, don’t panic—level with a knife and continue frosting for a smooth finish.
Common mistakes and how to fix them
- FORGOT to check oven temperature → Use an oven thermometer for accuracy.
- DUMPED too much food coloring → Use gel in small amounts, build color gradually.
- OVER-TORCHED the edges → Shield with foil if browning too quickly.
- FAILED to soften cream cheese → Soften at room temperature for smooth frosting.
Fast fixes and pantry swaps
- When the frosting looks runny, splash in more powdered sugar to thicken it up.
- If the cake is sinking, patch with extra frosting and level with a serrated knife.
- Splash a little lemon juice on strawberries to brighten their flavor and reduce excess moisture.
- Patch cracked cake layers with frosting and smoothing; no one will notice once decorated.
- Shield edges with foil if they brown too quickly during baking to prevent over-torching.
Prep, store, and reheat tips
- Prepare the cake layers a day in advance; wrap tightly in plastic to keep moist and prevent drying out.
- Store assembled, frosted cake in the fridge for up to 24 hours; the flavors meld and frosting sets better.
- Strawberries can be sliced a few hours ahead; keep refrigerated and drain excess juice before layering to avoid sogginess.
- Reheat leftover slices briefly in the microwave—15 seconds on medium—until slightly warm and the frosting softens, releasing inviting aromas.
- The cake’s flavor deepens after a day, but the strawberries may soften; best enjoyed within 1-2 days for optimal freshness.
Top questions about Red Velvet Strawberry Cake
1. Can I use frozen strawberries?
Use fresh, ripe strawberries for the best flavor; frozen can work, but drain excess juice thoroughly.
2. How do I prepare frozen strawberries?
Yes, but thaw and drain them well to prevent excess moisture from making the cake soggy.
3. Can I use liquid food coloring?
Gel food coloring provides vibrant, consistent color without diluting the batter; liquid can water it down.
4. Is it possible to make this vegan?
Absolutely. Swap coconut cream or vegan cream cheese, but expect a slightly different tang and texture.
5. How do I soften cream cheese?
Cream cheese should be softened fully so the frosting is silky and smooth; cold cheese creates lumps.
6. How do I know when the cake is done?
Bake until the edges are deep crimson and slightly cracked, and a toothpick comes out clean but moist.
7. How long should I chill the cake?
Chill the assembled cake for at least 30 minutes; this helps set the frosting and meld flavors.
8. How do I slice the cake neatly?
Use a serrated knife and saw gently through the layers for clean, neat slices without squishing.
9. How do I store the cake?
Store the cake in the fridge covered for up to 24 hours; bring to room temp before serving for best texture.
10. What if my frosting is too soft or the cake cracks?
If the frosting is runny, add a little powdered sugar; if the cake cracks, patch with frosting and smooth out.
Making this red velvet strawberry cake feels like capturing a moment of celebration and nostalgia in one slice. The combination of velvety richness and bright, juicy berries makes it a dessert I keep coming back to, especially when I want something both beautiful and honest. It’s a reminder that simple ingredients, when handled with care, can create something truly memorable.
In the end, this cake isn’t about perfection but about the joy of mixing, tasting, and sharing a little piece of my kitchen with those I love. Whether it’s for a special occasion or just because strawberries are at their peak, it’s a cake that feels like a small, sweet celebration of the season.

I’m Emily Richardson, the heart and soul behind Playing with Flavors. Cooking isn’t just a hobby for me – it’s a passion that I’ve cultivated for years, and it’s become the driving force of my life.
From the kitchen of my cozy café to the pages of this blog, every dish I create is a reflection of my love for food and the joy it brings to people.


