
Some afternoons just call for something sweet and straightforward, especially when time’s tight and energy’s low. These no-bake caramel bites are my go-to for those moments—they come together fast, without any fuss, and hit that nostalgic sweet spot I remember from childhood treats.
There’s a comfort in knowing I can whip up these little bites with just a handful of ingredients, no oven needed. They’re perfect for sneaking into busy weekdays or surprising someone with a quick, homemade gift. That familiar caramel aroma, the slightly chewy edge—these bites somehow make everything feel a little calmer, a little cozier.
Focusing on how these no-bake caramel bites can be a quick, nostalgic fix for busy weekdays or unexpected sweet cravings, highlighting their simplicity and comforting familiarity.
A Nostalgic Fix in Minutes
- These bites remind me of my grandma’s candy jar—sweet, sticky, and impossible to resist.
- I love how quick they come together, especially after a long day when I just need a little sweet escape.
- There’s a quiet pride in making something so simple yet totally satisfying, no oven required.
- Sometimes I stash a few in the freezer for those unexpected sweet cravings—thaw for a few minutes and they’re perfect.
- Nothing beats the smell of caramel melting — it’s like a warm hug in the kitchen, every time.
The story behind this recipe
- This recipe came together during a chaotic weekend, when I needed something sweet but simple—no oven, no fuss. I remembered those caramel candies I used to get from a street vendor, sticky and rich, and thought, why not make a quick version at home? It’s funny how a small, messy kitchen experiment can turn into a little tradition.
- I love how these bites feel like a tiny rebellion against busy days—sweet, chewy, with just enough caramel to make you smile. They’re my go-to when I crave something comforting but don’t want to spend hours in the kitchen. Plus, sharing them with friends makes even the busiest days feel a little brighter.
- heading
- story_type
Trivia and History
- These caramel bites trace back to old-fashioned candy traditions, simplified for quick home treats.
- No-bake recipes like this gained popularity during wartime shortages, making indulgence easier with limited ingredients.
- The combination of caramel and nuts has roots in European confections, adapted here into a modern, fuss-free form.
Ingredient breakdown: key components
- Sweetened condensed milk: I love how it creates that rich, gooey caramel core—just a quick stir, and it’s ready to set. Feel free to swap in coconut milk for a lighter touch, but the texture will be a bit less chewy.
- Butter: The butter adds a silky sheen and helps the caramel set firm. Use salted butter if you like a hint of savory, or go dairy-free with a coconut oil swap for a softer bite.
- Brown sugar: It’s what gives these bites their deep, molasses-y flavor—smell that smoky-sweet aroma as it melts. You can experiment with coconut sugar, but expect a lighter, slightly different caramel note.
- Vanilla extract: Just a splash brightens everything up with warm, floral notes. Skip it if you’re out, but it really enhances the richness—try a touch of almond extract for a twist.
- Sea salt: A pinch balances the sweetness and enhances the caramel flavor—don’t skip it. You could try smoked sea salt for a more complex, smoky edge, or flaky salt for texture.
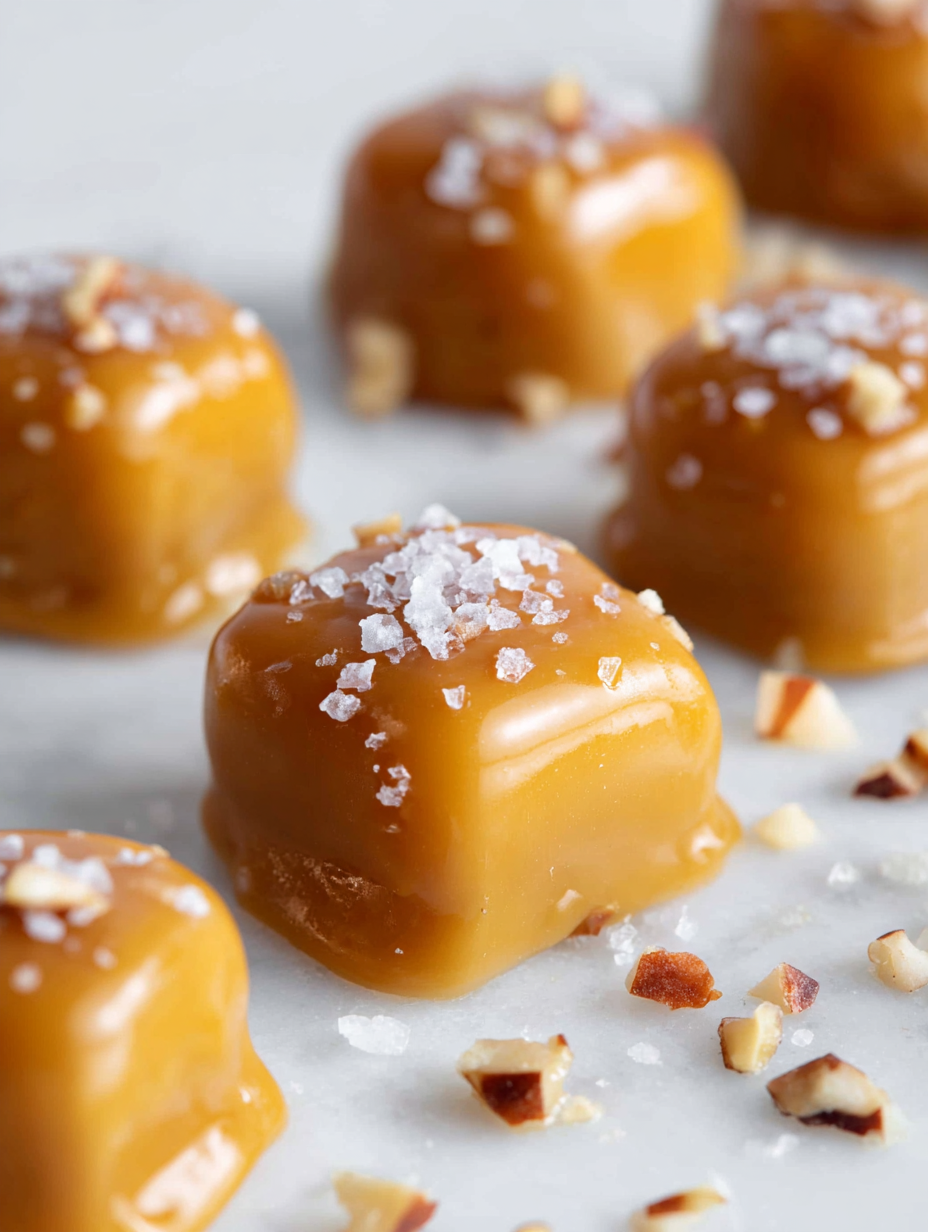
- Optional nuts or toppings: I like chopped pecans or sea salt flakes on top, adding crunch and contrast. Feel free to customize with dried fruit or a drizzle of chocolate once set.
- Parchment paper: Critical for easy removal—I double up to prevent sticking. No fancy silicone mats needed, just a sturdy sheet, and you’re good.
Spotlight on key ingredients
Sweetened condensed milk:
- I love how it creates that rich, gooey caramel core—just a quick stir, and it’s ready to set. Feel free to swap in coconut milk for a lighter touch, but the texture will be a bit less chewy.
- Butter: The butter adds a silky sheen and helps the caramel set firm. Use salted butter if you like a hint of savory, or go dairy-free with a coconut oil swap for a softer bite.
- Brown sugar: It’s what gives these bites their deep, molasses-y flavor—smell that smoky-sweet aroma as it melts. You can experiment with coconut sugar, but expect a lighter, slightly different caramel note.
Vanilla extract:
- Sea salt: A pinch balances the sweetness and enhances the caramel flavor—don’t skip it. You could try smoked sea salt for a more complex, smoky edge, or flaky salt for texture.
- Just a splash brightens everything up with warm, floral notes. Skip it if you’re out, but it really enhances the richness—try a touch of almond extract for a twist.
Notes for ingredient swaps
- Dairy-Free: Swap sweetened condensed milk for coconut condensed milk—rich and creamy, but expect a slightly lighter texture.
- Butter: Use plant-based butter or coconut oil for a dairy-free, slightly tropical flavor that still melts smoothly.
- Brown Sugar: Replace with coconut sugar for a caramel note with less molasses, or maple syrup for a different sweetness profile.
- Vanilla Extract: Try almond or coconut extract to add a different aromatic dimension—just a splash, as they’re potent.
- Sea Salt: Flaked sea salt adds crunch and contrast, but coarse kosher salt works well if you prefer a milder saltiness.
- Optional Toppings: Use chopped toasted nuts, dried fruits, or a drizzle of dark chocolate for extra texture and flavor.
- Parchment Paper: If you don’t have it, lightly butter your tray or silicone mats, but expect a little more sticking.
Equipment & Tools
- Small saucepan: To melt and cook the caramel mixture evenly.
- Spatula: For stirring and spreading the caramel smoothly.
- Silicone mold or parchment-lined tray: To shape and set the caramel bites easily.
- Spoon: For scooping and transferring caramel.
Step-by-step guide to caramel bites
- Gather your equipment: a small saucepan, a spatula, a silicone mold or parchment-lined tray, and a spoon for scooping. This keeps things simple and easy to clean.
- Combine 1 cup of sweetened condensed milk, 4 tbsp of unsalted butter, and 1/2 cup of brown sugar in the saucepan. Heat over low heat, stirring constantly, until the mixture is smooth and starts to bubble gently—about 5 minutes. Watch for a rich caramel aroma and a slight shimmer in the mixture.
- Continue cooking, stirring often, until the mixture thickens and turns a deep caramel color—about 8-10 minutes. If it begins to scorch or smell burnt, lower the heat immediately and stir in a splash of milk or water to loosen it up.
- Remove from heat and stir in 1 tsp vanilla extract and a pinch of sea salt. Mix well until combined. The mixture should be glossy and sticky, ready to pour.
- Spoon the caramel into your prepared mold or tray. Use the back of the spoon to spread evenly and smooth the top. If adding nuts or toppings, sprinkle now while the caramel is still soft. Chill in the fridge for at least 2 hours, or until firm.
- Once set, gently lift the caramel from the mold or cut into small bites with a sharp knife. Handle with clean hands or a spatula to prevent sticking.
- Rest the bites at room temperature for 10 minutes before serving to allow the flavors to mellow. Store in an airtight container in the fridge for up to a week, or freeze for longer storage.
Chill the caramel bites in the fridge for at least 2 hours until firm. Slice or pop out of molds gently, then let sit at room temperature for 10 minutes before serving. Store in an airtight container in the fridge.
How to Know It’s Done
- Color: Caramel should be a rich, deep amber without burnt black edges.
- Smell: A warm, sweet caramel aroma indicates proper cooking.
- Texture: Mixture should be thick and sticky, not runny or overly hardened.
No-Bake Caramel Bites
Ingredients
Equipment
Method
- Gather your saucepan, spatula, and a silicone mold or parchment-lined tray — these will be your tools for melting and shaping the caramel.
- Add the sweetened condensed milk, butter, and brown sugar to the saucepan. Place it over low heat, stirring constantly with the spatula. Watch for the mixture to become smooth and start to bubble gently, filling your kitchen with a sweet, caramel aroma after about 5 minutes.
- Continue stirring as the mixture thickens and deepens in color, turning a rich caramel shade. This process takes about 8-10 minutes, and you'll notice the sound change to a gentle simmer and a glossy, sticky texture forming.
- Remove the saucepan from heat and stir in the vanilla extract along with a pinch of sea salt. Mix well until everything is evenly combined and the caramel has a smooth, shiny appearance.
- Spoon the hot caramel into your prepared mold or tray, spreading it out evenly with the back of the spoon. If you like, sprinkle chopped nuts or a pinch of sea salt flakes on top for extra texture. Place in the fridge and chill for at least 2 hours until firm and set.
- Once the caramel is hardened, gently lift or cut it into small, bite-sized pieces. Handle with care to keep the chewy, sticky texture intact.
- Let the caramel bites sit at room temperature for about 10 minutes to soften slightly before serving. Enjoy these nostalgic, chewy treats that are perfect for satisfying a quick sweet craving.
Notes
Pro tips for perfect caramel bites
- Use low heat for a smooth melt—high heat causes scorch and graininess.
- Stir constantly as the mixture heats—stopping early leads to uneven caramelization.
- Watch the color closely—deep amber signals perfect caramel, avoid going too dark.
- Add salt at the end—mixing in too early can lead to uneven distribution.
- Chill in a shallow dish—helps the caramel set faster and more evenly for clean cuts.
- Use room temperature ingredients—cold butter or milk can cause seizing or uneven melting.
- For extra flavor, sprinkle sea salt or nuts on top before chilling—adds crunch and contrasts.
Common mistakes and how to fix them
- FORGOT to stir continuously → Stir constantly to prevent burning and ensure smooth caramel.
- DUMPED mixture too hot → Let it cool slightly before pouring to avoid melting molds or burning fingers.
- OVER-TORCHED caramel → Remove from heat immediately; burnt flavor is hard to fix once caramel darkens too much.
- MISSED the salt addition → Sprinkle salt early or at the end for balanced sweetness and enhanced flavor.
Quick fixes and pantry swaps
- When mixture thickens and hardens, splash in a little hot water to loosen it.
- If caramel is too runny, dump it back in the pan and heat briefly to thicken.
- Splash cold water on caramel if it scorches—stop heating immediately and stir in cream to mellow.
- Patch sticky bites by briefly warming in microwave—smell for warm caramel aroma, then chill again.
- Shield caramel from humidity by storing in an airtight container—crystal formation can ruin texture.
Prep, store, and reheat tips
- Prepare the caramel mixture up to two days in advance; store in an airtight container in the fridge to keep it fresh and prevent crystallization.
- Chill the set caramel bites in the fridge for at least 2 hours; they firm up nicely, making cutting or popping out easier.
- Store the finished bites in an airtight container in the fridge for up to a week; let sit at room temperature for 10 minutes before serving to soften slightly and enhance flavor.
- Reheat leftover caramel bites briefly in the microwave—about 10 seconds—until slightly warm, then feel the aroma and test for softening before serving again.
Top questions about caramel bites
1. Can I make these dairy-free?
Yes, you can swap the sweetened condensed milk with coconut milk, but expect a slightly softer, less chewy texture.
2. Can I use coconut oil instead of butter?
Absolutely, using coconut oil instead of butter will give a softer bite and a subtle tropical flavor.
3. My caramel isn’t setting properly, what do I do?
If your caramel mixture isn’t thickening, keep cooking it a few minutes longer, watching for a deep amber color.
4. Should I add salt to the caramel?
Yes, adding a pinch of sea salt enhances the caramel flavor and balances the sweetness beautifully.
5. Can I substitute the brown sugar?
You can replace brown sugar with coconut sugar for a lighter, caramel flavor, but it may be less rich.
6. How long should I chill the caramel bites?
Chill the bites for at least 2 hours until firm. Letting them sit at room temperature for 10 minutes before serving improves texture.
7. How do I cut the caramel once set?
Use a sharp knife to cut the set caramel into small bites for clean edges and easier serving.
8. My caramel is too thick or hard, what now?
If the mixture becomes too thick or hard to stir, warm it gently over low heat or add a splash of milk.
9. How should I store leftover caramel bites?
Store leftovers in an airtight container in the fridge for up to a week, bringing to room temp before serving.
10. What if my caramel burns?
If your caramel is scorched, immediately remove from heat, and try to salvage by adding a little milk or water to loosen.
These caramel bites, with their gooey centers and slightly chewy edges, capture a moment of simple joy. They’re perfect for when you need a quick fix or a nostalgic touch of sweetness that doesn’t require much fuss.
Sharing them feels like passing on a secret—something easy, comforting, and just a little indulgent. Sometimes, the best treats are the ones made in a rush, full of honest flavor and little messy moments.

I’m Emily Richardson, the heart and soul behind Playing with Flavors. Cooking isn’t just a hobby for me – it’s a passion that I’ve cultivated for years, and it’s become the driving force of my life.
From the kitchen of my cozy café to the pages of this blog, every dish I create is a reflection of my love for food and the joy it brings to people.


