
These ham and cheese sliders are more than just a quick snack; they’re a little pocket of childhood comfort, elevated with a secret garlic butter glaze that makes them irresistible. I’ve lost count of how many times this recipe has saved me from last-minute cravings or pulled together a crowd in no time. There’s something about the gooey cheese, smoky ham, and buttery roll that hits all the right nostalgic notes, but with a little extra flair that keeps it interesting.
The magic is in the details—warming the rolls just enough to coax out a soft, inviting texture, then adding that golden, slightly crisp top. It’s a recipe that feels familiar but surprises with its rich, buttery aroma and the punch of garlic that sneaks in with every bite. Perfect for lazy weekends, game days, or a quick party snack, these sliders bring warmth and joy without any fuss.
Focusing on the nostalgic comfort of ham and cheese sliders, but elevating the experience with a secret garlic butter glaze that transforms simple ingredients into a memorable, crave-worthy snack.
The story behind this recipe
I first stumbled on this recipe during a chaotic holiday gathering, where I needed something quick, warm, and crowd-pleasing. The smell of melting cheese and toasted buns filled the kitchen, wrapping everyone in a cozy, familiar hug. It’s a dish that’s been quietly evolving in my kitchen, turning into a staple for when I want comfort with a little extra flair. Every time I make these sliders, I remember that moment of simple joy and the magic of a well-loved, easy-to-throw-together snack that somehow feels special.
Key ingredients and tips
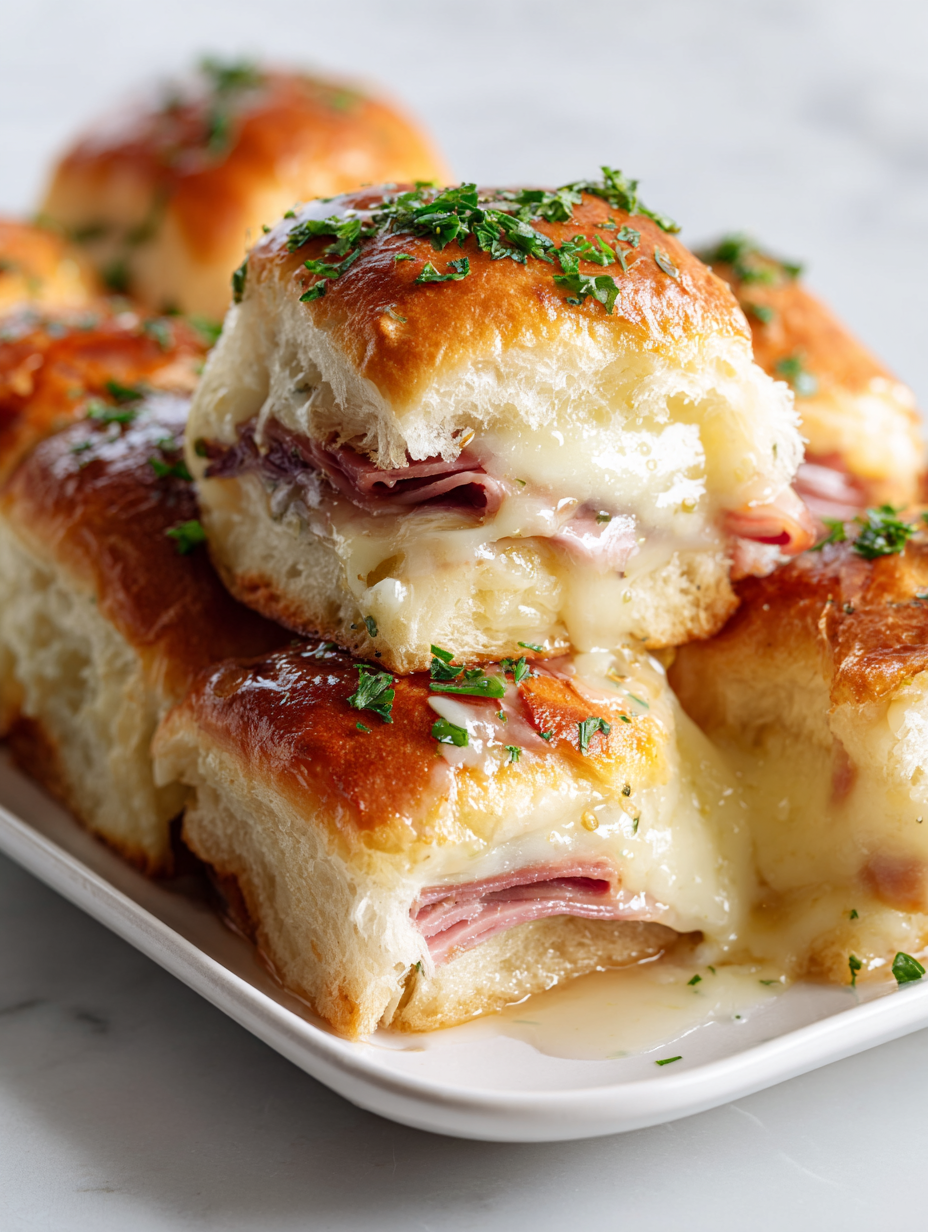
- Ham: I prefer a smoky, deli-sliced ham that’s juicy and tender, which adds a savory punch. Feel free to try honey ham if you want a touch of sweetness.
- Cheese: I use sharp cheddar for that rich, tangy flavor that melts beautifully. If you like it milder, mozzarella works too, but don’t skip the gooey melt.
- Rolls: Soft, buttery dinner rolls are my go-to—they soak up all the butter and juices, getting golden and slightly crispy on top. Brioche buns add extra richness if you’re feeling fancy.
- Garlic Butter: I make a quick glaze with melted butter, garlic, and a splash of Worcestershire. It’s the secret to that irresistible, fragrant crust—don’t skimp on the garlic.
- Seasonings: A pinch of paprika or everything bagel seasoning on top adds a smoky depth and a bit of crunch. Sprinkle it just before baking for maximum flavor.
- Additional Fillings: Sometimes I sneak in a few pickles or a dash of Dijon mustard inside for a tangy surprise. This keeps each bite interesting and layered.
- Optional Toppings: A light sprinkle of chopped chives or parsley right after baking adds freshness and a pop of color, balancing the richness.
Spotlight on key ingredients
Ham:
- I prefer a smoky, deli-sliced ham that’s juicy and tender, which adds a savory punch. Feel free to try honey ham if you want a touch of sweetness.
- Cheese: I use sharp cheddar for that rich, tangy flavor that melts beautifully. If you like it milder, mozzarella works too, but don’t skip the gooey melt.
- Rolls: Soft, buttery dinner rolls are my go-to—they soak up all the butter and juices, getting golden and slightly crispy on top. Brioche buns add extra richness if you’re feeling fancy.
Garlic Butter:
- I make a quick glaze with melted butter, garlic, and a splash of Worcestershire. It’s the secret to that irresistible, fragrant crust—don’t skimp on the garlic.
- Seasonings: A pinch of paprika or everything bagel seasoning on top adds a smoky depth and a bit of crunch. Sprinkle it just before baking for maximum flavor.
Notes for ingredient swaps
- Dairy-Free: Use vegan cheese and plant-based butter. Expect a slightly different melt and softer texture, but still tasty.
- Gluten-Free: Substitute with gluten-free rolls or sliced bell peppers for a low-carb twist. Keep an eye on moisture levels.
- Ham Alternatives: Try turkey slices or roasted chicken for a leaner option that still offers savory satisfaction.
- Cheese Variations: Swap sharp cheddar for Gruyère or Swiss for a nuttier, milder flavor profile, melting just as beautifully.
- Butter Swap: Use olive oil or a dairy-free margarine for a lighter, less rich topping—your kitchen will smell different but still inviting.
- Add-ins: Incorporate cooked bacon, sautéed onions, or pickles inside for layers of flavor and texture that pop.
- Seasoning Tweaks: Mix in a pinch of cayenne or smoked paprika into the garlic butter for a smoky, spicy kick.
Equipment & Tools
- Baking dish: Holds the sliders during baking.
- Brush or spoon: Apply garlic butter evenly.
- Small bowl: Mix garlic butter ingredients.
- Sharp knife: Slice the rolls evenly.
- Aluminum foil: Cover the dish during initial baking.
Step-by-step guide to ham and cheese sliders
- Preheat your oven to 180°C (350°F). Grease a 9×13-inch baking dish or line it with parchment paper for easy cleanup.
- Slice the rolls horizontally, keeping the bottom and top connected, like a book. Set aside.
- In a small bowl, melt 1/2 cup of unsalted butter. Stir in 3 minced garlic cloves, a pinch of salt, and a teaspoon of Worcestershire sauce.
- Spread a thin layer of mayonnaise or Dijon mustard on the cut sides of the rolls, if desired, for extra flavor.
- Layer slices of ham (about 4-6 per slider) on the bottom half of the rolls, then top with slices of sharp cheddar cheese.
- Place the top half of the rolls back on, pressing lightly to hold everything together.
- Brush the garlic butter generously over the top and sides of the rolls, making sure to get into all the nooks.
- Sprinkle a little paprika or everything bagel seasoning on top for added flavor and visual appeal.
- Cover the dish with foil and bake for 15 minutes, then remove the foil and bake for an additional 5 minutes until the top is golden and crisp.
- Remove from oven, let rest for 5 minutes, then slice into individual sliders and serve warm.
- Resting & Finishing: Let the sliders sit for 5 minutes to allow the cheese to set slightly. Serve directly from the dish, or transfer to a platter for presentation.
- Checkpoints & How to Know It’s Done: The cheese should be gooey and melted; the tops should be crispy and golden; the garlic butter should smell fragrant and toasted.
Let the sliders rest for 5 minutes after baking, allowing the cheese to set. Slice carefully with a serrated knife and serve warm. For best flavor, enjoy immediately, but they also reheat well in the oven for a few minutes.
How to Know It’s Done
- Cheese is fully melted and bubbly.
- Top is golden and crispy.
- Butter is absorbed into the rolls, not pool on top.
Ham and Cheese Sliders with Garlic Butter Glaze
Ingredients
Equipment
Method
- Preheat your oven to 180°C (350°F) and lightly grease a 9x13-inch baking dish.
- Gently slice the dinner rolls horizontally, keeping the bottom and top connected like a book. Place the bottom half in the prepared baking dish.
- In a small bowl, melt the butter and stir in the minced garlic, Worcestershire sauce, and a pinch of salt. This fragrant butter will be brushed over the rolls later.
- If desired, spread a thin layer of mayonnaise or Dijon mustard on the cut side of the rolls for added flavor.
- Layer slices of ham evenly over the bottom half of the rolls, then top with slices of sharp cheddar cheese, distributing them to cover the ham completely.
- Carefully place the top half of the rolls back over the layered fillings, pressing down lightly to help everything stick together.
- Using a brush or spoon, generously spread the garlic butter mixture over the top and sides of the assembled sliders, ensuring all surfaces are coated.
- Sprinkle a pinch of paprika or everything bagel seasoning on top for extra flavor and a hint of color.
- Cover the baking dish with aluminum foil and bake for 15 minutes until the cheese is melted and bubbly.
- Remove the foil and continue baking for an additional 5 minutes, until the tops are golden and crispy.
- Take the sliders out of the oven, let them rest for about 5 minutes to set, then slice into individual portions and serve warm.
Pro tips for perfect sliders
- Bolded mini-head: Use a sharp knife to cut rolls cleanly, avoiding squashing the soft bread.
- Bolded mini-head: Brush garlic butter generously to ensure every bite is fragrant and flavorful.
- Bolded mini-head: Add seasoning on top just before baking to keep the flavors fresh and vibrant.
- Bolded mini-head: Cover sliders with foil halfway through baking to prevent over-browning on top.
- Bolded mini-head: Rest the sliders for 5 minutes after baking to let the cheese set and avoid messy slices.
- Bolded mini-head: For extra crisp tops, broil for the last 2 minutes—watch carefully to prevent burning.
- Bolded mini-head: Use parchment paper lining to make clean-up easier and prevent sticking.
Common mistakes and how to fix them
- FORGOT to preheat oven → Always preheat to ensure even baking and golden tops.
- DUMPED too much butter → Use the right amount for crispy, not greasy, sliders.
- OVER-TORCHED top → Cover with foil if edges brown too quickly, then uncover to finish.
- MISSED resting time → Rest sliders 5 minutes for cheese to set, avoiding messy slices.
Quick fixes and pantry swaps
- When rolls are stale, splash them with a little broth before baking to revive softness.
- If cheese isn’t melting, increase oven temperature slightly or cover with foil to trap heat.
- Splash extra garlic butter if the top looks pale or dry before the final bake.
- Patch over burnt edges with a sprinkle of fresh herbs or a drizzle of butter for added flavor.
- Shield the sliders with foil if the tops brown too quickly, allowing cheese to melt fully.
Prep, store, and reheat tips
- Assemble the sliders a few hours ahead and refrigerate, keeping the garlic butter and fillings separate to prevent sogginess.
- Wrap tightly with plastic wrap or store in an airtight container; they stay fresh in the fridge for up to 24 hours.
- Baked sliders can be reheated in a 175°C (350°F) oven for 10-15 minutes until warm and gooey, with a crispy top restored.
- For longer storage, freeze unbaked sliders wrapped well for up to 2 months; bake directly from frozen, adding 5-8 minutes.
- Reheated sliders will lose some of their initial softness but will still be delicious, with the garlic aroma intensified when warm.
Top questions about ham and cheese sliders
1. Can I use different types of ham?
Use deli-sliced ham for even layers and juiciness. Thick slices work best for a tender bite.
2. What ham works best for this recipe?
Yes, but smoky or honey-glazed ham adds extra flavor. Avoid overly salty varieties to keep balance.
3. What cheese should I use?
Cheddar melts into a gooey, tangy layer that complements the smoky ham. For milder flavor, try mozzarella.
4. Can I mix different cheeses?
Sharp cheddar offers a nice tang, but mozzarella gives a softer, creamier melt. Feel free to mix cheeses.
5. What kind of rolls should I buy?
Use soft, buttery dinner rolls—they soak up the butter and become golden and crispy on top. Brioche adds richness.
6. How should I prepare the rolls?
Pre-sliced dinner rolls work perfectly. Slice horizontally to keep the layers intact during assembly.
7. How much garlic butter should I use?
The garlic butter creates a fragrant, crisp crust. Be generous to get that irresistible, toasted aroma.
8. How do I know when they’re done?
Bake until tops are golden and bubbly cheese is melted—about 20 minutes at 350°F (180°C).
9. What if the cheese isn’t melting?
If cheese isn’t gooey, return to oven for a few more minutes. Keep a close eye to prevent burning.
10. How do I reheat the sliders?
Reheat leftovers in a 350°F (175°C) oven for 10-15 minutes to restore crispness and warmth. Cover with foil if drying out.
These sliders are a straightforward way to bring a little comfort to the table, especially when you need something quick and satisfying. The blend of smoky ham, melted cheese, and that fragrant garlic butter topping makes each bite feel like a small celebration. They’re messy, warm, and totally worth every forkful.
Whenever I make these, I think about how simple ingredients can turn into something that feels special with just a touch of love and a good oven. They’re perfect for lazy weekends or last-minute gatherings, and somehow, they always disappear faster than I expect. That’s the magic of a well-made slider—familiar, cozy, and just a little bit indulgent.