
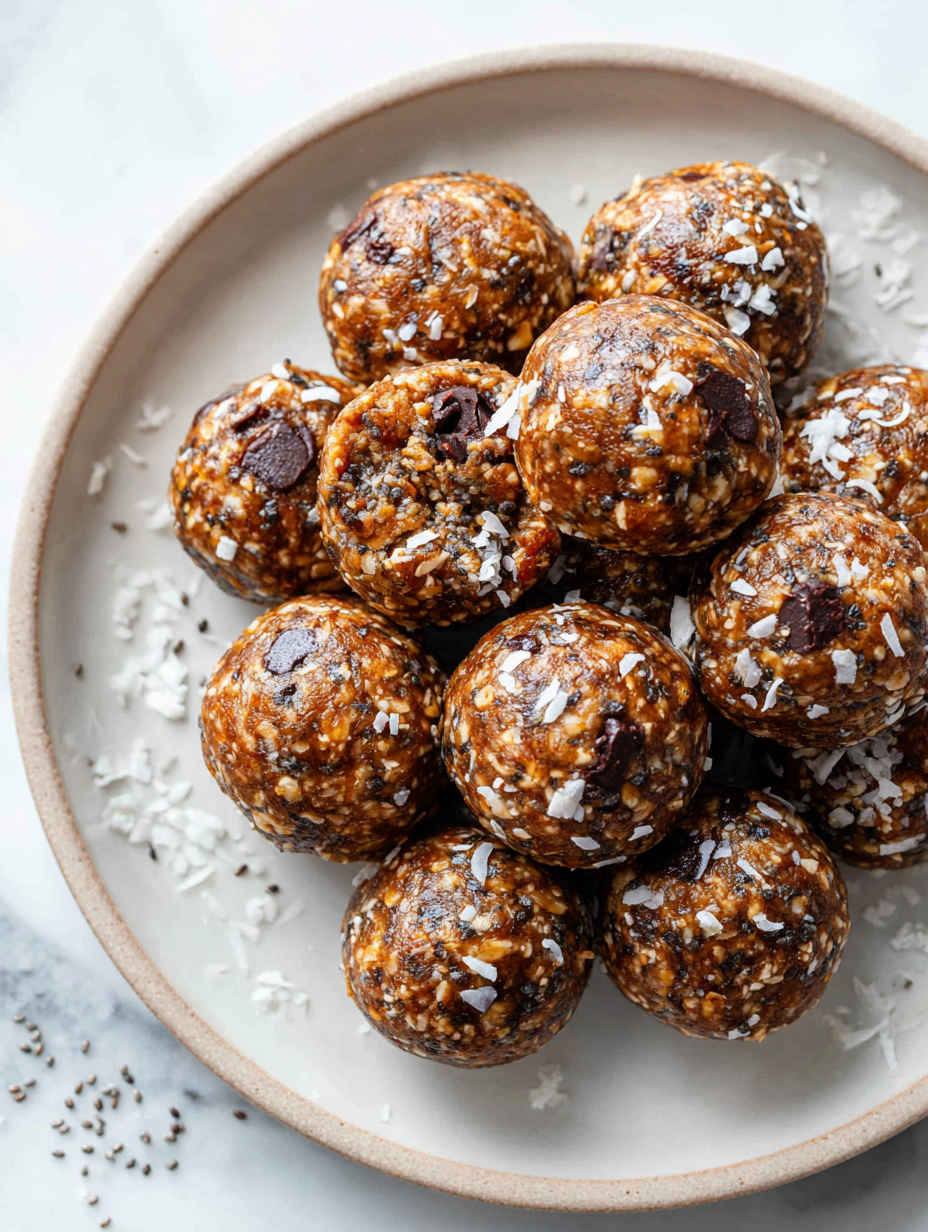
In the chaos of busy mornings or when energy dips mid-afternoon, these no bake energy balls come to the rescue. They’re a tiny, portable fix—sweet, nutty, a bit chewy—and no oven needed, which is a rare gift. I keep a stash in the fridge, just in case my day spirals into chaos and I need a quick, satisfying bite that doesn’t require any prep time or heat.
What I love most is how forgiving they are—play around with ingredients, skip what you don’t have, and still end up with something that’s genuinely good. They’re a little messy to roll, sure, but that’s part of the charm. Plus, they’re honest comfort food, packed with good fats, fiber, and just enough sweetness to keep me from reaching for that second sugary snack.
Focusing on how these no bake energy balls can be a quick, satisfying fix during chaotic mornings or busy afternoons, emphasizing their role as a reliable, no-fuss snack that keeps energy levels steady without the need for kitchen heat or complicated steps.
A Quick Fix for Busy Days
- These energy balls turned my chaotic mornings into a little more manageable rush, a quick grab-and-go that actually satisfies.
- I remember the first time I made them—messy hands, sticky mixture—but the feeling of that first bite was pure relief.
- Nothing beats the joy of tossing ingredients in a bowl without fuss, then having a sweet, chewy snack ready in minutes.
- They’re my secret weapon for busy days when I need a boost but don’t want to turn on the oven or mess up the kitchen.
- Every batch feels like a small victory, especially when I see my kids reach for them without me having to ask.
Origin of the No Bake Energy Balls
- This recipe was born out of a frantic morning where I needed something quick, nourishing, and no-fuss. I was tired of relying on overly processed snacks and wanted a clean, customizable option that I could whip up in minutes. The idea of no baking, just mixing and rolling, made it instantly appealing—especially on mornings when the kitchen feels like chaos.
- I started experimenting with different nut butters and add-ins, aiming for that perfect balance of chewy, crunchy, and sweet. Over time, these little bites became a staple—not just for me, but for my kids and anyone who needs a quick energy boost without the fuss. The best part? They’re forgiving, so you can tinker with ingredients based on what’s in your pantry and still end up with something satisfying.
- heading:
Historical & Cultural Roots
- These energy bites have roots in traditional no-cook snack ideas from various cultures, adapting over time to modern convenience.
- The concept gained popularity in the health food movement of the early 2000s, emphasizing quick, nutrient-dense snacks without heat.
- They’re often linked to raw food diets, which prioritize unprocessed, minimally cooked ingredients, making them a natural fit.
Ingredient breakdown: key components
- Oats: I use rolled oats, they give a chewy texture and stick together well, but quick oats work too if you’re in a rush.
- Nut Butter: Peanut butter is my go-to—rich and creamy—but almond or cashew work just as well for different flavor spins.
- Sweetener: Honey adds a sticky, sweet gloss, but maple syrup or agave syrup can be milder or more neutral, depending on your taste.
- Add-ins: Chia seeds or flaxseed for crunch and omega-3s—just a tablespoon is enough to boost nutrition without overwhelming the mixture.
- Dried Fruit: I like chopped dates or cranberries, they pack a punch of sweetness and a chewy bite, but raisins are an easy substitute.
- Cocoa Powder: A dash of cocoa adds depth and a hint of bitterness—go for dutched for a smoother, richer flavor.
- Vanilla Extract: A splash of vanilla makes everything more inviting, but almond or coconut extract can give a fun twist.
Spotlight on key ingredients
Oats & Nut Butter:
- Oats: I use rolled oats; they soak up moisture and give a chewy, hearty bite. Quick oats can work, but they soften faster.
- Nut Butter: Peanut butter is my favorite—smooth and rich—but almond or cashew butter works just as well for a different flavor punch.
Notes for ingredient swaps
- Dairy-Free: Nut butters like tahini or sunflower seed butter work well, but they lend a different richness and flavor. Try almond or cashew as alternatives for a more neutral or sweeter profile.
- Sweetener: Maple syrup or agave syrup can replace honey if you want a vegan version. They offer a similar sticky sweetness but bring their own distinct flavor notes—richer or more floral, respectively.
- Gluten-Free: Use certified gluten-free oats to keep these safe for celiac or gluten-sensitive eaters. Regular oats can sometimes carry gluten traces, so check labels carefully.
- Add-ins: Chia seeds or flaxseed can be swapped with hemp seeds or chopped nuts for crunch and omega-3s. Just keep the quantity similar to maintain the bind and texture.
- Chocolate: Swap mini chocolate chips with chopped dark chocolate or cacao nibs for a more intense cocoa flavor or a different crunch. White chocolate also works for a sweeter, milky note.
- Flavor Extracts: Vanilla is classic, but almond or coconut extract can add a fun twist. Use sparingly—about half the amount called for vanilla—to avoid overpowering.
- Oats: Quick oats can be used instead of rolled oats if you’re in a hurry, but they might create a slightly softer, less chewy texture.
Equipment & Tools
- Large mixing bowl: To combine all ingredients thoroughly.
- Sturdy spoon or spatula: To mix ingredients evenly.
- Cookie scoop or tablespoon: To portion out and shape the balls.
- Parchment paper: To prevent sticking during chilling.
Step-by-step guide to energy balls
- Gather your equipment: a large mixing bowl, a sturdy spoon or spatula, a small cookie scoop or tablespoon, and parchment paper. These tools make mixing, portioning, and clean-up easier.
- In the bowl, combine 1 cup of rolled oats, 1/2 cup of nut butter, and 1/4 cup of honey. Mix thoroughly until the mixture is uniform and sticky enough to hold together.
- Add in your preferred mix-ins: 1/4 cup of mini chocolate chips, a tablespoon of chia seeds, and a handful of chopped dried fruit. Stir well to evenly distribute.
- Using the cookie scoop or tablespoon, portion out the mixture and roll into balls about 1-inch diameter. If the mixture feels too dry, add a tiny splash of water or more honey; if too sticky, dust with a little extra oats.
- Place the formed balls on parchment-lined tray, making sure they’re evenly spaced. Chill in the fridge for at least 30 minutes to set — this helps them hold their shape.
- After chilling, check the texture: they should be firm but chewy, with a glossy exterior and visible bits of add-ins. If they’re too soft, give them a bit longer in the fridge.
- Serve directly from the fridge. Store leftovers in an airtight container for up to a week, or freeze for longer storage. Let frozen ones thaw slightly before eating for best texture.
- Optional: roll in shredded coconut or cocoa powder for extra flavor and visual appeal before serving.
Chill the energy balls in the fridge for at least 30 minutes. Serve straight from the fridge or let sit at room temperature for a few minutes if preferred. Store leftovers in an airtight container in the fridge for up to a week or freeze for longer storage.
How to Know It’s Done
- Appearance: balls should be uniform, glossy, and hold their shape.
- Texture: firm but chewy, not crumbly or too sticky.
- Flavor: taste after chilling—should be balanced, with a hint of sweetness and punch of add-ins.
No Bake Energy Balls
Ingredients
Equipment
Method
- Combine the rolled oats, nut butter, and honey in a large mixing bowl, stirring until the mixture is uniform and sticky.
- Add in the mini chocolate chips, chia seeds, and chopped dried fruit; fold everything together until evenly distributed.
- Use a cookie scoop or tablespoon to portion out the mixture, then roll each portion between your palms to form a tight ball about 1 inch in diameter.
- Place the formed balls on a parchment-lined tray, spacing them evenly apart.
- Chill the tray in the refrigerator for at least 30 minutes to help the balls set and hold their shape.
- Once chilled, the energy balls should be firm, glossy, and chewy with visible bits of add-ins. Serve directly from the fridge or at room temperature.
Notes
Tips & Tricks for Perfect Energy Balls
- Bolded mini-head: Use slightly warmer nut butter—makes mixing easier and the mixture more cohesive.
- Bolded mini-head: Chill the mixture before rolling—prevents stickiness and helps balls hold shape better.
- Bolded mini-head: Incorporate add-ins gradually—distributes flavors evenly and avoids overloading the mixture.
- Bolded mini-head: Avoid over-mixing—just combine ingredients to keep the texture chewy and not dense.
- Bolded mini-head: Roll balls firmly but gently—too tight can make them dense, too loose and they fall apart.
- Bolded mini-head: Store in an airtight container—keeps them fresh, chewy, and prevents drying out.
- Bolded mini-head: Add a splash of water if mixture is too dry—just enough to bring everything together without being sticky.
Common mistakes and how to fix them
- FORGOT to measure ingredients accurately? Use a scale for precision and avoid dry or overly sticky texture.
- DUMPED too many add-ins? Keep to recommended amounts to prevent the mixture from becoming too crumbly or sticky.
- OVER-TORCHED the mixture? Chill the dough briefly to firm it up before rolling into balls.
- MISSED the resting time? Ensure the balls chill for at least 30 minutes for proper setting and shape.
Quick fixes and pantry swaps
- When mixture feels too dry, splash in a tiny bit of water and knead briefly.
- If balls crack or fall apart, chill the mixture for 10 minutes before rolling.
- Splash a little extra honey or nut butter if the mixture isn’t sticky enough.
- Patch sticky hands with a sprinkle of oats to make rolling easier.
- Shield from humidity—store energy balls in an airtight container to prevent sticking or drying out.
Prep, store, and reheat tips
- Prepare the mixture ahead of time: combine ingredients and refrigerate for up to 24 hours to enhance flavor and make rolling easier.
- Store the energy balls in an airtight container in the fridge for up to a week. The cool temperature keeps them firm and chewy, with a fresh flavor.
- For longer storage, freeze the balls in a single layer on a baking sheet, then transfer to a freezer-safe bag. They’ll keep well for up to three months.
- Refrigerated energy balls may firm up further; let them sit at room temperature for 5 minutes to soften slightly before eating, releasing their nutty aroma.
- If frozen, thaw in the fridge for 30 minutes or at room temperature for 10 minutes, until they’re soft and fragrant. The texture should remain chewy and satisfying.
Top questions about no bake energy balls
1. Can I use a different sweetener?
You can replace honey with maple syrup or agave, but expect a slightly different sweetness and texture.
2. Can I substitute the nut butter?
Yes, you can swap peanut butter for almond or cashew butter for a different flavor and creaminess.
3. Are quick oats okay to use?
Using quick oats instead of rolled oats works, but the texture might be softer and less chewy.
4. How long do they last?
Store them in an airtight container in the fridge for up to a week, or freeze for longer storage.
5. Should I chill the mixture first?
Chilling the mixture for at least 30 minutes helps them hold shape better during rolling.
6. My mixture is too sticky—what now?
If mixture is too sticky, dust it with a little extra oats or coconut flakes before rolling.
7. How firm should I press when rolling?
When rolling, press firmly but avoid squeezing too hard to keep a chewy, tender interior.
8. Can I add other ingredients?
To customize, add chopped nuts, dried fruit, or chocolate chips based on your preference.
9. Can I make these ahead?
Yes, you can refrigerate the balls for up to a week or freeze them for 3 months.
10. How do I reheat or serve leftovers?
To reheat, just let frozen balls thaw in the fridge or at room temperature for a few minutes before eating.
These no bake energy balls are a lifesaver on hectic mornings or when I need a quick pick-me-up. They’re honest, simple, and honestly satisfying, especially when I catch that first nutty aroma from the mixture. No matter how frantic my day gets, they remind me that a little prep can keep things manageable and nourishing. Sometimes, the simplest snacks are the ones that stick with you. Sometimes, they’re the only thing that gets me through the chaos. That’s why I keep making these—they’re my small, reliable moment of calm amidst the rush. Almost like a quiet win, in a world that never slows down. And I think that’s what makes them special.
each paragraph is a little pause, a little breath, a reminder that good, honest food doesn’t have to be complicated to matter.

 Hello, I’m Emily Richardson, the heart and soul behind Playing with Flavors. Cooking isn’t just a hobby for me – it’s a passion that I’ve cultivated for years, and it’s become the driving force of my life.
From the kitchen of my cozy café to the pages of this blog, every dish I create is a reflection of my love for food and the joy it brings to people.
Hello, I’m Emily Richardson, the heart and soul behind Playing with Flavors. Cooking isn’t just a hobby for me – it’s a passion that I’ve cultivated for years, and it’s become the driving force of my life.
From the kitchen of my cozy café to the pages of this blog, every dish I create is a reflection of my love for food and the joy it brings to people.


