
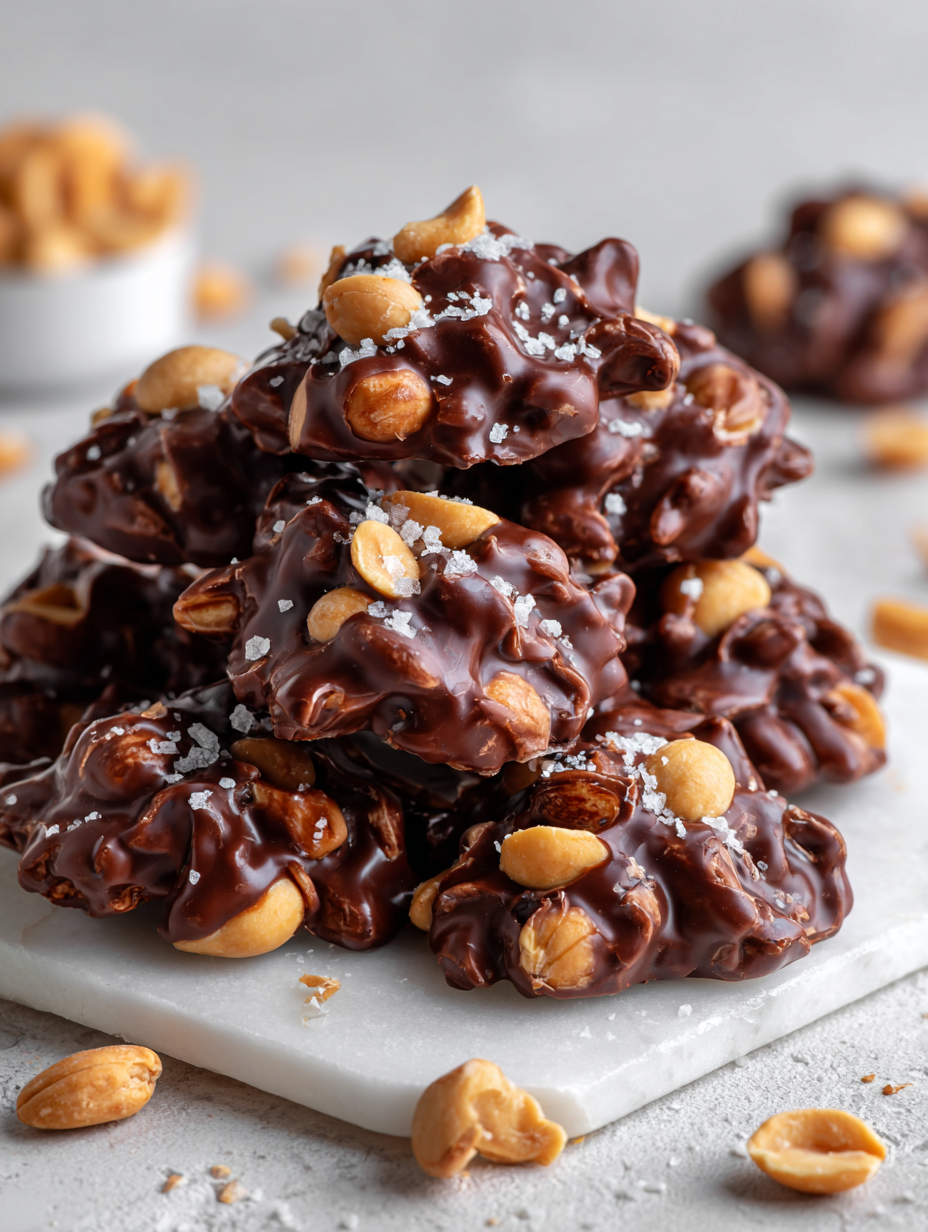
This no bake peanut clusters recipe is my go-to when I need something sweet and satisfying in a flash. No oven, no fuss—just good ingredients coming together in minutes. It’s like a little moment of nostalgia with every bite, reminding me of childhood snacks that felt indulgent but simple enough to whip up anytime.
What I love most is how flexible it is. You can tweak the saltiness or sweetness, toss in a handful of extras, or keep it straightforward. It’s a recipe that’s honest—no pretenses, just honest, homemade comfort that you can make with whatever peanuts and chocolate you have lying around.
This recipe is my secret weapon for busy afternoons when I need a quick, satisfying treat that feels homemade but takes no oven time. It’s about the comforting smell of roasted peanuts mingling with melting chocolate, all coming together effortlessly. I love how this simple mix sparks nostalgia—reminding me of childhood snacks—yet can be whipped up in minutes for unexpected guests or a late-night craving.
A Childhood Snack Reimagined
- Making these clusters always takes me back to lazy Sunday afternoons with my grandma, the smell of peanuts and melted chocolate filling the kitchen.
- I love how forgiving this recipe is—sometimes I add a dash of sea salt or a sprinkle of flaky sea salt on top, and it just elevates everything.
- There’s a quiet pride in whipping these up in a flash when friends drop by unannounced, their eyes lighting up at the sight of homemade treats.
The story behind this recipe
- This recipe was born out of a lazy afternoon when I needed a quick sweet fix but didn’t want to turn on the oven. I remember rummaging through my pantry, grabbing handfuls of peanuts and some chocolate chips, and just melting everything together over a makeshift double boiler. The smell of roasted peanuts mixed with warm chocolate was so tempting, I knew I had to share it.
- It’s funny how simple ingredients can turn into something so satisfying with just a little melting and mixing. These clusters remind me of childhood, when snacks were straightforward but felt like small treasures. Now, they’re my emergency treat—fast to make, deeply comforting, and impossible to resist.
- heading
- story_type
Historical Tidbits and Origins
- These no bake peanut clusters are believed to have originated in mid-20th century American home kitchens, where simplicity was key during post-war rationing times.
- Historically, similar confections appeared in community cookbooks, often as quick treats using pantry staples like peanuts and chocolate, reflecting a resourceful approach to sweet-making.
- In the 1950s, recipes for no bake candies surged in popularity, partly driven by the advent of convenience foods and the desire for quick, satisfying desserts.
Key ingredients breakdown
- Peanuts: I use roasted, salted peanuts for that rich, nutty aroma that fills the room as they melt—skip the raw ones to avoid dull flavor.
- Chocolate chips: I prefer semi-sweet chips—they melt smoothly and give a balanced sweetness. Feel free to swap with dark or milk for different vibes.
- Butter: A splash helps the chocolate flow easily and adds a glossy finish. Without it, the mixture can be a bit crumbly, so don’t skip this.
- Honey or corn syrup: I add a touch of honey for a slight floral note and to help the clusters stick. Use maple syrup if you want a smoky undertone.
- Salt: A pinch enhances all the flavors—sea salt flakes on top make a big difference. Without salt, the sweetness can feel a little flat.
- Optional add-ins: Feel free to toss in a handful of dried cranberries or shredded coconut for extra texture and flavor, but keep it simple if you want pure peanut goodness.
Spotlight on key ingredients
Peanuts:
- I prefer roasted, salted peanuts for that deep, nutty aroma that intensifies when heated—raw ones can be dull and lack that toasty flavor.
- Chocolate chips: I use semi-sweet chips because they melt smoothly and balance sweetness well; swapping with dark or milk chocolate changes the flavor profile but keeps the melt consistent.
Chocolate:
- Chocolate chips: They melt into a velvety coating, releasing a rich cocoa aroma that fills the room—be gentle with microwave bursts to avoid burning.
- Butter: Adds gloss and helps the chocolate flow—using unsalted butter gives a clean, sweet flavor, but you can swap in coconut oil for dairy-free needs, though it may affect the sheen.
Notes for ingredient swaps
- Dairy-Free: Use coconut oil instead of butter for a rich, tropical flavor that melts smoothly.
- Sweetener Swap: Maple syrup can replace honey, adding a smoky sweetness and a touch of complexity.
- Chocolate Options: Swap semi-sweet chips with dark chocolate for a more intense cocoa punch or milk chocolate for sweetness.
- Peanut Alternatives: Almonds or cashews can stand in for peanuts, offering different textures and subtle nutty flavors.
- Salt Variations: Fine sea salt or flaky sea salt on top enhances flavor; omit or reduce if you prefer less saltiness.
Equipment & Tools
- Medium heatproof bowl: Melting chocolate and butter evenly
- Silicone spatula: Stirring and mixing ingredients smoothly
- Baking sheet with parchment paper: Holding clusters for setting and easy removal
Step-by-step guide to peanut clusters
- Gather your equipment: a medium heatproof bowl, a silicone spatula, and a baking sheet lined with parchment paper.
- Combine chocolate chips, butter, and honey in the bowl. Melt over a double boiler or microwave in 30-second bursts, stirring in between, until smooth and glossy, about 2 minutes total.
- Add the peanuts to the melted chocolate mixture. Stir gently but thoroughly until all peanuts are coated. This takes about 1-2 minutes.
- Using a spoon or small cookie scoop, drop spoonfuls of the mixture onto the prepared baking sheet, spacing them about 1 inch apart.
- Sprinkle a pinch of sea salt or flaky sea salt on top of each cluster while the chocolate is still soft.
- Let the clusters set at room temperature for about 30 minutes, or refrigerate for 15-20 minutes if you’re in a rush. They should be firm yet slightly chewy when ready.
- Once set, gently lift the clusters off the parchment and store in an airtight container at room temperature for up to 3 days, or in the fridge for up to a week.
Allow the clusters to rest at room temperature or in the fridge until firm. Serve directly from the sheet or transfer to an airtight container for storage. No need for additional finishing—just enjoy the crisp, chocolatey bite.
How to Know It’s Done
- Chocolate is fully melted and smooth, with no lumps.
- Clusters hold their shape and are set without being sticky.
- A light crackle when you bite into them, indicating proper setting.
No Bake Peanut Clusters
Ingredients
Equipment
Method
- Combine the chocolate chips, butter, and honey in a medium heatproof bowl.
- Warm the mixture in the microwave in 30-second bursts, stirring well after each, until smooth and glossy—about 1-2 minutes total.
- Add the roasted peanuts to the melted chocolate, stirring gently to coat all the nuts evenly.
- Using a spoon or small scoop, drop spoonfuls of the mixture onto a parchment-lined baking sheet, spacing them apart.
- Sprinkle a tiny pinch of sea salt or flaky salt on top of each cluster while the chocolate is still soft.
- Let the clusters cool and set at room temperature for about 30 minutes, or refrigerate for 15-20 minutes until firm.
- Once set, gently lift the clusters from the parchment and store in an airtight container at room temperature or in the fridge.
Pro Tips for Perfect Clusters
- Bolded Mini-Head: Use gentle heat → Melt chocolate slowly to avoid scorching and achieve a silky texture.
- Bolded Mini-Head: Chill peanuts before mixing → Keeps the mixture from becoming greasy and helps clusters hold shape.
- Bolded Mini-Head: Add a pinch of salt → Enhances sweetness and makes flavors pop; sprinkle on top while still soft.
- Bolded Mini-Head: Stir frequently → Ensures even melting and prevents chocolate from seizing or burning.
- Bolded Mini-Head: Don’t rush the setting → Rest at room temp or in a cool spot for a glossy, crisp finish.
- Bolded Mini-Head: Use parchment paper → Prevents sticking and makes cleanup easier, preserving the shape of clusters.
- Bolded Mini-Head: Handle with care → Gently lift clusters once set to avoid breaking or cracking them.
Common mistakes and how to fix them
- FORGOT to check chocolate temperature → Use low heat to prevent burning.
- DUMPED too much salt → Keep salt minimal for balanced flavor.
- OVER-TORCHED chocolate → Stir immediately and reduce heat if chocolate seizes.
- DIDN’T let clusters set fully → Rest at room temp until firm and shiny.
Quick Fixes for Smooth Clusters
- If chocolate seizes, splash in a bit of warm milk to smooth it out.
- When clusters are sticky, refrigerate for 5 minutes to firm up.
- Splash some sea salt on top before setting for enhanced flavor.
- Patch a cracked cluster with a tiny dab of melted chocolate.
- Shield melting chocolate from drafts to prevent hardening or streaking.
Prep, store, and reheat tips
- Prepare clusters in advance by melting and mixing ingredients, then store tightly covered at room temperature for up to 2 days; they’ll stay glossy and fresh.
- Store leftovers in an airtight container in the fridge for up to a week; the chocolate firms up, keeping that satisfying snap.
- If you want to keep them longer, freeze in a sealed container for up to a month; they’ll become slightly chewier upon thawing, but still delicious.
- Reheat briefly in a low-temperature oven (around 90°C/194°F) for 3-5 minutes if you prefer slightly softer clusters, watching for melting edges and aroma revival.
Top questions about peanut clusters
1. Can I use raw peanuts instead of roasted?
Use fresh, roasted peanuts for the best flavor and crunch. Raw peanuts can be dull and less aromatic.
2. Can I skip roasting the peanuts?
Yes, but roasted peanuts bring a richer, toasted flavor that really shines in these clusters.
3. How do I fix sticky clusters?
Chill the clusters in the fridge for about 15 minutes if your chocolate is too soft or sticky.
4. How long do these keep?
Store in an airtight container at room temperature for up to 3 days or in the fridge for a week.
5. Can I freeze the clusters?
Refrigerate or freeze for longer storage. Let them come to room temp before serving for the best texture.
6. Can I substitute different chocolates?
Use semi-sweet chocolate chips for a balanced sweetness, or swap with dark chocolate for a more intense cocoa flavor.
7. Should I add salt?
Add a pinch of flaky sea salt on top while the chocolate is still soft to enhance flavor and texture.
8. Can I add other ingredients?
Mix in dried cranberries or shredded coconut for extra texture, but keep it simple for pure peanut goodness.
9. How do I prevent breaking the clusters?
Handle the clusters gently once set to avoid breaking them. Use a spatula for lifting if needed.
10. What if my chocolate seizes?
If the chocolate seizes or becomes grainy, add a splash of warm milk and stir until smooth.
These no bake peanut clusters are more than just a treat—they’re a reminder that simple ingredients can come together quickly and satisfyingly. Whenever I need a small pick-me-up or an easy gift, I turn to this recipe without hesitation.
They’re perfect for spontaneous moments, and the process smells like childhood comfort—rich chocolate and toasted peanuts mingling in the air. No matter how often I make them, they always bring a little bit of joy, plain and simple.
 Hello, I’m Emily Richardson, the heart and soul behind Playing with Flavors. Cooking isn’t just a hobby for me – it’s a passion that I’ve cultivated for years, and it’s become the driving force of my life.
From the kitchen of my cozy café to the pages of this blog, every dish I create is a reflection of my love for food and the joy it brings to people.
Hello, I’m Emily Richardson, the heart and soul behind Playing with Flavors. Cooking isn’t just a hobby for me – it’s a passion that I’ve cultivated for years, and it’s become the driving force of my life.
From the kitchen of my cozy café to the pages of this blog, every dish I create is a reflection of my love for food and the joy it brings to people.


